Group –
Thermal Zone Description/Geometry[LINK]
Without thermal zones and surfaces, the building can’t be
simulated. This group of objects (Zone, BuildingSurface)
describes the thermal zone characteristics as well as the
details of each surface to be modeled. Included here are
shading surfaces.
This element sets up the parameters to simulate each
thermal zone of the building.
Field: Direction of
Relative North[LINK]
The Zone
North Axis is specified relative to the
Building](page-006.html#building) North Axis. This
value is specified in degrees (clockwise is positive). For
more information, see the figure below as well as the
description under “[GlobalGeometryRules”.
Field(s): (X,Y,Z) Origin[LINK]
The X,Y,Z coordinates of a zone origin can be specified,
for convenience in vertice entry. Depending on the values in
“GlobalGeometryRules” (see description later in this section),
these will be used to completely specify the building
coordinates in “world coordinate” or not. Zone
Origin coordinates are specified relative to the
Building](page-006.html#building) Origin (which always
0,0,0). The following figure illustrates the use of
[Zone North Axis as well as Zone
Origin values.
Zone
type is currently unused.
Field: Multiplier[LINK]
Zone
Multiplier is designed as a “multiplier” for floor area, zone
loads, and energy consumed by internal gains. It takes the
calculated load for the zone and multiplies it, sending the
multiplied load to the attached HVAC system. The HVAC system
size is specified to meet the entire multiplied zone load and
will report the amount of the load met in the Zone
Air System Sensible Heating or Cooling Energy/Rate output
variable. Autosizing automatically accounts for multipliers.
Metered energy consumption by internal gains objects such as
[Lights](../input-output-reference/page-015.html#lights)
or Electric Equipment will be mutliplied. The default is
1.
Field: Ceiling Height[LINK]
Zone
ceiling height is used in several areas within EnergyPlus
(such as various room models, some convection coefficient
calculations and, primarily, in calculating zone volume in the
absence of other parameters). Energyplus automatically
calculates the zone ceiling height (m) from the average height
of the zone. If this field is 0.0, negative or
autocalculate, then the calculated zone
ceiling height will be used in subsequent calculations. If
this field is positive, then the calculated zone ceiling
height will not be used – the number entered here will be used
as the zone ceiling height. If this number differs
significantly from the calculated ceiling height, then a
warning message will be issued. If a zone ceiling height is
entered, but no Volume is entered, then the floor area (if
there is one) times the zone ceiling height will be used as
the volume.
Note that the Zone
Ceiling Height is the distance from the Floor to the Ceiling
in the Zone,
not an absolute height from the ground.
Field: Volume[LINK]
Zone
volume is used in several areas within EnergyPlus (such as
calculating air change rates for reporting or flow when air
change rates are chosen as input, daylighting calculations,
some convection coefficient calculations). EnergyPlus
automatically calculates the zone volume (m3) from
the zone geometry given by the surfaces that belong to the
zone. If this field is 0.0, negative or
autocalculate, then the calculated zone
volume will be used in subsequent calculations. If this field
is positive, then it will be used as the zone volume. If this
number differs significantly from the calculated zone volume a
warning message will be issued. For autocalculate to work
properly, the zone must be enclosed by the entered walls. Note
that indicating the volume to be calculated but entering a
positive ceiling height in the previous field will cause the
volume to be calculated as the floor area (if > 0) times
the entered ceiling height; else the volume will be calculated
from the described surfaces. If this field is positive, any
ceiling height positive value will not be used in volume
calculations.
Field: Floor Area[LINK]
Zone
floor area is used in many places within EnergyPlus.
EnergyPlus automatically calculates the zone floor area
(m2) from the zone geometry given by the surfaces
that belong to the zone. If this field is 0.0, negative or
autocalculate, then the calculated zone floor
area will be used in subsequent calculations. If this field is
positive, then it will be used as the zone floor area. If this
number differs significantly from the calculated zone floor
area a warning message will be issued.
Field: Zone
Inside Convection Algorithm[LINK]
The Zone
Inside Convection Algorithm field is optional. This field
specifies the convection model to be used for the inside face
of heat transfer surfaes associated with this zone. The
choices are: Simple (constant natural
convection - ASHRAE), Detailed (variable
natural convection based on temperature difference - ASHRAE),
CeilingDiffuser (ACH based forced and mixed
convection correlations for ceiling diffuser configuration
with simple natural convection limit),
AdaptiveConvectionAlgorithm (complex
arrangement of various models that adapt to various zone
conditions and can be customized) and
TrombeWall (variable natural convection in an
enclosed rectangular cavity). See the Inside Convection
Algorithm object for further descriptions of the available
models.
If omitted or blank, the algorithm specified in the [SurfaceConvectionAlgorithm:Inside](../input-output-reference/page-006.html#surfaceconvectionalgorithminside)
object is the default.
Field: Zone
Outside Convection Algorithm[LINK]
The Zone
Outside Convection Algorithm field is optional. This field
specifies the convection model to be used for the outside face
of heat transfer surfaces associated with this zone. The
choices are: SimpleCombined,
TARP, DOE-2, MoWiTT,
and AdaptiveConvectionAlgorithm. The simple
convection model applies heat transfer coefficients depending
on the roughness and windspeed. This is a combined heat
transfer coefficient that includes radiation to sky, ground,
and air. The correlation is based on Figure 1, Page 25.1
(Thermal and Water Vapor Transmission Data), 2001 ASHRAE
Handbook of Fundamentals.
The other convection models apply heat transfer
coefficients depending on the roughness, windspeed, and
terrain of the building’s location. These are convection
only heat transfer coefficients; radiation heat transfer
coefficients are calculated automatically by the program. The
TARP algorithm was developed for the TARP software and
combines natural and wind-driven convection correlations from
laboratory measurements on flat plates. The DOE-2 and MoWiTT
were derived from field measurements. The
AdaptiveConvectionAlgorithm model is an dynamic algorithm that
organizes a large number of different convection models and
automatically selects the one that best applies. The adaptive
convection algorithm can also be customized using the [SurfaceConvectionAlgorithm:Outside:AdaptiveModelSelections](../input-output-reference/page-012.html#surfaceconvectionalgorithmoutsideadaptivemodelselections)
input object. All algorithms are described more fully in the
Engineering Reference.
If omitted or blank, the algorithm specified in the [SurfaceConvectionAlgorithm:Outside](../input-output-reference/page-006.html#surfaceconvectionalgorithmoutside)
object is the default.
Field: Part of Total
Floor Area[LINK]
This optional field defaults to Yes if not specified. The
field is used to show when a zone is not part of the Total
Floor Area as shown in the Annual [Building](../input-output-reference/page-006.html#building)
Utility Performance Summary tables. Specifically, when No is
specified, the area is excluded from both the conditioned
floor area and the total floor area in the [Building](../input-output-reference/page-006.html#building)
Area sub table and the Normalized Metrics sub tables.
And, an IDF example:
Zone,
  DORM ROOMS AND COMMON AREAS,  !- Name
  0.0000000E+00,           !- Direction of Relative North {deg}
  0.0000000E+00,           !- X Origin {m}
  6.096000,                !- Y Origin {m}
  0.0000000E+00,           !- Z Origin {m}
  1,                       !- Type
  1,                       !- Multiplier
  autocalculate,           !- Ceiling Height {m}
  autocalculate;           !- Volume {m3}
Zone,Average,Zone Outdoor Air Drybulb Temperature [C]
Zone,Average,Zone Outdoor Air Wetbulb Temperature [C]
Zone,Average,Zone Outdoor Air Wind Speed [m/s]
Zone Outdoor
Air Drybulb Temperature [C][LINK]
The outdoor air dry-bulb temperature calculated at the
height above ground of the zone centroid.
Zone Outdoor
Air Wetbulb Temperature [C][LINK]
The outdoor air wet-bulb temperature calculated at the
height above ground of the zone centroid.
Zone Outdoor Air Wind
Speed [m/s][LINK]
The outdoor wind speed calculated at the height above
ground of the zone centroid.
Zone Thermal Output(s)[LINK]
In addition to the canned Surface reports (view the Reports
section later in this document) and surface variables (above),
the following variables are available for all zones:
Zone,Sum,Zone Total Internal Radiant Heating Energy [J]
Zone,Average,Zone Total Internal Radiant Heating Rate [W]
Zone,Sum,Zone Total Internal Visible Radiation Heating Energy [J]
Zone,Average,Zone Total Internal Visible Radiation Heating Rate [W]
Zone,Sum,Zone Total Internal Convective Heating Energy [J]
Zone,Average,Zone Total Internal Convective Heating Rate [W]
Zone,Sum,Zone Total Internal Latent Gain Energy [J]
Zone,Average,Zone Total Internal Latent Gain Rate [W]
Zone,Sum,Zone Total Internal Total Heating Energy [J]
Zone,Average,Zone Total Internal Total Heating Rate [W]
Zone,Average,Zone Mean Air Temperature [C]
HVAC,Average,Zone Air Temperature [C]
Zone,Average,Zone Mean Air Dewpoint Temperature [C]
Zone,Average,Zone Mean Radiant Temperature [C]
Zone,Average,Zone Operative Temperature [C]
HVAC,Average,Zone Air Heat Balance Internal Convective Heat Gain Rate [W]
HVAC,Average,Zone Air Heat Balance Surface Convection Rate [W]
HVAC,Average,Zone Air Heat Balance Interzone Air Transfer Rate [W]
HVAC,Average,Zone Air Heat Balance Outdoor Air Transfer Rate [W]
HVAC,Average,Zone Air Heat Balance System Air Transfer Rate [W]
HVAC,Average,Zone Air Heat Balance System Convective Heat Gain Rate [W]
HVAC,Average,Zone Air Heat Balance Air Energy Storage Rate [W]
HVAC,Average,Zone Air Heat Balance Deviation Rate [W]
HVAC,Sum,Zone Air System Sensible Heating Energy [J]
HVAC,Sum,Zone Air System Sensible Cooling Energy [J]
HVAC,Average,Zone Air System Sensible Heating Rate [W]
HVAC,Average,Zone Air System Sensible Cooling Rate [W]
HVAC,Average,Zone Air Humidity Ratio[kgWater/kgDryAir]
HVAC,Average,Zone Air Relative Humidity[%]
Two of these are of particular interest:
Zone,Average,Zone Mean Air Temperature [C]
HVAC,Average,Zone Air Temperature [C]
These two variable outputs are/should be identical.
However, note that they can be reported at different time
intervals. “Zone Mean Air Temperature” is only available on
the Zone/HB timestep (Number of Timesteps per Hour) whereas
“Zone Air Temperature” can be reported at the HVAC timestep
(which can vary).
Zone Mean Air Temperature
[C][LINK]
From the code definition, the zone mean air temperature is
the average temperature of the air temperatures at the system
timestep. Remember that the zone heat balance represents a
“well stirred” model for a zone, therefore there is only one
mean air temperature to represent the air temperature for the
zone.
Zone Air Temperature [C][LINK]
This is very similar to the mean air temperature in the
last field. The “well stirred” model for the zone is the
basis, but this temperature is also available at the
“detailed” system timestep.
Zone Mean Air
Dewpoint Temperature [C][LINK]
This is the dewpoint temperature of the zone calculated
from the Zone
Mean Air Temperature (above), the Zone
Air Humidity Ratio (below) and the outdoor barometric
pressure.
Zone Thermostat Air
Temperature [C][LINK]
This is the zone air node temperature for the well-mixed
room air model, which is the default room air model type
(RoomAirModelType=Mixing). But for other types of Room Air
Model (the RoomAir:TemperaturePattern:* and RoomAirSettings:*
objects) the zone thermostat air temperature may depend on the
Thermostat Height and Thermostat Offset.
Zone Mean Radiant
Temperature [C][LINK]
The Mean Radiant Temperature (MRT) in degrees Celsius of a
space is a measure of the combined effects of temperatures of
surfaces within that space. Specifically it is the surface
area × emissivity weighted average of the zone inside surface
temperatures (ref. Surface Inside Temperature), where
emissivity is the Thermal Absorptance of the inside material
layer of each surface.
Zone Operative
Temperature [C][LINK]
Zone
Operative Temperature (OT) is the average of the Zone
Mean Air Temperature (MAT) and Zone
Mean Radiant Temperature (MRT), OT = 0.5*MAT + 0.5*MRT. This
output variable is not affected by the type of thermostat
controls in the zone, and does not include the direct effect
of high temperature radiant systems. See also Zone
Thermostat Operative Temperature.
Zone
Air Heat Balance Internal Convective Heat Gain Rate [W][LINK]
The Zone
Air Heat Balance Internal Convective Heat Gain Rate is the
sum, in watts, of heat transferred to the zone air from all
types of internal gains, including people, lights, equipment
etc. This and the following provide results on the load
components of the zone air heat balance. This field is not
multiplied by zone or group multipliers.
Zone
Air Heat Balance Surface Convection Rate [W][LINK]
The Zone
Air Heat Balance Surface Convection Rate is the sum, in watts,
of heat transferred to the zone air from all the surfaces.
This field is not multiplied by zone or group multipliers.
Zone
Air Heat Balance Interzone Air Transfer Rate [W][LINK]
The Zone
Air Heat Balance Interzone Air Transfer Rate is the sum, in
watts, of heat transferred to the zone air from all the
transfers of air from other thermal zones. This field is not
multiplied by zone or group multipliers.
Zone
Air Heat Balance Outdoor Air Transfer Rate [W][LINK]
The Zone
Air Heat Balance Outdoor Air Transfer Rate is the sum, in
watts, of heat transferred to the zone air from all the
transfers of air from the out side, such as infiltration. This
field is not multiplied by zone or group multipliers.
Zone
Air Heat Balance System Air Transfer Rate [W][LINK]
The Zone
Air Heat Balance System Air Transfer Rate is the sum, in
watts, of heat transferred to the zone air by HVAC forced-air
systems and air terminal units. Such HVAC systems are
connected to the zone by an inlet node (see
ZoneHVac:EquipmentConnections input field called Zone
Air Inlet Node or Node List Name) This field is not multiplied
by zone or group multipliers.
Zone
Air Heat Balance System Convective Heat Gain Rate [W][LINK]
The Zone
Air Heat Balance System Convective Heat Gain Rate is the sum,
in watts, of heat transferred directly to the zone air by
“non-air” HVAC systems. Such HVAC systems are not connected to
the zone by an inlet node but rather add or subtract heat
directly to the zone air in a manner similar to internal
gains. These include the convective fraction of zone HVAC
baseboards and high temperature radiant systems, zone HVAC
refrigeration chiller set, and the extra convective cooling
provided by the cooled beam air terminal unit. This field is
not multiplied by zone or group multipliers.
Zone
Air Heat Balance Air Energy Storage Rate [W][LINK]
The Zone
Air Heat Balance Air Energy Storage Rate is the heat stored,
in watts, in the zone air as result of zone air temperature
changing from one timestep to the next. This field is not
multiplied by zone or group multipliers.
Zone Air Heat
Balance Deviation Rate [W][LINK]
The Zone
Air Heat Balance Deviation Rate is the imbalance, in watts, in
the energy balance for zone air. The value should be near zero
but will become non-zero if zone conditions are changing
rapidly or erratically. This field is not multiplied by zone
or group multipliers. (This output variable is only generated
if the user has set a computer system environment variable
DisplayAdvancedReportVariables equal to “yes”.)
Zone Air
System Sensible Heating Energy [J][LINK]
This output variable represents the sensible heating energy
in Joules that is actually supplied by the system to that zone
for the timestep reported. This is the sensible heating rate
multiplied by the simulation timestep. This is calculated and
reported from the Correct step in the Zone
Predictor-Corrector module. . This field is not multiplied by
zone or group multipliers.
Zone
Air System Sensible Heating (and Cooling) Energy (and Rate)
all report the heating or cooling delivered by the HVAC system
to a zone. These values are calculated by multiplying the
supply air mass flow rate by the difference between the supply
air temperature and the zone air temperature. This does not
always indicate the operation of heating or cooling coils. For
example, cooling will be reported if the supply air is cooled
due to the introduction of outside air, even if all coils are
off.
Note that these variables are calculated at the system
timestep. When reported at the “detailed” reporting frequency,
these variable will never show heating and cooling both in the
same system timestep. If reported at a frequency less than
“Detailed” (for example, Hourly) values may appear in both the
heating and cooling variable for the same hour if the system
cooled the zone for part of the reporting period and heated
the zone for another part of the reporting period.
Zone Air
System Sensible Cooling Energy [J][LINK]
This output variable represents the sensible cooling energy
in Joules that is actually supplied by the system to that zone
for the timestep reported. This is the sensible cooling rate
multiplied by the simulation timestep. This is calculated and
reported from the Correct step in the Zone
Predictor-Corrector module. This field is not multiplied by
zone or group multipliers.
Zone Air
System Sensible Heating Rate [W][LINK]
This output variable represents the sensible heating rate
in Watts that is actually supplied by the system to that zone
for the timestep reported. This is calculated and reported
from the Correct step in the Zone
Predictor-Corrector module. This field is not multiplied by
zone or group multipliers.
Zone Air
System Sensible Cooling Rate [W][LINK]
This output variable represents the sensible cooling rate
in Watts that is actually supplied by the system to that zone
for the timestep reported. This is calculated and reported
from the Correct step in the Zone
Predictor-Corrector module. This field is not multiplied by
zone or group multipliers.
Zone Air
Humidity Ratio [kgWater/kgDryAir][LINK]
This output variable represents the air humidity ratio
after the correct step for each zone. The humidity ratio is
the mass of water vapor to the mass of dry air contained in
the zone in (kg water/kg air) and is unitless.
Zone Air Relative Humidity
[%][LINK]
This output variable represents the air relative humidity
after the correct step for each zone. The relative humidity is
in percent and uses the Zone
Air Temperature, the Zone
Air Humidity Ratio and the Outside Barometric Pressure for
calculation.
Zone Total
Internal Radiant Heating Rate [W][LINK]
Zone
Total Internal Radiant Heating Energy [J][LINK]
These output variables represent the sum of radiant gains
from specific internal sources (e.g. equipment) throughout the
zone in Watts (for rate) or joules. This includes radiant gain
from [People](../input-output-reference/page-015.html#people),
[Lights](../input-output-reference/page-015.html#lights),
Electric Equipment, Gas Equipment, Other Equipment, Hot Water
Equipment, and Steam Equipment.
Zone
Total Internal Visible Radiation Heating Rate [W][LINK]
Zone
Total Internal Visible Radiation Heating Energy [J][LINK]
These output variables expresse the sum of heat gain in
Watts (for rate) or joules that is the calculated short
wavelength radiation gain from lights in the zones. This
calculation uses the total energy from lights and the fraction
visible to realize this value, summed over the zones in the
simulation.
Zone
Total Internal Convective Heating Rate [W][LINK]
Zone
Total Internal Convective Heating Energy [J][LINK]
These output variables represent the sum of convective
gains from specific sources (e.g. equipment) throughout the
zone in Watts (for rate) or joules. This includes convective
gain from [People](../input-output-reference/page-015.html#people),
[Lights](../input-output-reference/page-015.html#lights),
Electric Equipment, Gas Equipment, Other Equipment, Hot Water
Equipment, and Steam Equipment.
Zone Total
Internal Latent Gain Rate [W][LINK]
Zone Total
Internal Latent Gain Energy [J][LINK]
These output variables represent the sum of latent gains
from specific internal sources (e.g. equipment) throughout the
zone in Watts (for rate) or joules. This includes latent gain
from [People](../input-output-reference/page-015.html#people),
Electric Equipment, Gas Equipment, Other Equipment, Hot Water
Equipment, and Steam Equipment.
Zone Total
Internal Total Heating Rate [W][LINK]
Zone Total
Internal Total Heating Energy [J][LINK]
These output variables represent the sum of all heat gains
throughout the zone in Watts (for rate) or joules. This
includes all heat gains from [People](../input-output-reference/page-015.html#people),
[Lights](../input-output-reference/page-015.html#lights),
Electric Equipment, Gas Equipment, Other Equipment, Hot Water
Equipment, and Steam Equipment.
The ZoneList
object defines a list of Zone
objects. It is primarily used with the ZoneGroup
object to provide a generalized way for doing “Floor
Multipliers”. (See the ZoneGroup
description below.) The associated ZoneList
output variables also provide a way to aggregate and organize
zone loads.
Zone
lists are not exclusive. A zone can be referenced be more than
one ZoneList
object.
Field: Zone List Name[LINK]
The name of the ZoneList
object. Must be unique across ZoneLists.
Field: Zone 1 – 20 Name[LINK]
Reference to a Zone
object. This field is extensible; for greater than 20 zones,
edit the IDD to add more Zone
Name fields.
ZoneList,
  Mid Floor List,  !- Name
  Mid West Zone,  !- Zone 1 Name
  Mid Center Zone,  !- Zone 2 Name
  Mid East Zone;  !- Zone 3 Name
ZoneList Outputs[LINK]
The following output variables are reported by the ZoneList
object:
HVAC,Average,Zone List Sensible Heating Rate [W]
HVAC,Average,Zone List Sensible Cooling Rate [W]
HVAC,Sum,Zone List Sensible Heating Energy [J]
HVAC,Sum,Zone List Sensible Cooling Energy [J]
All ZoneList
variables are the sum of the corresponding Zone
variables. Zone
Multiplier fields in the Zone
objects are also taken into account.
The ZoneGroup
object adds a multiplier to a ZoneList.
This can be used to reduce the amount of input necessary for
simulating repetitive structures, such as the identical floors
of a multi-story building. To create a “Floor Multiplier”, use
the ZoneList
object to organize several zones into a typical floor. Then
use the Zone
List Multiplier field in the ZoneGroup
object to multiply the system load for the zones in the list
will also be multiplied. Zones with a Multiplier
field greater than one in the Zone
object are effectively double-multiplied.
NOTE: Although ZoneLists are not exclusive by themselves,
ZoneLists used to form a ZoneGroup
are exclusive; the ZoneLists used with a ZoneGroup
must not have any zones in common.
Tips for Multi-Story
Simulations:[LINK]
- For floors that are multiplied, connect exterior boundary
conditions of the floor to the ceiling and vice versa.
- Since exterior convection coefficients vary with
elevation, locate the typical middle floor zones midheight
between the lowest and highest middle floors to be
modeled.
- Shading must be identical for all multiplied floors or
less accurate results may be obtained by using the zone list
multiplier.
ZoneGroup
and ZoneList
can also be used to simulate other repetitive cases, such as
clusters of zones on the ground.
Field: Zone Group Name[LINK]
The name of the ZoneGroup
object. This must be unique across ZoneGroups.
Field: Zone List Name[LINK]
Reference to a ZoneList
object. The zones in the list constitute the zones in the
group.
Field: Zone List
Multiplier[LINK]
An integer multiplier. Zone
List Multiplier is designed as a “multiplier” for floor area,
zone loads, and energy consumed by internal gains. It takes
the calculated load for the zone and multiplies it, sending
the multiplied load to the attached HVAC system. The HVAC
system size is specified to meet the entire multiplied zone
load and will report the amount of the load met in the Zone
Air System Sensible Heating or Cooling Energy/Rate output
variable. Autosizing automatically accounts for multipliers.
Metered energy consumption by internal gains objects such as
[Lights](../input-output-reference/page-015.html#lights)
or Electric Equipment will be mutliplied. The default is
1.
ZONE GROUP,
  Mid Floor,  !- Zone Group Name
  Mid Floor List,  !- Zone List Name
  8;  !- Zone List Multiplier
ZoneGroup Outputs[LINK]
The following output variables are reported by the ZoneGroup
object:
HVAC,Average,Zone Group Sensible Heating Rate [W]
HVAC,Average,Zone Group Sensible Cooling Rate [W]
HVAC,Sum,Zone Group Sensible Heating Energy [J]
HVAC,Sum,Zone Group Sensible Cooling Energy [J]
All ZoneGroup
variables report the associated ZoneList
value multiplied by the Zone
List Multiplier.
What’s a building without surfaces?
EnergyPlus allows for several surface types:
- BuildingSurface:Detailed
- FenestrationSurface:Detailed
- Shading:Site:Detailed
- Shading:Building:Detailed
- Shading:Zone:Detailed
Each of the preceding surfaces has “correct” geometry
specifications. BuildingSurface and Fenestration surfaces
(heat transfer surfaces) are used to describe the important
elements of the building (walls, roofs, floors, windows,
doors) that will determine the interactions of the building
surfaces with the outside environment parameters and the
internal space requirements. These surfaces are also used to
represent “interzone” heat transfer. During specification of
surfaces, several “outside” environments may be chosen:
Ground – when the surface is in touch
with the ground (e.g. slab floors)
Outdoors – when the surface is an
external surface (e.g. walls, roofs, windows directly exposed
to the outdoor conditions)
Surface – when the surface is
An adiabatic internal zone surface
A interzone surface
Zone
– when the surface is
A interzone surface in which the other surface is not
put in the input file.
OtherSideCoefficients – when using a
custom profile to describe the external conditions of the
surface (advanced concept – covered in subject: [SurfaceProperty:OtherSideCoefficients](../input-output-reference/page-012.html#surfacepropertyothersidecoefficients))
OtherSideConditionsModel – when using
specially modeled components, such as active solar systems,
that cover the outside surface and modify the conditions it
experiences.
Surface items must also specify an
“outside face object”. This is
- Current surface name – for adiabatic internal
surfaces.
- A surface name in another zone – for interzone heat
transfer.
- An “opposing” surface name (in the current zone) – for
representing “middle” zones.
Zone
items must also specify an “outside face object”. This is
- The zone that contains the other surface that is adjactent
to this surface but is not entered in input.
Note that heat transfer surfaces are fully represented with
each description. As stated earlier in the [Construction](../input-output-reference/page-010.html#construction)
description, materials in the construction (outside to inside)
are included but film coeffients neither inside nor outside
are used in the description – these are automatically
calculated during the EnergyPlus run. Interzone surfaces which
do not have a symmetrical construction (such as a
ceiling/floor) require two [Construction](../input-output-reference/page-010.html#construction)
objects with the layers in reverse order. For example, CEILING
with carpet, concrete, ceiling tile and FLOOR with ceiling
tile, concrete, carpet. If interzone surfaces have a
symmetrical construction, the specification for the two
surfaces can reference the same [Construction](../input-output-reference/page-010.html#construction).
Shading surfaces are used to describe
aspects of the site which do not directly impact the physical
interactions of the environmental parameters but may
significantly shade the building during specific hours of the
day or time so the year (e.g. trees, bushes, mountains, nearby
buildings which aren’t being simulated as part of this
facility, etc.)
Note that surfaces which are part of the simulated building
automatically shade other parts of the building as geometry
and time of day dictate – there is no need on the user’s part
to include surfaces that might be in other zones for
shading.
Another surface type:
is used to specify the construction/material parameters and
area of items within the space that are important to heat
transfer calculations but not necessarily important
geometrically. (For example, furniture within the space –
particularly for large spaces). Internal mass can also be used
for internal walls that are not needed (when
FullInteriorAndExterior Solar Distribution is in effect) for
solar distribution or to represent many, if not all, interior
walls when solar is distributed to the floors only.
Interzone Surfaces[LINK]
EnergyPlus can quite accurately simulate the surface heat
exchange between two zones. However, this accuracy is not
always required and using interzonal heat transfer does add to
the complexity of the calculations – thus requiring more CPU
time to simulate. More information about interzonal heat
transfer calculations is contained in the Engineering
Reference. Some simple guidelines are presented here – for
three cases: adiabatic surfaces, surfaces in “middle” zones,
and surfaces where heat transfer is “expected” (e.g. between a
residence and an unheated, attached garage).
- Adiabatic Surfaces – These surfaces would be represented
as common surfaces (between two zones) where both zones are
typically the same temperature. Thus, no transfer is expected
in the surface from one zone to the next. These surfaces
should be described as simply internal surfaces for the zone
referencing as their Outside Boundary Condition Object (see
later description in individual surface objects) their own
surface names.
- Surfaces in Middle Zones – Middle zones in a building can
be simulated using a judicious use of surfaces and zone
multipliers to effect the correct “loads” for the building.
Thus, middle zone behavior can be simulated without modeling
the adjacent zones. This is done by specifying a surface
within the zone. For example, a middle floor zone can be
modeled by making the floor the Outside Boundary Condition
Object for the ceiling, and the ceiling the Outside Boundary
Condition Object for the floor.
- Surfaces between Zones with differing temperatures – These
zones represent the true use of interzone surfaces. In a
residence that has an attached garage, the garage may be
unheated/uncooled or at least not conditioned to the same
degree as the residence interior. In this case, EnergyPlus can
be used to accurately calculate the effects of the differently
conditioned space to the other spaces.
Surface View Factors[LINK]
EnergyPlus uses an area weighted approximation to calculate
“view factors” between surfaces within a thermal zone. Each
surface uses the total area that it can “see” among the other
surfaces. The approximate view factor from this surface to
each other surface is then the area of the receiving surface
over the sum of areas that is visible to the sending
surface.
In order to account in some limited way for the fact that
certain surfaces will not see each other, several assumptions
have been built into this simple view factor approximation.
First, a surface cannot see itself. Second, surfaces with
approximately the same azimuth (facing direction) and tilt
(“same” being within a built in limit) will not see each
other. This means that a window will not see the wall that it
is placed on, for example. Third, floors cannot see each
other. Fourth, if the surface is a floor, ceiling, roof, or
internal mass, the rule for the same azimuth and tilt
eliminating radiant exchange between surface is waived when
the receiving surface is floor, roof, ceiling, or internal
mass as long as both surfaces are not floors.
Note that this does not take into account that surfaces may
be “around the corner” from each other and in reality not see
each other at all. Rooms are assumed to be convex rather than
concave in this method.
To summarize, using the Surface “Class”, the approximate
view factors have:
- No surface sees itself.
- No Floor sees another floor.
- All other surface types see Internal Mass.
- All other surface types see floors.
- Floors always see ceilings.
- Floors always see roofs.
- All other surfaces whose tilt or facing angle differences
are greater than 10 degrees see each other.
If geometry is correct, conditions 1,3, and 7 should take
care of all surfaces, but the other conditions supply common
sense when the geometry is incorrect. More information about
the EnergyPlus view factor calculation is contained in the
Engineering Reference document.
GlobalGeometryRules[LINK]
Before the surface objects are explained in detail, a
description of geometric parameters used in EnergyPlus will be
given. Since the input of surface vertices is common to most
of the surface types, it will also be given a separate
discussion.
Some flexibility is allowed in specifying surface vertices.
This flexibility is embodied in the GlobalGeometryRules
class/object in the input file. Note that the parameters
specified in this statement are used for all surface vertice
inputs – there is no further “flexibility” allowed.
In order to perform shadowing calculations, the building
surfaces must be specified. EnergyPlus uses a three
dimensional (3D) Cartesian coordinate system for surface
vertex specification. This Right Hand coordinate system has
the X-axis pointing east, the Y-axis pointing north, and the
Z-axis pointing up. See figure below.
Field: Starting Vertex
Position[LINK]
The shadowing algorithms in EnergyPlus rely on surfaces
having vertices in a certain order and positional structure.
Thus, the surface translator needs to know the starting point
for each surface entry. The choices are: UpperLeftCorner,
LowerLeftCorner , UpperRightCorner, or LowerRightCorner. Since
most surfaces will be 4 sided, the convention will specify
this position as though each surface were 4 sided. Extrapolate
3 sided figures to this convention. For 5 and more sided
figures, again, try to extrapolate the best “corner” starting
position.
Field: Vertex Entry
Direction[LINK]
Surfaces are always specified as being viewed from the
outside of the zone to which they belong. (Shading surfaces
are specified slightly differently and are discussed under the
particular types). EnergyPlus needs to know whether the
surfaces are being specified in counterclockwise or clockwise
order (from the Starting Vertex Position). EnergyPlus uses
this to determine the outward facing normal for the surface
(which is the facing angle of the surface – very
important in shading and shadowing calculations.
Field: Coordinate System[LINK]
Vertices can be specified in two ways: using
“Absolute”/“World” coordinates, or a relative
coordinate specification. Relative coordinates allow
flexibility of rapid change to observe changes in building
results due to orientation and position. “World” coordinates
will facilitate use within a CADD system structure.
Relative coordinates make use of both
Building](page-006.html#building) and [Zone North Axis values
as well as Zone
Origin values to locate the surface in 3D coordinate space.
World coordinates do not use these
values.
Typically, all zone origin values for “World” coordinates
will be (0,0,0) but Building](page-006.html#building) and
[Zone North Axis values may be used in certain instances
(namely the Daylighting Coordinate Location entries).
Field:
Daylighting Reference Point Coordinate System[LINK]
Daylighting reference points need to be specified as well.
Again, there can be two flavors; relative and
world. Daylighting reference points must fit
within the zone boundaries.
Relative coordinates make use of both
Building](page-006.html#building) and [Zone North Axis values
as well as Zone
Origin values to locate the reference point in 3D coordinate
space. World coordinates do not use these
values.
Field:
Rectangular Surface Coordinate System[LINK]
Simple, rectangular surfaces (Wall:Exterior, Wall:Adiabatic,
Wall:Underground,
Wall:Interzone,
Roof,
Ceiling:Adiabatic,
Ceiling:Interzone,
Floor:GroundContact,
Floor:Adiabatic,
Floor:Interzone) can be specified with their Lower Left Corner
as relative or world.
Relative (default) corners are specified
relative to the Zone
Origin for each surface. World corners would
specify the absolute/world coordinate for this corner.
Surfaces make up the buildings and the elements that shade
buildings. There are several methods to inputting surfaces,
ranging from simple rectangular surfaces to detailed
descriptions that describe each vertex in the order specified
in the GlobalGeometryRules
object. The simple, rectangular surface objects are described
first with the more detailed descriptions following.
Walls are usually vertical (tilt = 90 degrees). These
objects are used to describe exterior walls, interior walls
(adiabatic), underground walls, and walls adjacent to other
zones.
Wall:Exterior[LINK]
The Wall:Exterior
object is used to describe walls that are exposed to the
external environment. They receive sun, wind – all the
characteristics of the external world.
This is a unique name associated with the exterior wall. It
is used in several other places as a reference (e.g. as the
base surface name for a Window
or Door).
Field: Construction Name[LINK]
This is the name of the construction (ref: [Construction](../input-output-reference/page-010.html#construction)
object) used in the surface. Regardless of location in the
building, the “full” construction (all layers) is used. For
example, for an interior wall separating two zones, zone x
would have the outside layer (e.g. drywall) as the material
that shows in zone y and then the layers to the inside layer –
the material that shows in zone x. For symmetric
constructions, the same construction can be used in the
surfaces described in both zones.
Field: Zone Name[LINK]
This is the zone name to which the surface belongs.
Field: Azimuth Angle[LINK]
The Azimuth Angle indicates the direction that the wall
faces (outward normal). The angle is specified in degrees
where East=90, South=180, West=270, North=0.
Field: Tilt Angle[LINK]
The tilt angle is the angle (in degrees) that the wall is
tilted from horizontal (or the ground). Normally, walls are
tilted 90 degrees and that is the default for this field.
Starting Corner for
the surface[LINK]
The rectangular surfaces specify the lower left corner of
the surface for their starting coordinate. This is specified
with (x,y,z) and can be relative to the zone origin or in
world coordinates, depending on the value for rectangular
surfaces specified in the GlobalGeometryRules
object.
Field: Starting X
Coordinate[LINK]
This field is the X coordinate (in meters).
Field: Starting Y
Coordinate[LINK]
This field is the Y coordinate (in meters).
Field: Starting Z
Coordinate[LINK]
This field is the Z coordinate (in meters).
Field: Length[LINK]
This field is the length of the wall in meters.
Field: Height[LINK]
This field is the height of the wall in meters.
Wall:Adiabatic[LINK]
The Wall:Adiabatic
object is used to describe interior walls and partitions.
Adiabatic walls are used to describe walls next to zones that
have the same thermal conditions (thus, no heat transfer).
This is a unique name associated with the interior wall. It
is used in several other places as a reference (e.g. as the
base surface name for a Window
or Door).
Field: Construction
Name[LINK]
This is the name of the construction (ref: [Construction](../input-output-reference/page-010.html#construction)
object) used in the surface. Regardless of location in the
building, the “full” construction (all layers) is used. For
example, for an interior wall separating two zones, zone x
would have the outside layer (e.g. drywall) as the material
that shows in zone y and then the layers to the inside layer –
the material that shows in zone x. For symmetric
constructions, the same construction can be used in the
surfaces described in both zones.
Field: Zone Name[LINK]
This is the zone name to which the surface belongs.
Field: Azimuth Angle[LINK]
The Azimuth Angle indicates the direction that the wall
faces (outward normal). The angle is specified in degrees
where East=90, South=180, West=270, North=0.
Field: Tilt Angle[LINK]
The tilt angle is the angle (in degrees) that the wall is
tilted from horizontal (or the ground). Normally, walls are
tilted 90 degrees and that is the default for this field.
Starting Corner for
the surface[LINK]
The rectangular surfaces specify the lower left corner of
the surface for their starting coordinate. This is specified
with (x,y,z) and can be relative to the zone origin or in
world coordinates, depending on the value for rectangular
surfaces specified in the GlobalGeometryRules
object.
Field: Starting X
Coordinate[LINK]
This field is the X coordinate (in meters).
Field: Starting Y
Coordinate[LINK]
This field is the Y coordinate (in meters).
Field: Starting Z
Coordinate[LINK]
This field is the Z coordinate (in meters).
Field: Length[LINK]
This field is the length of the wall in meters.
Field: Height[LINK]
This field is the height of the wall in meters.
Wall:Underground[LINK]
The Wall:Underground
object is used to describe walls with ground contact. The
temperature at the outside of the wall is the temperature in
the GroundTemperature:BuildingSurface object.
This is a unique name associated with the underground wall.
It is used in several other places as a reference (e.g. as the
base surface name for a Window
or Door).
Field: Construction
Name[LINK]
This is the name of the construction (ref: [Construction](../input-output-reference/page-010.html#construction)
object) used in the surface. Regardless of location in the
building, the “full” construction (all layers) is used. For
example, for an interior wall separating two zones, zone x
would have the outside layer (e.g. drywall) as the material
that shows in zone y and then the layers to the inside layer –
the material that shows in zone x. For symmetric
constructions, the same construction can be used in the
surfaces described in both zones. Note that if the
construction is Construction:CfactorUndergroundWall
then the GroundFCfactoreMethod will be used for this wall.
Field: Zone Name[LINK]
This is the zone name to which the surface belongs.
Field: Azimuth Angle[LINK]
The Azimuth Angle indicates the direction that the wall
faces (outward normal). The angle is specified in degrees
where East=90, South=180, West=270, North=0.
Field: Tilt Angle[LINK]
The tilt angle is the angle (in degrees) that the wall is
tilted from horizontal (or the ground). Normally, walls are
tilted 90 degrees and that is the default for this field.
Starting Corner for
the surface[LINK]
The rectangular surfaces specify the lower left corner of
the surface for their starting coordinate. This is specified
with (x,y,z) and can be relative to the zone origin or in
world coordinates, depending on the value for rectangular
surfaces specified in the GlobalGeometryRules
object.
Field: Starting X
Coordinate[LINK]
This field is the X coordinate (in meters).
Field: Starting Y
Coordinate[LINK]
This field is the Y coordinate (in meters).
Field: Starting Z
Coordinate[LINK]
This field is the Z coordinate (in meters).
Field: Length[LINK]
This field is the length of the wall in meters.
Field: Height[LINK]
This field is the height of the wall in meters.
Wall:Interzone[LINK]
The Wall:Interzone
object is used to describe walls adjacent to zones that are
significantly different conditions than the zone with this
wall.
This is a unique name associated with the interzone wall.
It is used in several other places as a reference (e.g. as the
base surface name for a Window
or Door).
Field: Construction
Name[LINK]
This is the name of the construction (ref: [Construction](../input-output-reference/page-010.html#construction)
object) used in the surface. Regardless of location in the
building, the “full” construction (all layers) is used. For
example, for an interior wall separating two zones, zone x
would have the outside layer (e.g. drywall) as the material
that shows in zone y and then the layers to the inside layer –
the material that shows in zone x. For symmetric
constructions, the same construction can be used in the
surfaces described in both zones.
Field: Zone Name[LINK]
This is the zone name to which the surface belongs.
Field:
Outside Boundary Condition Object[LINK]
The Outside Boundary Condition Object field is the name of
a wall in an adjacent zone or the name of the adjacent zone.
If the adjacent zone option is used, the adjacent wall is
automatically generated in the adjacent zone. If the surface
name is used, it must be in the adjacent zone.
Field: Azimuth Angle[LINK]
The Azimuth Angle indicates the direction that the wall
faces (outward normal). The angle is specified in degrees
where East=90, South=180, West=270, North=0.
Field: Tilt Angle[LINK]
The tilt angle is the angle (in degrees) that the wall is
tilted from horizontal (or the ground). Normally, walls are
tilted 90 degrees and that is the default for this field.
Starting Corner for
the surface[LINK]
The rectangular surfaces specify the lower left corner of
the surface for their starting coordinate. This is specified
with (x,y,z) and can be relative to the zone origin or in
world coordinates, depending on the value for rectangular
surfaces specified in the GlobalGeometryRules
object.
Field: Starting X
Coordinate[LINK]
This field is the X coordinate (in meters).
Field: Starting Y
Coordinate[LINK]
This field is the Y coordinate (in meters).
Field: Starting Z
Coordinate[LINK]
This field is the Z coordinate (in meters).
Field: Length[LINK]
This field is the length of the wall in meters.
Field: Height[LINK]
This field is the height of the wall in meters.
Roofs/Ceilings[LINK]
Roofs and ceilings are, by default, flat (tilt = 0
degrees). These objects are used to describe roofs, interior
ceilings (adiabatic) and ceilings adjacent to other zones.
The Roof
object is used to describe roofs that are exposed to the
external environment.
This is a unique name associated with the roof. It is used
in several other places as a reference (e.g. as the base
surface name for a Window
or Door).
Field: Construction
Name[LINK]
This is the name of the construction (ref: [Construction](../input-output-reference/page-010.html#construction)
object) used in the surface. Regardless of location in the
building, the “full” construction (all layers) is used. For
example, for an interior wall separating two zones, zone x
would have the outside layer (e.g. drywall) as the material
that shows in zone y and then the layers to the inside layer –
the material that shows in zone x. For symmetric
constructions, the same construction can be used in the
surfaces described in both zones.
Field: Zone Name[LINK]
This is the zone name to which the surface belongs.
Field: Azimuth Angle[LINK]
The Azimuth Angle indicates the direction of the outward
normal for the roof. The angle is specified in degrees where
East=90, South=180, West=270, North=0.
Field: Tilt Angle[LINK]
The tilt angle is the angle (in degrees) that the wall is
tilted from horizontal (or the ground). Flat roofs are tilted
0 degrees and that is the default for this field.
Starting Corner for
the surface[LINK]
The rectangular surfaces specify the lower left corner of
the surface for their starting coordinate. This is specified
with (x,y,z) and can be relative to the zone origin or in
world coordinates, depending on the value for rectangular
surfaces specified in the GlobalGeometryRules
object.
Field: Starting X
Coordinate[LINK]
This field is the X coordinate (in meters).
Field: Starting Y
Coordinate[LINK]
This field is the Y coordinate (in meters).
Field: Starting Z
Coordinate[LINK]
This field is the Z coordinate (in meters).
Field: Length[LINK]
This field is the length of the roof in meters.
This field is the width of the roof in meters.
Ceiling:Adiabatic[LINK]
The Ceiling:Adiabatic
object is used to describe interior ceilings that separate
zones of like conditions.
This is a unique name associated with the ceiling. It is
used in several other places as a reference (e.g. as the base
surface name for a Window
or Door).
Field: Construction
Name[LINK]
This is the name of the construction (ref: [Construction](../input-output-reference/page-010.html#construction)
object) used in the surface. Regardless of location in the
building, the “full” construction (all layers) is used. For
example, for an interior wall separating two zones, zone x
would have the outside layer (e.g. drywall) as the material
that shows in zone y and then the layers to the inside layer –
the material that shows in zone x. For symmetric
constructions, the same construction can be used in the
surfaces described in both zones.
Field: Zone Name[LINK]
This is the zone name to which the surface belongs.
Field: Azimuth Angle[LINK]
The Azimuth Angle indicates the direction of the outward
normal for the roof. The angle is specified in degrees where
East=90, South=180, West=270, North=0.
Field: Tilt Angle[LINK]
The tilt angle is the angle (in degrees) that the wall is
tilted from horizontal (or the ground). Flat ceilings are
tilted 0 degrees and that is the default for this field.
Starting Corner for
the surface[LINK]
The rectangular surfaces specify the lower left corner of
the surface for their starting coordinate. This is specified
with (x,y,z) and can be relative to the zone origin or in
world coordinates, depending on the value for rectangular
surfaces specified in the GlobalGeometryRules
object.
Field: Starting X
Coordinate[LINK]
This field is the X coordinate (in meters).
Field: Starting Y
Coordinate[LINK]
This field is the Y coordinate (in meters).
Field: Starting Z
Coordinate[LINK]
This field is the Z coordinate (in meters).
Field: Length[LINK]
This field is the length of the ceiling in meters.
This field is the width of the ceiling in meters.
Ceiling:Interzone[LINK]
The Ceiling:Interzone
object is used to describe interior ceilings that separate
zones of differing conditions (and expect heat transfer
through the ceiling from the adjacent zone).
This is a unique name associated with the interzone
ceiling. It is used in several other places as a reference
(e.g. as the base surface name for a Window
or Door).
Field: Construction
Name[LINK]
This is the name of the construction (ref: [Construction](../input-output-reference/page-010.html#construction)
object) used in the surface. Regardless of location in the
building, the “full” construction (all layers) is used. For
example, for an interior wall separating two zones, zone x
would have the outside layer (e.g. drywall) as the material
that shows in zone y and then the layers to the inside layer –
the material that shows in zone x. For symmetric
constructions, the same construction can be used in the
surfaces described in both zones.
Field: Zone Name[LINK]
This is the zone name to which the surface belongs.
Field:
Outside Boundary Condition Object[LINK]
The Outside Boundary Condition Object field is the name of
a floor in an adjacent zone or the name of the adjacent zone.
If the adjacent zone option is used, the adjacent floor is
automatically generated in the adjacent zone. If the surface
name is used, it must be in the adjacent zone.
Field: Azimuth Angle[LINK]
The Azimuth Angle indicates the direction of the outward
normal for the roof. The angle is specified in degrees where
East=90, South=180, West=270, North=0.
Field: Tilt Angle[LINK]
The tilt angle is the angle (in degrees) that the wall is
tilted from horizontal (or the ground). Flat ceilings are
tilted 0 degrees and that is the default for this field.
Starting Corner for
the surface[LINK]
The rectangular surfaces specify the lower left corner of
the surface for their starting coordinate. This is specified
with (x,y,z) and can be relative to the zone origin or in
world coordinates, depending on the value for rectangular
surfaces specified in the GlobalGeometryRules
object.
Field: Starting X
Coordinate[LINK]
This field is the X coordinate (in meters).
Field: Starting Y
Coordinate[LINK]
This field is the Y coordinate (in meters).
Field: Starting Z
Coordinate[LINK]
This field is the Z coordinate (in meters).
Field: Length[LINK]
This field is the length of the ceiling in meters.
This field is the width of the ceiling in meters.
Floors are, by default, flat (tilt = 180 degrees). These
objects are used to describe floors on the ground, interior
floors (adiabatic) and floors adjacent to other zones.
The Floor:GroundContact
object is used to describe floors that have ground contact
(usually called slabs). The temperature at the outside of the
floor is the temperature in the
GroundTemperature:BuildingSurface object.
This is a unique name associated with the floor.
Field: Construction
Name[LINK]
This is the name of the construction (ref: [Construction](../input-output-reference/page-010.html#construction)
object) used in the surface. Regardless of location in the
building, the “full” construction (all layers) is used. For
example, for an interior wall separating two zones, zone x
would have the outside layer (e.g. drywall) as the material
that shows in zone y and then the layers to the inside layer –
the material that shows in zone x. For symmetric
constructions, the same construction can be used in the
surfaces described in both zones. Note that if the
construction is Construction:FfactorGroundFloor,
then the GroundFCfactorMethod will be used with this
floor.
Field: Zone Name[LINK]
This is the zone name to which the surface belongs.
Field: Azimuth Angle[LINK]
The Azimuth Angle indicates the direction of the outward
normal for the roof. The angle is specified in degrees where
East=90, South=180, West=270, North=0.
Field: Tilt Angle[LINK]
The tilt angle is the angle (in degrees) that the wall is
tilted from horizontal (or the ground). Flat floors are tilted
180 degrees and that is the default for this field.
Starting Corner for
the surface[LINK]
The rectangular surfaces specify the lower left corner of
the surface for their starting coordinate. This is specified
with (x,y,z) and can be relative to the zone origin or in
world coordinates, depending on the value for rectangular
surfaces specified in the GlobalGeometryRules
object.
Field: Starting X
Coordinate[LINK]
This field is the X coordinate (in meters).
Field: Starting Y
Coordinate[LINK]
This field is the Y coordinate (in meters).
Field: Starting Z
Coordinate[LINK]
This field is the Z coordinate (in meters).
Field: Length[LINK]
This field is the length of the floor in meters.
This field is the width of the floor in meters.
Floor:Adiabatic[LINK]
The Floor:Adiabatict object is used to describe interior
floors or floors that you wish to model with no heat transfer
from the exterior to the floor.
This is a unique name associated with the floor.
Field: Construction
Name[LINK]
This is the name of the construction (ref: [Construction](../input-output-reference/page-010.html#construction)
object) used in the surface. Regardless of location in the
building, the “full” construction (all layers) is used. For
example, for an interior wall separating two zones, zone x
would have the outside layer (e.g. drywall) as the material
that shows in zone y and then the layers to the inside layer –
the material that shows in zone x. For symmetric
constructions, the same construction can be used in the
surfaces described in both zones.
Field: Zone Name[LINK]
This is the zone name to which the surface belongs.
Field: Azimuth Angle[LINK]
The Azimuth Angle indicates the direction of the outward
normal for the roof. The angle is specified in degrees where
East=90, South=180, West=270, North=0.
Field: Tilt Angle[LINK]
The tilt angle is the angle (in degrees) that the wall is
tilted from horizontal (or the ground). Flat floors are tilted
180 degrees and that is the default for this field.
Starting Corner for
the surface[LINK]
The rectangular surfaces specify the lower left corner of
the surface for their starting coordinate. This is specified
with (x,y,z) and can be relative to the zone origin or in
world coordinates, depending on the value for rectangular
surfaces specified in the GlobalGeometryRules
object.
Field: Starting X
Coordinate[LINK]
This field is the X coordinate (in meters).
Field: Starting Y
Coordinate[LINK]
This field is the Y coordinate (in meters).
Field: Starting Z
Coordinate[LINK]
This field is the Z coordinate (in meters).
Field: Length[LINK]
This field is the length of the floor in meters.
This field is the width of the floor in meters.
Floor:Interzone[LINK]
The Floor:Interzone
object is used to describe floors that are adjacent to other
zones that have differing conditions and you wish to model the
heat transfer through the floor.
This is a unique name associated with the floor.
Field: Construction
Name[LINK]
This is the name of the construction (ref: [Construction](../input-output-reference/page-010.html#construction)
object) used in the surface. Regardless of location in the
building, the “full” construction (all layers) is used. For
example, for an interior wall separating two zones, zone x
would have the outside layer (e.g. drywall) as the material
that shows in zone y and then the layers to the inside layer –
the material that shows in zone x. For symmetric
constructions, the same construction can be used in the
surfaces described in both zones.
Field: Zone Name[LINK]
This is the zone name to which the surface belongs.
Field:
Outside Boundary Condition Object[LINK]
The Outside Boundary Condition Object field is the name of
a ceiling in an adjacent zone or the name of the adjacent
zone. If the adjacent zone option is used, the adjacent
ceiling is automatically generated in the adjacent zone. If
the surface name is used, it must be in the adjacent zone.
Field: Azimuth Angle[LINK]
The Azimuth Angle indicates the direction of the outward
normal for the roof. The angle is specified in degrees where
East=90, South=180, West=270, North=0.
Field: Tilt Angle[LINK]
The tilt angle is the angle (in degrees) that the wall is
tilted from horizontal (or the ground). Flat floors are tilted
180 degrees and that is the default for this field.
Starting Corner for
the surface[LINK]
The rectangular surfaces specify the lower left corner of
the surface for their starting coordinate. This is specified
with (x,y,z) and can be relative to the zone origin or in
world coordinates, depending on the value for rectangular
surfaces specified in the GlobalGeometryRules
object.
Field: Starting X
Coordinate[LINK]
This field is the X coordinate (in meters).
Field: Starting Y
Coordinate[LINK]
This field is the Y coordinate (in meters).
Field: Starting Z
Coordinate[LINK]
This field is the Z coordinate (in meters).
Field: Length[LINK]
This field is the length of the floor in meters.
This field is the width of the floor in meters.
Windows/Doors[LINK]
The following window and door objects can be used to
specify simple, rectangular doors and windows. In each case,
the lower left corner (locator coordinate) of the window or
door is specified relative to the surface it
is on. Viewing the base surface as a planar surface, base the
relative location from the lower left corner of the base
surface. Vertex entry description as well as provisions for a
few other surface types can be entered with the FenestrationSurface:Detailed
object.
The Window
object is used to place windows on surfaces that can have
windows, including exterior walls, interior walls, interzone
walls, roofs, floors that are exposed to outdoor conditions,
interzone ceiling/floors. These, of course, can be entered
using the simple rectangular objects or the more detailed
vertex entry objects.
This is a unique name associated with the window.
Field: Construction
Name[LINK]
This is the name of the subsurface’s construction (ref:
objects: [Construction](../input-output-reference/page-010.html#construction),
[Construction:WindowDataFile](../input-output-reference/page-010.html#constructionwindowdatafile),
Construction:CompexFenestrationState).
For windows, if Construction](page-010.html#construction)
Name is not found among the constructions on the input (.idf)
file, the [Window Data File (ref. [Construction:WindowDataFile](../input-output-reference/page-010.html#constructionwindowdatafile)
object) will be searched for that [Construction](../input-output-reference/page-010.html#construction)
Name (see “Importing Windows from WINDOW”). If that file is
not present or if the [Construction](../input-output-reference/page-010.html#construction)
Name does not match the name of an entry on the file, an error
will result. If there is a match, a window construction and
its corresponding glass and gas materials will be created from
the information read from the file.
Field: Building Surface
Name[LINK]
This is the name of a surface that contains this
subsurface. Certain kinds of surfaces may not be allowed to
have subsurfaces. For example, a surface in contact with the
ground (e.g., Outside Boundary Condition = Ground) cannot
contain a window. The window assumes the outward facing angle
as well as the tilt angle of the base surface.
Field: Shading Control
Name[LINK]
This field, if not blank, is the name of the window shading
control (ref: WindowProperty:ShadingControl
object) for this subsurface. It is used for Surface Type = Window
and GlassDoor. To assign a shade to a window or glass door,
see WindowMaterial: Shade. To assign a screen, see
WindowMaterial:Screen](page-010.html#windowmaterialscreen). To
assign a blind, see [WindowMaterial:Blind](../input-output-reference/page-010.html#windowmaterialblind).
To assign switchable glazing, such as electrochromic glazing,
see [WindowProperty:ShadingControl.
Field: Frame and Divider
Name[LINK]
This field, if not blank, can be used to specify window
frame, divider and reveal-surface data (ref: WindowProperty:FrameAndDivider
object). It is used only for exterior GlassDoors and
rectangular exterior Windows, i.e., those with
OutsideFaceEnvironment = Outdoors.
This field should be blank for triangular windows.
Field: Multiplier[LINK]
This field is the number of identical items on the base
surface. Using Multiplier can save input effort and
calculation time. In the calculation the area (and area of
frame and divider, if present and surface type is a window) is
multiplied by Multiplier. The calculation of shadowing on the
subsurfaces (and the calculation of the interior distribution
of beam solar radiation transmitted by windows and glass
doors) are done for the specified subsurface position and
dimensions.
Multiplier should be used with caution. Multiplier > 1
can give inaccurate or nonsensical results in situations where
the results are sensitive to window or glass door position.
This includes shadowing on the window/glass door, daylighting
from the window/glass door, and interior distribution of solar
radiation from the window/glass door. In these cases, the
results for the single input window/glass door, after
multiplication, may not be representative of the results you
would get if you entered each of the multiple subsurfaces
separately.
If Multiplier > 1, you will get
–a warning if Solar Distribution = FullExterior or
FullInteriorAndExterior (ref: [Building](../input-output-reference/page-006.html#building)
- Field: Solar Distribution), indicating that the shadowing on
the input window or the interior solar radiation distribution
from the input window may not be representative of the actual
group of windows. No warning is issued if Solar Distribution =
MinimalShadowing.
–an error if the window is an exterior
window/glass door in a zone that has a detailed daylighting
calculation (Daylighting:Detailed specified for the zone).
Since a single window with a multiplier can never give the
same daylight illuminance as the actual set of windows, you
are not allowed to use Multiplier in this situation.
Starting Corner
for the surface[LINK]
The rectangular subsurfaces specify the lower left corner
of the surface for their starting coordinate. This corner is
specifed relative to the lower left corner of the base surface
by specifying the X and Z values from that corner.
Field: Starting X
Coordinate[LINK]
This field is the X coordinate (in meters).
Field: Starting Z
Coordinate[LINK]
This field is the Z coordinate (in meters).
Field: Length[LINK]
This field is the length of the window in meters.
Field: Height[LINK]
This field is the height of the window in meters.
The Door
object is used to place opaque doors on surfaces that can have
doors, including exterior walls, interior walls, interzone
walls, roofs, floors that are exposed to outdoor conditions,
interzone ceiling/floors. These, of course, can be entered
using the simple rectangular objects or the more detailed
vertex entry objects.
This is a unique name associated with the door.
Field: Construction
Name[LINK]
This is the name of the subsurface’s construction (ref: [Construction](../input-output-reference/page-010.html#construction)
object)
Field: Building Surface
Name[LINK]
This is the name of a surface that contains this
subsurface. Certain kinds of surfaces may not be allowed to
have subsurfaces. The door assumes the outward facing angle as
well as the tilt angle of the base surface.
Field: Multiplier[LINK]
This field is the number of identical items on the base
surface. Using Multiplier can save input effort and
calculation time. In the calculation the area (and area of
frame and divider, if present and surface type is a window) is
multiplied by Multiplier. The calculation of shadowing on the
subsurfaces (and the calculation of the interior distribution
of beam solar radiation transmitted by windows and glass
doors) are done for the specified subsurface position and
dimensions.
Multiplier should be used with caution. Multiplier > 1
can give inaccurate or nonsensical results in situations where
the results are sensitive to window or glass door position.
This includes shadowing on the window/glass door, daylighting
from the window/glass door, and interior distribution of solar
radiation from the window/glass door. In these cases, the
results for the single input window/glass door, after
multiplication, may not be representative of the results you
would get if you entered each of the multiple subsurfaces
separately.
If Multiplier > 1, you will get
–a warning if Solar Distribution = FullExterior or
FullInteriorAndExterior (ref: [Building](../input-output-reference/page-006.html#building)
- Field: Solar Distribution), indicating that the shadowing on
the input window or the interior solar radiation distribution
from the input window may not be representative of the actual
group of windows. No warning is issued if Solar Distribution =
MinimalShadowing.
–an error if the window is an exterior
window/glass door in a zone that has a detailed daylighting
calculation (Daylighting:Detailed specified for the zone).
Since a single window with a multiplier can never give the
same daylight illuminance as the actual set of windows, you
are not allowed to use Multiplier in this situation.
Starting Corner
for the surface[LINK]
The rectangular subsurfaces specify the lower left corner
of the surface for their starting coordinate. This corner is
specifed relative to the lower left corner of the base surface
by specifying the X and Z values from that corner.
Field: Starting X
Coordinate[LINK]
This field is the X coordinate (in meters).
Field: Starting Z
Coordinate[LINK]
This field is the Z coordinate (in meters).
Field: Length[LINK]
This field is the length of the door in meters.
Field: Height[LINK]
This field is the height of the door in meters.
The GlazedDoor
object is used to place doors on surfaces that can have doors,
including exterior walls, interior walls, interzone walls,
roofs, floors that are exposed to outdoor conditions,
interzone ceiling/floors. These, of course, can be entered
using the simple rectangular objects or the more detailed
vertex entry objects.
This is a unique name associated with the glass door.
Field: Construction
Name[LINK]
This is the name of the subsurface’s construction (ref:
objects: [Construction](../input-output-reference/page-010.html#construction),
[Construction:WindowDataFile](../input-output-reference/page-010.html#constructionwindowdatafile),
Construction:CompexFenestrationState).
For windows, if Construction](page-010.html#construction)
Name is not found among the constructions on the input (.idf)
file, the [Window Data File (ref. [Construction:WindowDataFile](../input-output-reference/page-010.html#constructionwindowdatafile)
object) will be searched for that [Construction](../input-output-reference/page-010.html#construction)
Name (see “Importing Windows from WINDOW”). If that file is
not present or if the [Construction](../input-output-reference/page-010.html#construction)
Name does not match the name of an entry on the file, an error
will result. If there is a match, a window construction and
its corresponding glass and gas materials will be created from
the information read from the file.
Field: Building Surface
Name[LINK]
This is the name of a surface that contains this
subsurface. Certain kinds of surfaces may not be allowed to
have subsurfaces. For example, a surface in contact with the
ground (Outside Boundary Condition = Ground) cannot contain a
window. The door assumes the outward facing angle as well as
the tilt angle of the base surface.
Field: Shading Control
Name[LINK]
This field, if not blank, is the name of the window shading
control (ref: WindowProperty:ShadingControl
object) for this subsurface. It is used for Surface Type = Window
and GlassDoor. To assign a shade to a window or glass door,
see WindowMaterial: Shade. To assign a screen, see
WindowMaterial:Screen](page-010.html#windowmaterialscreen). To
assign a blind, see [WindowMaterial:Blind](../input-output-reference/page-010.html#windowmaterialblind).
To assign switchable glazing, such as electrochromic glazing,
see [WindowProperty:ShadingControl.
Field: Frame and
Divider Name[LINK]
This field, if not blank, can be used to specify window
frame, divider and reveal-surface data (ref: WindowProperty:FrameAndDivider
object). It is used only for exterior GlassDoors and
rectangular exterior Windows, i.e., those with
OutsideFaceEnvironment = Outdoors.
This field should be blank for triangular windows.
Field: Multiplier[LINK]
This field is the number of identical items on the base
surface. Using Multiplier can save input effort and
calculation time. In the calculation the area (and area of
frame and divider, if present and surface type is a window) is
multiplied by Multiplier. The calculation of shadowing on the
subsurfaces (and the calculation of the interior distribution
of beam solar radiation transmitted by windows and glass
doors) are done for the specified subsurface position and
dimensions.
Multiplier should be used with caution. Multiplier > 1
can give inaccurate or nonsensical results in situations where
the results are sensitive to window or glass door position.
This includes shadowing on the window/glass door, daylighting
from the window/glass door, and interior distribution of solar
radiation from the window/glass door. In these cases, the
results for the single input window/glass door, after
multiplication, may not be representative of the results you
would get if you entered each of the multiple subsurfaces
separately.
If Multiplier > 1, you will get
–a warning if Solar Distribution = FullExterior or
FullInteriorAndExterior (ref: [Building](../input-output-reference/page-006.html#building)
- Field: Solar Distribution), indicating that the shadowing on
the input window or the interior solar radiation distribution
from the input window may not be representative of the actual
group of windows. No warning is issued if Solar Distribution =
MinimalShadowing.
–an error if the window is an exterior
window/glass door in a zone that has a detailed daylighting
calculation (Daylighting:Detailed specified for the zone).
Since a single window with a multiplier can never give the
same daylight illuminance as the actual set of windows, you
are not allowed to use Multiplier in this situation.
Starting Corner
for the surface[LINK]
The rectangular subsurfaces specify the lower left corner
of the surface for their starting coordinate. This corner is
specifed relative to the lower left corner of the base surface
by specifying the X and Z values from that corner.
Field: Starting X
Coordinate[LINK]
This field is the X coordinate (in meters).
Field: Starting Z
Coordinate[LINK]
This field is the Z coordinate (in meters).
Field: Length[LINK]
This field is the length of the door in meters.
Field: Height[LINK]
This field is the height of the door in meters.
Window:Interzone[LINK]
The Window:Interzone
object is used to place windows on surfaces that can have
windows, including interzone walls, interzone ceiling/floors.
These, of course, can be entered using the simple rectangular
objects or the more detailed vertex entry objects.
This is a unique name associated with the window.
Field: Construction
Name[LINK]
This is the name of the subsurface’s construction (ref:
objects: [Construction](../input-output-reference/page-010.html#construction),
[Construction:WindowDataFile](../input-output-reference/page-010.html#constructionwindowdatafile),
Construction:CompexFenestrationState).
For windows, if Construction](page-010.html#construction)
Name is not found among the constructions on the input (.idf)
file, the [Window Data File (ref. [Construction:WindowDataFile](../input-output-reference/page-010.html#constructionwindowdatafile)
object) will be searched for that [Construction](../input-output-reference/page-010.html#construction)
Name (see “Importing Windows from WINDOW”). If that file is
not present or if the [Construction](../input-output-reference/page-010.html#construction)
Name does not match the name of an entry on the file, an error
will result. If there is a match, a window construction and
its corresponding glass and gas materials will be created from
the information read from the file.
Field: Building Surface
Name[LINK]
This is the name of a surface that contains this
subsurface. Certain kinds of surfaces may not be allowed to
have subsurfaces. For example, a surface in contact with the
ground (Outside Boundary Condition = Ground) cannot contain a
window. The window assumes the outward facing angle as well as
the tilt angle of the base surface.
Field:
Outside Boundary Condition Object[LINK]
The Outside Boundary Condition Object field is the name of
a window in an adjacent zone or the name of the adjacent zone.
If the adjacent zone option is used, the adjacent ceiling is
automatically generated in the adjacent zone. If the surface
name is used, it must be in the adjacent zone.
Field: Multiplier[LINK]
This field is the number of identical items on the base
surface. Using Multiplier can save input effort and
calculation time. In the calculation the area (and area of
frame and divider, if present and surface type is a window) is
multiplied by Multiplier. The calculation of shadowing on the
subsurfaces (and the calculation of the interior distribution
of beam solar radiation transmitted by windows and glass
doors) are done for the specified subsurface position and
dimensions.
Multiplier should be used with caution. Multiplier > 1
can give inaccurate or nonsensical results in situations where
the results are sensitive to window or glass door position.
This includes shadowing on the window/glass door, daylighting
from the window/glass door, and interior distribution of solar
radiation from the window/glass door. In these cases, the
results for the single input window/glass door, after
multiplication, may not be representative of the results you
would get if you entered each of the multiple subsurfaces
separately.
If Multiplier > 1, you will get
–a warning if Solar Distribution = FullExterior or
FullInteriorAndExterior (ref: [Building](../input-output-reference/page-006.html#building)
- Field: Solar Distribution), indicating that the shadowing on
the input window or the interior solar radiation distribution
from the input window may not be representative of the actual
group of windows. No warning is issued if Solar Distribution =
MinimalShadowing.
–an error if the window is an exterior
window/glass door in a zone that has a detailed daylighting
calculation (Daylighting:Detailed specified for the zone).
Since a single window with a multiplier can never give the
same daylight illuminance as the actual set of windows, you
are not allowed to use Multiplier in this situation.
Starting Corner
for the surface[LINK]
The rectangular subsurfaces specify the lower left corner
of the surface for their starting coordinate. This corner is
specifed relative to the lower left corner of the base surface
by specifying the X and Z values from that corner.
Field: Starting X
Coordinate[LINK]
This field is the X coordinate (in meters).
Field: Starting Z
Coordinate[LINK]
This field is the Z coordinate (in meters).
Field: Length[LINK]
This field is the length of the window in meters.
Field: Height[LINK]
This field is the height of the window in meters.
Door:Interzone[LINK]
The Door:Interzone
object is used to place opaque doors on surfaces that can have
doors, including interzone walls, interzone ceiling/floors.
These, of course, can be entered using the simple rectangular
objects or the more detailed vertex entry objects.
This is a unique name associated with the door.
Field: Construction
Name[LINK]
This is the name of the subsurface’s construction (ref: [Construction](../input-output-reference/page-010.html#construction)
object).
Field: Building Surface
Name[LINK]
This is the name of a surface that contains this
subsurface. Certain kinds of surfaces may not be allowed to
have subsurfaces. The door assumes the outward facing angle as
well as the tilt angle of the base surface.
Field:
Outside Boundary Condition Object[LINK]
The Outside Boundary Condition Object field is the name of
a door in an adjacent zone or the name of the adjacent zone.
If the adjacent zone option is used, the adjacent ceiling is
automatically generated in the adjacent zone. If the surface
name is used, it must be in the adjacent zone.
Field: Multiplier[LINK]
This field is the number of identical items on the base
surface. Using Multiplier can save input effort and
calculation time. In the calculation the area (and area of
frame and divider, if present and surface type is a window) is
multiplied by Multiplier. The calculation of shadowing on the
subsurfaces (and the calculation of the interior distribution
of beam solar radiation transmitted by windows and glass
doors) are done for the specified subsurface position and
dimensions.
Multiplier should be used with caution. Multiplier > 1
can give inaccurate or nonsensical results in situations where
the results are sensitive to window or glass door position.
This includes shadowing on the window/glass door, daylighting
from the window/glass door, and interior distribution of solar
radiation from the window/glass door. In these cases, the
results for the single input window/glass door, after
multiplication, may not be representative of the results you
would get if you entered each of the multiple subsurfaces
separately.
If Multiplier > 1, you will get
–a warning if Solar Distribution = FullExterior or
FullInteriorAndExterior (ref: [Building](../input-output-reference/page-006.html#building)
- Field: Solar Distribution), indicating that the shadowing on
the input window or the interior solar radiation distribution
from the input window may not be representative of the actual
group of windows. No warning is issued if Solar Distribution =
MinimalShadowing.
–an error if the window is an exterior
window/glass door in a zone that has a detailed daylighting
calculation (Daylighting:Detailed specified for the zone).
Since a single window with a multiplier can never give the
same daylight illuminance as the actual set of windows, you
are not allowed to use Multiplier in this situation.
Starting Corner
for the surface[LINK]
The rectangular subsurfaces specify the lower left corner
of the surface for their starting coordinate. This corner is
specifed relative to the lower left corner of the base surface
by specifying the X and Z values from that corner.
Field: Starting X
Coordinate[LINK]
This field is the X coordinate (in meters).
Field: Starting Z
Coordinate[LINK]
This field is the Z coordinate (in meters).
Field: Length[LINK]
This field is the length of the door in meters.
Field: Height[LINK]
This field is the height of the door in meters.
GlazedDoor:Interzone[LINK]
The GlazedDoor:Interzone
object is used to place doors on surfaces that can have doors,
including interzone walls, interzone ceiling/floors. These, of
course, can be entered using the simple rectangular objects or
the more detailed vertex entry objects.
This is a unique name associated with the glass door.
Field: Construction
Name[LINK]
This is the name of the subsurface’s construction (ref:
objects: [Construction](../input-output-reference/page-010.html#construction),
[Construction:WindowDataFile](../input-output-reference/page-010.html#constructionwindowdatafile),
[Construction:ComplexFenestrationState](../input-output-reference/page-010.html#constructioncomplexfenestrationstate)).
For windows, if Construction](page-010.html#construction)
Name is not found among the constructions on the input (.idf)
file, the [Window Data File (ref. [Construction:WindowDataFile](../input-output-reference/page-010.html#constructionwindowdatafile)
object) will be searched for that [Construction](../input-output-reference/page-010.html#construction)
Name (see “Importing Windows from WINDOW”). If that file is
not present or if the [Construction](../input-output-reference/page-010.html#construction)
Name does not match the name of an entry on the file, an error
will result. If there is a match, a window construction and
its corresponding glass and gas materials will be created from
the information read from the file.
Field: Building Surface
Name[LINK]
This is the name of a surface that contains this
subsurface. Certain kinds of surfaces may not be allowed to
have subsurfaces. For example, a surface in contact with the
ground (Outside Boundary Condition = Ground) cannot contain a
window. The door assumes the outward facing angle as well as
the tilt angle of the base surface.
Field:
Outside Boundary Condition Object[LINK]
The Outside Boundary Condition Object field is the name of
a glazed (glass) door in an adjacent zone or the name of the
adjacent zone. If the adjacent zone option is used, the
adjacent ceiling is automatically generated in the adjacent
zone. If the surface name is used, it must be in the adjacent
zone.
Field: Multiplier[LINK]
This field is the number of identical items on the base
surface. Using Multiplier can save input effort and
calculation time. In the calculation the area (and area of
frame and divider, if present and surface type is a window) is
multiplied by Multiplier. The calculation of shadowing on the
subsurfaces (and the calculation of the interior distribution
of beam solar radiation transmitted by windows and glass
doors) are done for the specified subsurface position and
dimensions.
Multiplier should be used with caution. Multiplier > 1
can give inaccurate or nonsensical results in situations where
the results are sensitive to window or glass door position.
This includes shadowing on the window/glass door, daylighting
from the window/glass door, and interior distribution of solar
radiation from the window/glass door. In these cases, the
results for the single input window/glass door, after
multiplication, may not be representative of the results you
would get if you entered each of the multiple subsurfaces
separately.
If Multiplier > 1, you will get
–a warning if Solar Distribution = FullExterior or
FullInteriorAndExterior (ref: [Building](../input-output-reference/page-006.html#building)
- Field: Solar Distribution), indicating that the shadowing on
the input window or the interior solar radiation distribution
from the input window may not be representative of the actual
group of windows. No warning is issued if Solar Distribution =
MinimalShadowing.
–an error if the window is an exterior
window/glass door in a zone that has a detailed daylighting
calculation (Daylighting:Detailed specified for the zone).
Since a single window with a multiplier can never give the
same daylight illuminance as the actual set of windows, you
are not allowed to use Multiplier in this situation.
Starting Corner
for the surface[LINK]
The rectangular subsurfaces specify the lower left corner
of the surface for their starting coordinate. This corner is
specifed relative to the lower left corner of the base surface
by specifying the X and Z values from that corner.
Field: Starting X
Coordinate[LINK]
This field is the X coordinate (in meters).
Field: Starting Z
Coordinate[LINK]
This field is the Z coordinate (in meters).
Field: Length[LINK]
This field is the length of the door in meters.
Field: Height[LINK]
This field is the height of the door in meters.
Examples of the rectangular surfaces are found in the
example files 4ZoneWithShading_Simple_1.idf and
4ZoneWithShading_Simple_2. Some examples:
      Wall:Exterior,
        Zn001:Wall001,           !- Name
        EXTERIOR,                !- Construction Name
        ZONE 1,                  !- Zone Name
        180,                     !- Azimuth Angle {deg}
        90,                      !- Tilt Angle {deg}
        0,                       !- Starting X Coordinate {m}
        0,                       !- Starting Y Coordinate {m}
        0,                       !- Starting Z Coordinate {m}
        20,                      !- Length {m}
        10;                      !- Height {m}

      Window,
        Zn001:Wall001:Win001,    !- Name
        SINGLE PANE HW WINDOW,   !- Construction Name
        Zn001:Wall001,           !- Building Surface Name
        ,                        !- Shading Control Name
        ,                        !- Frame and Divider Name
        1,                       !- Multiplier
        4,                       !- Starting X Coordinate {m}
        3,                       !- Starting Z Coordinate {m}
        3,                       !- Length {m}
        5;                       !- Height {m}

      Door,
        Zn001:Wall001:Door001,   !- Name
        HOLLOW WOOD DOOR,        !- Construction Name
        Zn001:Wall001,           !- Building Surface Name
        1,                       !- Multiplier
        14,                      !- Starting X Coordinate {m}
        0,                       !- Starting Z Coordinate {m}
        3,                       !- Length {m}
        5;                       !- Height {m}
      Wall:Adiabatic,
        Zn001:Wall004,           !- Name
        INTERIOR,                !- Construction Name
        ZONE 1,                  !- Zone Name
        90,                      !- Azimuth Angle {deg}
        90,                      !- Tilt Angle {deg}
        20,                      !- Starting X Coordinate {m}
        0,                       !- Starting Y Coordinate {m}
        0,                       !- Starting Z Coordinate {m}
        20,                      !- Length {m}
        10;                      !- Height {m}

      Floor:Adiabatic,
        Zn001:Flr001,            !- Name
        FLOOR,                   !- Construction Name
        ZONE 1,                  !- Zone Name
        90,                      !- Azimuth Angle {deg}
        180,                     !- Tilt Angle {deg}
        0,                       !- Starting X Coordinate {m}
        0,                       !- Starting Y Coordinate {m}
        0,                       !- Starting Z Coordinate {m}
        20,                      !- Length {m}
        20;                      !- Width {m}

      Ceiling:Interzone,
        Zn001:Roof001,           !- Name
        CEILING34,               !- Construction Name
        ZONE 1,                  !- Zone Name
        Zn003:Flr001,            !- Outside Boundary Condition Object
        180,                     !- Azimuth Angle {deg}
        0,                       !- Tilt Angle {deg}
        0,                       !- Starting X Coordinate {m}
        0,                       !- Starting Y Coordinate {m}
        10,                      !- Starting Z Coordinate {m}
        20,                      !- Length {m}
        20;                      !- Width {m}

Window,
  Zn002:Wall001:Win001,    !- Name
  SINGLE PANE HW WINDOW,   !- Construction Name
  Zn002:Wall001,           !- Building Surface Name
  ,                        !- Shading Control Name
  ,                        !- Frame and Divider Name
  1,                       !- Multiplier
  4,                       !- Starting X Coordinate {m}
  3,                       !- Starting Z Coordinate {m}
  3,                       !- Length {m}
  5;                       !- Height {m}
Surface Vertices[LINK]
Each of the following surfaces:
BuildingSurface:Detailed
Wall:Detailed
RoofCeiling:Detailed
Floor:Detailed
FenstrationSurface:Detailed
Shading:Site:Detailed
Shading:Building:Detailed
Shading:Zone:Detailed
use the same vertex input. The numeric parameters indicated
below are taken from the BuildingSurface:Detailed
definition; the others may not be exactly the same but are
identical in configuration. They are also “extensible” – so,
if you want more vertices for these surfaces, you may add to
the IDD definition as indicated in the “extensible” comment
or, as EnergyPlus is “auto-extensible” just add the number of
vertices into your input file.. Note that FenestrationSurface:Detailed
is not extensible and is limited to 4 (max) vertices. If you
leave the Number of Surface Vertex groups blank or enter
autocalculate, EnergyPlus looks at the number
of groups entered and figures out how many coordinate groups
are entered.
Note that the resolution on the surface vertex
input is 1 millimeter (.001 meter). Therefore, using vertices
that are very close together (<1 mm) may result in invalid
dot product and fatal errors during shading
calculations.
The figure above will help illustrate Surface Vertex entry.
The convention used in “GlobalGeometryRules” dictates the
order of the vertices (ref: GlobalGeometryRules). In this
example, the conventions used are Starting Vertex Position =
UpperLeftCorner and Vertex Entry Direction= CounterClockwise.
The surfaces for this single zone are:
4,0,0,H, 0,0,0, A,0,0, A,0,H; ! (4 vertices, South Wall)
4,A,0,H,A,0,0,A,B,0,A,B,H;  ! (4 vertices, East Wall)
     ignore other walls that are not shown in this figure
4,C,0,J,A,0,H,A,B,H,C,B,J; ! (4 vertices, roof)
3,C,0,J,0,0,H,A,0,H; ! (3 vertices, gable end)
4,0,0,H, 0,0,0, A,0,0, A,0,H; ! (4 vertices, South Wall)
Note that in this example, point 1 of the entry is the
Upper Left Corner of the rectangular surfaces and the point of
the triangle for the 3 sided surface. The east wall shows the
order of vertex entry. For horizontal surfaces, any vertex may
be chosen as the starting position, but the Vertex Entry
Direction convention must be followed. The surface details
report (Output: Surfaces:List, Details;) is very useful for
reviewing the accuracy of surface geometry inputs (ref:
Surface Output Variables/Reports and Variable Dictionary
Reports).
From the detailed vertices, EnergyPlus tries to determine
the “height” and “width” of the surface. Obviously, this
doesn’t work well for >4 sided surfaces; for these, if the
calculated height and width are not close to the gross area
for the surface, the height and width shown will be the square
root of the area (and thus a square).
Building Surfaces -
Detailed[LINK]
A building surface is necessary for all calculations. There
must be at least one building surface per zone. You can use
the detailed descriptions as shown below or the simpler,
rectangular surface descriptions shown earlier.
Wall:Detailed[LINK]
The Wall:Detailed
object is used to describe walls.
This is a unique name associated with each building
surface. It is used in several other places as a reference
(e.g. as the base surface name for a Window
or Door).
Field: Construction
Name[LINK]
This is the name of the construction (ref: [Construction](../input-output-reference/page-010.html#construction)
object) used in the surface. Regardless of location in the
building, the “full” construction (all layers) is used. For
example, for an interior wall separating two zones, zone x
would have the outside layer (e.g. drywall) as the material
that shows in zone y and then the layers to the inside layer –
the material that shows in zone x. For symmetric
constructions, the same construction can be used in the
surfaces described in both zones.
Field: Zone Name[LINK]
This is the zone name to which the surface belongs.
Field: Outside
Boundary Condition[LINK]
This value can be one of several things depending on the
actual kind of surface.
Surface – if this surface is an internal
surface, then this is the choice. The value will either be a
surface in the base zone or a surface in another zone. The
heat balance between two zones can be accurately simulated by
specifying a surface in an adjacent zone. EnergyPlus will
simulate a group of zones simultaneously and will include the
heat transfer between zones. However, as this increases the
complexity of the calculations, it is not necessary to specify
the other zone unless the two zones will have a significant
temperature difference. If the two zones will not be very
different (temperature wise), then the surface should use
itself as the outside environment or specify this field as
Adiabatic. The surface name on the “outside”
of this surface (adjacent to) is placed in the next field.
Adiabatic – an internal surface in the
same Zone.
This surface will not transfer heat out of the zone, but will
still store heat in thermal mass. Only the inside face of the
surface will exchange heat with the zone (i.e. two adiabatic
surfaces are required to model internal partitions where both
sides of the surface are exchanging heat with the zone). The
Outside Boundary Condition Object can be left blank.
Zone
– this is similar to Surface but EnergyPlus will automatically
create the required surface in the adjacent zone when this is
entered for the surface. If there are windows or doors on the
surface, EnergyPlus automatically creates appropriate
sub-surfaces as well.
Outdoors – if this surface is exposed to
outside temperature conditions, then this is the choice. See
Sun Exposure and Wind Exposure below for further
specifications on this kind of surface.
Ground – if this surface is exposed to the
ground, then this is the usual choice. The temperature on the
outside of this surface will be the
Site:GroundTemperature:Surface value for the month. For more
information on ground contact surfaces, reference the
Auxiliary Programs document section on “Ground Heat Transfer
in EnergyPlus”.
GroundFCfactorMethod – if this surface is
exposed to the ground and using the Construction:CfactorUndergroundWall,
then this is the choice. The temperature on the outside of
this surface will be the Site:GroundTemperature:FcfactorMethod
value for the month.
OtherSideCoefficients – if this surface
has a custom, user specified temperature or other parameters
(See [SurfaceProperty:OtherSideCoefficients](../input-output-reference/page-012.html#surfacepropertyothersidecoefficients)
specification), then this is the choice. The outside boundary
condition will be the name of the [SurfaceProperty:OtherSideCoefficients](../input-output-reference/page-012.html#surfacepropertyothersidecoefficients)
specification.
OtherSideConditionsModel – if this surface
has a specially-modeled multi-skin component, such as a
transpired collector or vented photovoltaic panel, attached to
the outside (See [SurfaceProperty:OtherSideConditionsModel](../input-output-reference/page-012.html#surfacepropertyothersideconditionsmodel)
specification), then this the choice. The outside face
environment will be the name of the
SurfaceProperty:OtherSideConditionsModelspecification.
GroundSlabPreprocessorAverage – uses the
average results from the Slab preprocessor calculations.
GroundSlabPreprocessorCore – uses the core
results from the Slab preprocessor calculations.
GroundSlabPreprocessorPerimeter – uses the
perimeter results from the Slab preprocessor calculations.
GroundBasementPreprocessorAverageWall –
uses the average wall results from the Basement preprocessor
calculations.
GroundBasementPreprocessorAverageFloor –
uses the average floor results from the Basement preprocessor
calculations.
GroundBasementPreprocessorUpperWall – uses
the upper wall results from the Basement preprocessor
calculations.
GroundBasementPreprocessorLowerWall – uses
the lower wall results from the Basement preprocessor
calculations.
Field:
Outside Boundary Condition Object[LINK]
If neither Surface, OtherSideCoefficients, or
OtherSideConditionsModel are specified for the Outside
Boundary Condition (previous field), then this field should be
left blank.
As stated above, if the Outside Boundary Condition is
“Surface”, then this field’s value must be the surface name
whose inside face temperature will be forced on the outside
face of the base surface. This permits heat exchange between
adjacent zones (interzone heat transfer) when multiple zones
are simulated, but can also be used to simulate middle zone
behavior without modeling the adjacent zones. This is done by
specifying a surface within the zone. For example, a middle
floor zone can be modeled by making the floor the Outside
Boundary Condition Object for the ceiling, and the ceiling the
Outside Boundary Condition Object for the floor.
If the Outside Boundary Condition is Zone,
then this field should contain the zone name of the adjacent
zone for the surface.
Note: Zones with interzone heat transfer are not adiabatic
and the internal surfaces contribute to gains or losses.
Adiabatic surfaces are modeled by specifying the base surface
itself in this field. Also, for interzone heat transfer, both
surfaces must be represented – for example, if you want
interzone heat transfer to an attic space, the ceiling in the
lower zone must have a surface object with the outside face
environment as the floor in the attic and, likewise, there
must be a floor surface object in the attic that references
the ceiling surface name in the lower zone.
Equally, if the Outside Boundary Condition is
“OtherSideCoefficients”, then this field’s value must be the
[SurfaceProperty:OtherSideCoefficients](../input-output-reference/page-012.html#surfacepropertyothersidecoefficients)
name. Or if the Outside Boundary Condition is
“OtherSideConditionsModel” then this field’s value must be the
[SurfaceProperty:OtherSideConditionsModel](../input-output-reference/page-012.html#surfacepropertyothersideconditionsmodel)
name.
Field: Sun Exposure[LINK]
If the surface is exposed to the sun, then “SunExposed”
should be entered in this field. Otherwise, “NoSun” should be
entered.
Note, a cantilevered floor could have “Outdoors” but
“NoSun” exposure.
Field: Wind Exposure[LINK]
If the surface is exposed to the Wind, then “WindExposed”
should be entered in this field. Otherwise, “NoWind” should be
entered.
Note: When a surface is specified with “NoWind”, this has
several implications. Within the heat balance code, this
surface will default to using the simple ASHRAE exterior
convection coefficient correlation with a zero wind speed. In
addition, since the ASHRAE simple method does not have a
separate value for equivalent long wavelength radiation to the
sky and ground, using “NoWind” also eliminates long wavelength
radiant exchange from the exterior of the surface to both the
sky and the ground. Thus, only simple convection takes place
at the exterior face of a surface specified with “NoWind”.
Field: View Factor to
Ground[LINK]
The fraction of the ground plane (assumed horizontal) that
is visible from a heat-transfer surface. It is used to
calculate the diffuse solar radiation from the ground that is
incident on the surface.
For example, if there are no obstructions, a vertical
surface sees half of the ground plane and so View Factor to
Ground = 0.5. A horizontal downward-facing surface sees the
entire ground plane, so View Factor to Ground = 1.0. A
horizontal upward-facing surface (horizontal roof) does not
see the ground at all, so View Factor to Ground = 0.0.
Unused if reflections option in Solar Distribution field in
[Building](../input-output-reference/page-006.html#building)
object input unless a [DaylightingDevice:Shelf](../input-output-reference/page-016.html#daylightingdeviceshelf)
or [DaylightingDevice:Tubular](../input-output-reference/page-016.html#daylightingdevicetubular)
has been specified.
If you do not use the reflections option in the Solar
Distribution field in your [Building](../input-output-reference/page-006.html#building)
object input, you are responsible for entering the View Factor
to Ground for each heat-transfer surface. Typical values for a
surface that is not shadowed are obtained by the simple
equation:
View Factor to Ground = (1-cos(SurfTilt))/2
For example, this gives 0.5 for a wall of tilt 90°. If the
tilt of the wall changes, then the View Factor to Ground must
also change.
If you enter autocalculate in this field,
EnergyPlus will automatically calculate the view factor to
ground based on the tilt of the surface.
If you do use the reflections option in the Solar
Distribution field in your [Building](../input-output-reference/page-006.html#building)
object input, you do not have to enter View
Factor to Ground values. In this case the program will
automatically calculate the value to use for each exterior
surface taking into account solar shadowing (including
shadowing of the ground by the building) and reflections from
obstructions (ref: [Building](../input-output-reference/page-006.html#building),
Field: Solar Distribution).
However, if you do use the reflections option AND you are
modeling a
DaylightingDevice:Shelf](page-016.html#daylightingdeviceshelf)
or [DaylightingDevice:Tubular](../input-output-reference/page-016.html#daylightingdevicetubular),
then you still need to enter some values of View Factor to
Ground. For [DaylightingDevice:Shelf](../input-output-reference/page-016.html#daylightingdeviceshelf)
you need to enter View Factor to Ground for the window
associated with the shelf. And for [DaylightingDevice:Tubular](../input-output-reference/page-016.html#daylightingdevicetubular)
you need to enter the View Factor to Ground for the
[FenestrationSurface:Detailed corresponding to the dome of the
tubular device.
Note 1: The corresponding view factor to the sky for
diffuse solar radiation is not a user input; it is calculated
within EnergyPlus based on surface orientation, sky solar
radiance distribution, and shadowing surfaces.
Note 2: The view factors to the sky and ground for thermal
infrared (long-wave) radiation are not user inputs; they are
calculated within EnergyPlus based on surface tilt and
shadowing surfaces. Shadowing surfaces are considered to have
the same emissivity and temperature as the ground, so they are
lumped together with the ground in calculating the ground IR
view factor.
Field: Number of
Vertices[LINK]
This field specifies the number of sides in the surface
(number of X,Y,Z vertex groups). For further information, see
the discussion on “Surface Vertices” above.
RoofCeiling:Detailed[LINK]
The RoofCeiling:Detailed
object is used to describe walls.
This is a unique name associated with each building
surface. It is used in several other places as a reference
(e.g. as the base surface name for a Window
or Door).
Field: Construction
Name[LINK]
This is the name of the construction (ref: [Construction](../input-output-reference/page-010.html#construction)
object) used in the surface. Regardless of location in the
building, the “full” construction (all layers) is used. For
example, for an interior wall separating two zones, zone x
would have the outside layer (e.g. drywall) as the material
that shows in zone y and then the layers to the inside layer –
the material that shows in zone x. For symmetric
constructions, the same construction can be used in the
surfaces described in both zones.
Field: Zone Name[LINK]
This is the zone name to which the surface belongs.
Field: Outside
Boundary Condition[LINK]
This value can be one of several things depending on the
actual kind of surface.
- Surface – if this surface is an internal
surface, then this is the choice. The value will either be a
surface in the base zone or a surface in another zone. The
heat balance between two zones can be accurately simulated by
specifying a surface in an adjacent zone. EnergyPlus will
simulate a group of zones simultaneously and will include the
heat transfer between zones. However, as this increases the
complexity of the calculations, it is not necessary to specify
the other zone unless the two zones will have a significant
temperature difference. If the two zones will not be very
different (temperature wise), then the surface should use
itself as the outside environment or specify this field as
Adiabatic. The surface name on the “outside”
of this surface (adjacent to) is placed in the next
field.
- Adiabatic – an internal surface in the
same Zone. This surface will not transfer heat out of the
zone, but will still store heat in thermal mass. Only the
inside face of the surface will exchange heat with the zone
(i.e. two adiabatic surfaces are required to model internal
partitions where both sides of the surface are exchanging heat
with the zone). The Outside Boundary Condition Object can be
left blank.
- Zone – this is similar to Surface but
EnergyPlus will automatically create the required surface in
the adjacent zone when this is entered for the surface. If
there are windows or doors on the surface, EnergyPlus
automatically creates appropriate sub-surfaces as well.
- Outdoors – if this surface is exposed to
outside temperature conditions, then this is the choice. See
Sun Exposure and Wind Exposure below for further
specifications on this kind of surface.
- Ground – if this surface is exposed to
the ground, then this is the choice. The temperature on the
outside of this surface will be the Ground Temperature.
- OtherSideCoefficients – if this surface
has a custom, user specified temperature or other parameters
(See SurfaceProperty:OtherSideCoefficients
specification), then this is the choice. The outside boundary
condition will be the name of the SurfaceProperty:OtherSideCoefficients
specification.
- OtherSideConditionsModel – if this
surface has a specially-modeled multi-skin component, such as
a transpired collector or vented photovoltaic panel, attached
to the outside (See SurfaceProperty:OtherSideConditionsModel
specification), then this the choice. The outside face
environment will be the name of the
SurfaceProperty:OtherSideConditionsModelspecification.
- GroundSlabPreprocessorAverage – uses the
average results from the Slab preprocessor calculations.
- GroundSlabPreprocessorCore – uses the
core results from the Slab preprocessor calculations.
- GroundSlabPreprocessorPerimeter – uses
the perimeter results from the Slab preprocessor
calculations.
- GroundBasementPreprocessorAverageWall –
uses the average wall results from the Basement preprocessor
calculations.
- GroundBasementPreprocessorAverageFloor –
uses the average floor results from the Basement preprocessor
calculations.
- GroundBasementPreprocessorUpperWall –
uses the upper wall results from the Basement preprocessor
calculations.
- GroundBasementPreprocessorLowerWall –
uses the lower wall results from the Basement preprocessor
calculations.
Field:
Outside Boundary Condition Object[LINK]
If neither Surface, OtherSideCoefficients, or
OtherSideConditionsModel are specified for the Outside
Boundary Condition (previous field), then this field should be
left blank.
As stated above, if the Outside Boundary Condition is
“Surface”, then this field’s value must be the surface name
whose inside face temperature will be forced on the outside
face of the base surface. This permits heat exchange between
adjacent zones (interzone heat transfer) when multiple zones
are simulated, but can also be used to simulate middle zone
behavior without modeling the adjacent zones. This is done by
specifying a surface within the zone. For example, a middle
floor zone can be modeled by making the floor the Outside
Boundary Condition Object for the ceiling, and the ceiling the
Outside Boundary Condition Object for the floor.
If the Outside Boundary Condition is Zone,
then this field should contain the zone name of the adjacent
zone for the surface.
Note: Zones with interzone heat transfer are not adiabatic
and the internal surfaces contribute to gains or losses.
Adiabatic surfaces are modeled by specifying the base surface
itself in this field. Also, for interzone heat transfer, both
surfaces must be represented – for example, if you want
interzone heat transfer to an attic space, the ceiling in the
lower zone must have a surface object with the outside face
environment as the floor in the attic and, likewise, there
must be a floor surface object in the attic that references
the ceiling surface name in the lower zone.
Equally, if the Outside Boundary Condition is
“OtherSideCoefficients”, then this field’s value must be the
[SurfaceProperty:OtherSideCoefficients](../input-output-reference/page-012.html#surfacepropertyothersidecoefficients)
name. Or if the Outside Boundary Condition is
“OtherSideConditionsModel” then this field’s value must be the
[SurfaceProperty:OtherSideConditionsModel](../input-output-reference/page-012.html#surfacepropertyothersideconditionsmodel)
name.
Field: Sun Exposure[LINK]
If the surface is exposed to the sun, then “SunExposed”
should be entered in this field. Otherwise, “NoSun” should be
entered.
Note, a cantilevered floor could have “Outdoors” but
“NoSun” exposure.
Field: Wind Exposure[LINK]
If the surface is exposed to the Wind, then “WindExposed”
should be entered in this field. Otherwise, “NoWind” should be
entered.
Note: When a surface is specified with “NoWind”, this has
several implications. Within the heat balance code, this
surface will default to using the simple ASHRAE exterior
convection coefficient correlation with a zero wind speed. In
addition, since the ASHRAE simple method does not have a
separate value for equivalent long wavelength radiation to the
sky and ground, using “NoWind” also eliminates long wavelength
radiant exchange from the exterior of the surface to both the
sky and the ground. Thus, only simple convection takes place
at the exterior face of a surface specified with “NoWind”.
Field: View Factor to
Ground[LINK]
The fraction of the ground plane (assumed horizontal) that
is visible from a heat-transfer surface. It is used to
calculate the diffuse solar radiation from the ground that is
incident on the surface.
For example, if there are no obstructions, a vertical
surface sees half of the ground plane and so View Factor to
Ground = 0.5. A horizontal downward-facing surface sees the
entire ground plane, so View Factor to Ground = 1.0. A
horizontal upward-facing surface (horizontal roof) does not
see the ground at all, so View Factor to Ground = 0.0.
Unused if reflections option in Solar Distribution field in
[Building](../input-output-reference/page-006.html#building)
object input unless a [DaylightingDevice:Shelf](../input-output-reference/page-016.html#daylightingdeviceshelf)
or [DaylightingDevice:Tubular](../input-output-reference/page-016.html#daylightingdevicetubular)
has been specified.
If you do not use the reflections option in the Solar
Distribution field in your [Building](../input-output-reference/page-006.html#building)
object input, you are responsible for entering the View Factor
to Ground for each heat-transfer surface. Typical values for a
surface that is not shadowed are obtained by the simple
equation:
View Factor to Ground = (1-cos(SurfTilt))/2
For example, this gives 0.5 for a wall of tilt 90°. If the
tilt of the wall changes, then the View Factor to Ground must
also change.
If you enter autocalculate in this field,
EnergyPlus will automatically calculate the view factor to
ground based on the tilt of the surface.
If you do use the reflections option in the Solar
Distribution field in your [Building](../input-output-reference/page-006.html#building)
object input, you do not have to enter View
Factor to Ground values. In this case the program will
automatically calculate the value to use for each exterior
surface taking into account solar shadowing (including
shadowing of the ground by the building) and reflections from
obstructions (ref: [Building](../input-output-reference/page-006.html#building),
Field: Solar Distribution).
However, if you do use the reflections option AND you are
modeling a
DaylightingDevice:Shelf](page-016.html#daylightingdeviceshelf)
or [DaylightingDevice:Tubular](../input-output-reference/page-016.html#daylightingdevicetubular),
then you still need to enter some values of View Factor to
Ground. For [DaylightingDevice:Shelf](../input-output-reference/page-016.html#daylightingdeviceshelf)
you need to enter View Factor to Ground for the window
associated with the shelf. And for [DaylightingDevice:Tubular](../input-output-reference/page-016.html#daylightingdevicetubular)
you need to enter the View Factor to Ground for the
[FenestrationSurface:Detailed corresponding to the dome of the
tubular device.
Note 1: The corresponding view factor to the sky for
diffuse solar radiation is not a user input; it is calculated
within EnergyPlus based on surface orientation, sky solar
radiance distribution, and shadowing surfaces.
Note 2: The view factors to the sky and ground for thermal
infrared (long-wave) radiation are not user inputs; they are
calculated within EnergyPlus based on surface tilt and
shadowing surfaces. Shadowing surfaces are considered to have
the same emissivity and temperature as the ground, so they are
lumped together with the ground in calculating the ground IR
view factor.
Field: Number of
Vertices[LINK]
This field specifies the number of sides in the surface
(number of X,Y,Z vertex groups). For further information, see
the discussion on “Surface Vertices” above.
Floor:Detailed[LINK]
The Floor:Detailed
object is used to describe walls.
This is a unique name associated with each building
surface. It is used in several other places as a reference
(e.g. as the base surface name for a Window
or Door).
Field: Construction
Name[LINK]
This is the name of the construction (ref: [Construction](../input-output-reference/page-010.html#construction)
object) used in the surface. Regardless of location in the
building, the “full” construction (all layers) is used. For
example, for an interior wall separating two zones, zone x
would have the outside layer (e.g. drywall) as the material
that shows in zone y and then the layers to the inside layer –
the material that shows in zone x. For symmetric
constructions, the same construction can be used in the
surfaces described in both zones.
Field: Zone Name[LINK]
This is the zone name to which the surface belongs.
Field: Outside
Boundary Condition[LINK]
This value can be one of several things depending on the
actual kind of surface.
- Surface – if this surface is an internal
surface, then this is the choice. The value will either be a
surface in the base zone or a surface in another zone. The
heat balance between two zones can be accurately simulated by
specifying a surface in an adjacent zone. EnergyPlus will
simulate a group of zones simultaneously and will include the
heat transfer between zones. However, as this increases the
complexity of the calculations, it is not necessary to specify
the other zone unless the two zones will have a significant
temperature difference. If the two zones will not be very
different (temperature wise), then the surface should use
itself as the outside environment or specify this field as
Adiabatic. The surface name on the “outside”
of this surface (adjacent to) is placed in the next
field.
- Adiabatic – an internal surface in the
same Zone. This surface will not transfer heat out of the
zone, but will still store heat in thermal mass. Only the
inside face of the surface will exchange heat with the zone
(i.e. two adiabatic surfaces are required to model internal
partitions where both sides of the surface are exchanging heat
with the zone). The Outside Boundary Condition Object can be
left blank.
- Zone – this is similar to Surface but
EnergyPlus will automatically create the required surface in
the adjacent zone when this is entered for the surface. If
there are windows or doors on the surface, EnergyPlus
automatically creates appropriate sub-surfaces as well.
- Outdoors – if this surface is exposed to
outside temperature conditions, then this is the choice. See
Sun Exposure and Wind Exposure below for further
specifications on this kind of surface.
- Ground – if this surface is exposed to
the ground, then this is the usual choice. The temperature on
the outside of this surface will be the
Site:GroundTemperature:Surface value for the month. For more
information on ground contact surfaces, reference the
Auxiliary Programs document section on “Ground Heat Transfer
in EnergyPlus”.
- GroundFCfactorMethod – if this surface is
exposed to the ground and using the
Construction:FfactorGroundFloor, then this is
the choice. The temperature on the outside of this surface
will be the Site:GroundTemperature:FcfactorMethod value for
the month.
- OtherSideCoefficients – if this surface
has a custom, user specified temperature or other parameters
(See SurfaceProperty:OtherSideCoefficients
specification), then this is the choice. The outside boundary
condition will be the name of the SurfaceProperty:OtherSideCoefficients
specification.
- OtherSideConditionsModel – if this
surface has a specially-modeled multi-skin component, such as
a transpired collector or vented photovoltaic panel, attached
to the outside (See SurfaceProperty:OtherSideConditionsModel
specification), then this the choice. The outside face
environment will be the name of the
SurfaceProperty:OtherSideConditionsModelspecification.
- GroundSlabPreprocessorAverage – uses the
average results from the Slab preprocessor calculations.
- GroundSlabPreprocessorCore – uses the
core results from the Slab preprocessor calculations.
- GroundSlabPreprocessorPerimeter – uses
the perimeter results from the Slab preprocessor
calculations.
- GroundBasementPreprocessorAverageWall –
uses the average wall results from the Basement preprocessor
calculations.
- GroundBasementPreprocessorAverageFloor –
uses the average floor results from the Basement preprocessor
calculations.
- GroundBasementPreprocessorUpperWall –
uses the upper wall results from the Basement preprocessor
calculations.
- GroundBasementPreprocessorLowerWall –
uses the lower wall results from the Basement preprocessor
calculations.
Field:
Outside Boundary Condition Object[LINK]
If neither Surface, OtherSideCoefficients, or
OtherSideConditionsModel are specified for the Outside
Boundary Condition (previous field), then this field should be
left blank.
As stated above, if the Outside Boundary Condition is
“Surface”, then this field’s value must be the surface name
whose inside face temperature will be forced on the outside
face of the base surface. This permits heat exchange between
adjacent zones (interzone heat transfer) when multiple zones
are simulated, but can also be used to simulate middle zone
behavior without modeling the adjacent zones. This is done by
specifying a surface within the zone. For example, a middle
floor zone can be modeled by making the floor the Outside
Boundary Condition Object for the ceiling, and the ceiling the
Outside Boundary Condition Object for the floor.
If the Outside Boundary Condition is Zone,
then this field should contain the zone name of the adjacent
zone for the surface.
Note: Zones with interzone heat transfer are not adiabatic
and the internal surfaces contribute to gains or losses.
Adiabatic surfaces are modeled by specifying the base surface
itself in this field. Also, for interzone heat transfer, both
surfaces must be represented – for example, if you want
interzone heat transfer to an attic space, the ceiling in the
lower zone must have a surface object with the outside face
environment as the floor in the attic and, likewise, there
must be a floor surface object in the attic that references
the ceiling surface name in the lower zone.
Equally, if the Outside Boundary Condition is
“OtherSideCoefficients”, then this field’s value must be the
[SurfaceProperty:OtherSideCoefficients](../input-output-reference/page-012.html#surfacepropertyothersidecoefficients)
name. Or if the Outside Boundary Condition is
“OtherSideConditionsModel” then this field’s value must be the
[SurfaceProperty:OtherSideConditionsModel](../input-output-reference/page-012.html#surfacepropertyothersideconditionsmodel)
name.
Field: Sun Exposure[LINK]
If the surface is exposed to the sun, then “SunExposed”
should be entered in this field. Otherwise, “NoSun” should be
entered.
Note, a cantilevered floor could have “Outdoors” but
“NoSun” exposure.
Field: Wind Exposure[LINK]
If the surface is exposed to the Wind, then “WindExposed”
should be entered in this field. Otherwise, “NoWind” should be
entered.
Note: When a surface is specified with “NoWind”, this has
several implications. Within the heat balance code, this
surface will default to using the simple ASHRAE exterior
convection coefficient correlation with a zero wind speed. In
addition, since the ASHRAE simple method does not have a
separate value for equivalent long wavelength radiation to the
sky and ground, using “NoWind” also eliminates long wavelength
radiant exchange from the exterior of the surface to both the
sky and the ground. Thus, only simple convection takes place
at the exterior face of a surface specified with “NoWind”.
Field: View Factor to
Ground[LINK]
The fraction of the ground plane (assumed horizontal) that
is visible from a heat-transfer surface. It is used to
calculate the diffuse solar radiation from the ground that is
incident on the surface.
For example, if there are no obstructions, a vertical
surface sees half of the ground plane and so View Factor to
Ground = 0.5. A horizontal downward-facing surface sees the
entire ground plane, so View Factor to Ground = 1.0. A
horizontal upward-facing surface (horizontal roof) does not
see the ground at all, so View Factor to Ground = 0.0.
Unused if reflections option in Solar Distribution field in
[Building](../input-output-reference/page-006.html#building)
object input unless a [DaylightingDevice:Shelf](../input-output-reference/page-016.html#daylightingdeviceshelf)
or [DaylightingDevice:Tubular](../input-output-reference/page-016.html#daylightingdevicetubular)
has been specified.
If you do not use the reflections option in the Solar
Distribution field in your [Building](../input-output-reference/page-006.html#building)
object input, you are responsible for entering the View Factor
to Ground for each heat-transfer surface. Typical values for a
surface that is not shadowed are obtained by the simple
equation:
View Factor to Ground = (1-cos(SurfTilt))/2
For example, this gives 0.5 for a wall of tilt 90°. If the
tilt of the wall changes, then the View Factor to Ground must
also change.
If you enter autocalculate in this field,
EnergyPlus will automatically calculate the view factor to
ground based on the tilt of the surface.
If you do use the reflections option in the Solar
Distribution field in your [Building](../input-output-reference/page-006.html#building)
object input, you do not have to enter View
Factor to Ground values. In this case the program will
automatically calculate the value to use for each exterior
surface taking into account solar shadowing (including
shadowing of the ground by the building) and reflections from
obstructions (ref: [Building](../input-output-reference/page-006.html#building),
Field: Solar Distribution).
However, if you do use the reflections option AND you are
modeling a
DaylightingDevice:Shelf](page-016.html#daylightingdeviceshelf)
or [DaylightingDevice:Tubular](../input-output-reference/page-016.html#daylightingdevicetubular),
then you still need to enter some values of View Factor to
Ground. For [DaylightingDevice:Shelf](../input-output-reference/page-016.html#daylightingdeviceshelf)
you need to enter View Factor to Ground for the window
associated with the shelf. And for [DaylightingDevice:Tubular](../input-output-reference/page-016.html#daylightingdevicetubular)
you need to enter the View Factor to Ground for the
[FenestrationSurface:Detailed corresponding to the dome of the
tubular device.
Note 1: The corresponding view factor to the sky for
diffuse solar radiation is not a user input; it is calculated
within EnergyPlus based on surface orientation, sky solar
radiance distribution, and shadowing surfaces.
Note 2: The view factors to the sky and ground for thermal
infrared (long-wave) radiation are not user inputs; they are
calculated within EnergyPlus based on surface tilt and
shadowing surfaces. Shadowing surfaces are considered to have
the same emissivity and temperature as the ground, so they are
lumped together with the ground in calculating the ground IR
view factor.
Field: Number of
Vertices[LINK]
This field specifies the number of sides in the surface
(number of X,Y,Z vertex groups). For further information, see
the discussion on “Surface Vertices” above.
Some examples of using these objects:
    Floor:Detailed,
        Floor_NorthZone_1stFloor,!- Name
        FLOOR-SLAB-ASSEMBLY,     !- Construction Name
        NorthZone_1stFloor,      !- Zone Name
        Ground,                  !- Outside Boundary Condition
        ,                        !- Outside Boundary Condition Object
        NoSun,                   !- Sun Exposure
        NoWind,                  !- Wind Exposure
        0.0,                     !- View Factor to Ground
        4,                       !- Number of Vertices
        0, 11, 0,                           !- X,Y,Z  1 {m}
        25, 11, 0,                          !- X,Y,Z  2 {m}
        25, 5.5, 0,                         !- X,Y,Z  3 {m}
        0, 5.5, 0;                          !- X,Y,Z  4 {m}

    RoofCeiling:Detailed,
        Ceiling_SouthZone_1stFloor,  !- Name
        CEILING-FLOOR-ASSEMBLY,  !- Construction Name
        SouthZone_1stFloor,      !- Zone Name
        Surface,                 !- Outside Boundary Condition
        Floor_SouthZone_2ndFloor,!- Outside Boundary Condition Object
        NoSun,                   !- Sun Exposure
        NoWind,                  !- Wind Exposure
        0.0,                     !- View Factor to Ground
        4,                       !- Number of Vertices
        0, 0, 3.4,                          !- X,Y,Z  1 {m}
        25, 0, 3.4,                         !- X,Y,Z  2 {m}
        25, 5.5, 3.4,                       !- X,Y,Z  3 {m}
        0, 5.5, 3.4;                        !- X,Y,Z  4 {m}

    Wall:Detailed,
        InteriorWall_SouthZone_1stFloor,  !- Name
        INTERIOR-WALL-ASSEMBLY,  !- Construction Name
        SouthZone_1stFloor,      !- Zone Name
        Surface,                 !- Outside Boundary Condition
        InteriorWall_NorthZone_1stFloor,  !- Outside Boundary Condition Object
        NoSun,                   !- Sun Exposure
        NoWind,                  !- Wind Exposure
        0,                       !- View Factor to Ground
        4,                       !- Number of Vertices
        25, 5.5, 3.7,                       !- X,Y,Z  1 {m}
        25, 5.5, 0,                         !- X,Y,Z  2 {m}
        0, 5.5, 0,                          !- X,Y,Z  3 {m}
        0, 5.5, 3.7;                        !- X,Y,Z  4 {m}
BuildingSurface:Detailed[LINK]
The BuildingSurface:Detailed
object can more generally describe each of the surfaces.
This is a unique name associated with each building
surface. It is used in several other places as a reference
(e.g. as the base surface name for a Window
or Door).
Field: Surface Type[LINK]
Used primarily for convenience, the surface type can be one
of the choices illustrated above – Wall, Floor, Ceiling, Roof.
Azimuth (facing) and Tilt are determined from the vertex
coordinates. Note that “normal” floors will be tilted 180°
whereas flat roofs/ceilings will be tilted 0°. EnergyPlus uses
this field’s designation, along with the calculated tilt of
the surface, to issue warning messages when tilts are “out of
range”. Calculations in EnergyPlus use the actual calculated
tilt values for the actual heat balance calculations. Note,
however, that a floor tilted 0° is really facing “into” the
zone and is not what you will desire for the calculations even
though the coordinate may appear correct in the viewed DXF
display.
“Normal” tilt for walls is 90° – here you may use the
calculated Azimuth to make sure your walls are facing away
from the zone’s interior.
Field: Construction
Name[LINK]
This is the name of the construction (ref: [Construction](../input-output-reference/page-010.html#construction)
object) used in the surface. Regardless of location in the
building, the “full” construction (all layers) is used. For
example, for an interior wall separating two zones, zone x
would have the outside layer (e.g. drywall) as the material
that shows in zone y and then the layers to the inside layer –
the material that shows in zone x. For symmetric
constructions, the same construction can be used in the
surfaces described in both zones.
Field: Zone Name[LINK]
This is the zone name to which the surface belongs.
Field: Outside
Boundary Condition[LINK]
This value can be one of several things depending on the
actual kind of surface.
- Surface – if this surface is an internal
surface, then this is the choice. The value will either be a
surface in the base zone or a surface in another zone. The
heat balance between two zones can be accurately simulated by
specifying a surface in an adjacent zone. EnergyPlus will
simulate a group of zones simultaneously and will include the
heat transfer between zones. However, as this increases the
complexity of the calculations, it is not necessary to specify
the other zone unless the two zones will have a significant
temperature difference. If the two zones will not be very
different (temperature wise), then the surface should use
itself as the outside environment or specify this field as
Adiabatic. In either case, the surface name
on the “outside” of this surface (adjacent to) is placed in
the next field.
- Adiabatic – an internal surface in the
same Zone. This surface will not transfer heat out of the
zone, but will still store heat in thermal mass. Only the
inside face of the surface will exchange heat with the zone
(i.e. two adiabatic surfaces are required to model internal
partitions where both sides of the surface are exchanging heat
with the zone). The Outside Boundary Condition Object can be
left blank.
- Zone – this is similar to Surface but
EnergyPlus will automatically create the required surface in
the adjacent zone when this is entered for the surface. If
there are windows or doors on the surface, EnergyPlus
automatically creates appropriate sub-surfaces as well.
- Outdoors – if this surface is exposed to
outside temperature conditions, then this is the choice. See
Sun Exposure and Wind Exposure below for further
specifications on this kind of surface.
- Ground – if this surface is exposed to
the ground, then this is the usual choice. The temperature on
the outside of this surface will be the
Site:GroundTemperature:Surface value for the month. For more
information on ground contact surfaces, reference the
Auxiliary Programs document section on “Ground Heat Transfer
in EnergyPlus”.
- GroundFCfactorMethod – if this surface is
exposed to the ground and using the
Construction:CfactorUndergroundWall or
Construction:FfactorGroundFloor (depending on
surface type), then this is the choice. The temperature on the
outside of this surface will be the
Site:GroundTemperature:FcfactorMethod value for the
month.
- OtherSideCoefficients – if this surface
has a custom, user specified temperature or other parameters
(See SurfaceProperty:OtherSideCoefficients
specification), then this is the choice. The outside boundary
condition will be the name of the SurfaceProperty:OtherSideCoefficients
specification.
- OtherSideConditionsModel – if this
surface has a specially-modeled multi-skin component, such as
a transpired collector or vented photovoltaic panel, attached
to the outside (See SurfaceProperty:OtherSideConditionsModel
specification), then this the choice. The outside face
environment will be the name of the
SurfaceProperty:OtherSideConditionsModelspecification.
- GroundSlabPreprocessorAverage – uses the
average results from the Slab preprocessor calculations.
- GroundSlabPreprocessorCore – uses the
core results from the Slab preprocessor calculations.
- GroundSlabPreprocessorPerimeter – uses
the perimeter results from the Slab preprocessor
calculations.
- GroundBasementPreprocessorAverageWall –
uses the average wall results from the Basement preprocessor
calculations.
- GroundBasementPreprocessorAverageFloor –
uses the average floor results from the Basement preprocessor
calculations.
- GroundBasementPreprocessorUpperWall –
uses the upper wall results from the Basement preprocessor
calculations.
- GroundBasementPreprocessorLowerWall –
uses the lower wall results from the Basement preprocessor
calculations.
Field:
Outside Boundary Condition Object[LINK]
If neither Surface, OtherSideCoefficients, or
OtherSideConditionsModel are specified for the Outside
Boundary Condition (previous field), then this field should be
left blank.
As stated above, if the Outside Boundary Condition is
“Surface”, then this field’s value must be the surface name
whose inside face temperature will be forced on the outside
face of the base surface. This permits heat exchange between
adjacent zones (interzone heat transfer) when multiple zones
are simulated, but can also be used to simulate middle zone
behavior without modeling the adjacent zones. This is done by
specifying a surface within the zone. For example, a middle
floor zone can be modeled by making the floor the Outside
Boundary Condition Object for the ceiling, and the ceiling the
Outside Boundary Condition Object for the floor.
If the Outside Boundary Condition is Zone,
then this field should contain the zone name of the adjacent
zone for the surface.
Note: Zones with interzone heat transfer are not adiabatic
and the internal surfaces contribute to gains or losses.
Adiabatic surfaces are modeled by specifying the base surface
itself in this field. Also, for interzone heat transfer, both
surfaces must be represented – for example, if you want
interzone heat transfer to an attic space, the ceiling in the
lower zone must have a surface object with the outside face
environment as the floor in the attic and, likewise, there
must be a floor surface object in the attic that references
the ceiling surface name in the lower zone.
Equally, if the Outside Boundary Condition is
“OtherSideCoefficients”, then this field’s value must be the
[SurfaceProperty:OtherSideCoefficients](../input-output-reference/page-012.html#surfacepropertyothersidecoefficients)
name. Or if the Outside Boundary Condition is
“OtherSideConditionsModel” then this field’s value must be the
[SurfaceProperty:OtherSideConditionsModel](../input-output-reference/page-012.html#surfacepropertyothersideconditionsmodel)
name.
Field: Sun Exposure[LINK]
If the surface is exposed to the sun, then “SunExposed”
should be entered in this field. Otherwise, “NoSun” should be
entered.
Note, a cantilevered floor could have “Outdoors” but
“NoSun” exposure.
Field: Wind Exposure[LINK]
If the surface is exposed to the Wind, then “WindExposed”
should be entered in this field. Otherwise, “NoWind” should be
entered.
Note: When a surface is specified with “NoWind”, this has
several implications. Within the heat balance code, this
surface will default to using the simple ASHRAE exterior
convection coefficient correlation with a zero wind speed. In
addition, since the ASHRAE simple method does not have a
separate value for equivalent long wavelength radiation to the
sky and ground, using “NoWind” also eliminates long wavelength
radiant exchange from the exterior of the surface to both the
sky and the ground. Thus, only simple convection takes place
at the exterior face of a surface specified with “NoWind”.
Field: View Factor to
Ground[LINK]
The fraction of the ground plane (assumed horizontal) that
is visible from a heat-transfer surface. It is used to
calculate the diffuse solar radiation from the ground that is
incident on the surface.
For example, if there are no obstructions, a vertical
surface sees half of the ground plane and so View Factor to
Ground = 0.5. A horizontal downward-facing surface sees the
entire ground plane, so View Factor to Ground = 1.0. A
horizontal upward-facing surface (horizontal roof) does not
see the ground at all, so View Factor to Ground = 0.0.
Unused if reflections option in Solar Distribution field in
[Building](../input-output-reference/page-006.html#building)
object input unless a [DaylightingDevice:Shelf](../input-output-reference/page-016.html#daylightingdeviceshelf)
or [DaylightingDevice:Tubular](../input-output-reference/page-016.html#daylightingdevicetubular)
has been specified.
If you do not use the reflections option in the Solar
Distribution field in your [Building](../input-output-reference/page-006.html#building)
object input, you are responsible for entering the View Factor
to Ground for each heat-transfer surface. Typical values for a
surface that is not shadowed are obtained by the simple
equation:
View Factor to Ground = (1-cos(SurfTilt))/2
For example, this gives 0.5 for a wall of tilt 90°. If the
tilt of the wall changes, then the View Factor to Ground must
also change.
If you enter autocalculate in this field,
EnergyPlus will automatically calculate the view factor to
ground based on the tilt of the surface.
If you do use the reflections option in the Solar
Distribution field in your [Building](../input-output-reference/page-006.html#building)
object input, you do not have to enter View
Factor to Ground values. In this case the program will
automatically calculate the value to use for each exterior
surface taking into account solar shadowing (including
shadowing of the ground by the building) and reflections from
obstructions (ref: [Building](../input-output-reference/page-006.html#building),
Field: Solar Distribution).
However, if you do use the reflections option AND you are
modeling a
DaylightingDevice:Shelf](page-016.html#daylightingdeviceshelf)
or [DaylightingDevice:Tubular](../input-output-reference/page-016.html#daylightingdevicetubular),
then you still need to enter some values of View Factor to
Ground. For [DaylightingDevice:Shelf](../input-output-reference/page-016.html#daylightingdeviceshelf)
you need to enter View Factor to Ground for the window
associated with the shelf. And for [DaylightingDevice:Tubular](../input-output-reference/page-016.html#daylightingdevicetubular)
you need to enter the View Factor to Ground for the
[FenestrationSurface:Detailed corresponding to the dome of the
tubular device.
Note 1: The corresponding view factor to the sky for
diffuse solar radiation is not a user input; it is calculated
within EnergyPlus based on surface orientation, sky solar
radiance distribution, and shadowing surfaces.
Note 2: The view factors to the sky and ground for thermal
infrared (long-wave) radiation are not user inputs; they are
calculated within EnergyPlus based on surface tilt and
shadowing surfaces. Shadowing surfaces are considered to have
the same emissivity and temperature as the ground, so they are
lumped together with the ground in calculating the ground IR
view factor.
Field: Number of
Vertices[LINK]
This field specifies the number of sides in the surface
(number of X,Y,Z vertex groups). For further information, see
the discussion on “Surface Vertices” above.
IDF example of three walls (first is an exterior wall,
second and third are interzone partitions):
    BuildingSurface:Detailed,Zn001:Wall001,  !- Base Surface Name
      Wall,EXTERIOR,  !- Class and Construction Name
      ZONE 1 @ 200 601 0 T,  !- Zone
      Outdoors,,  !- Outside Boundary Condition  and Target (if applicable)
       SunExposed,  !- Solar Exposure
       WindExposed,  !- Wind Exposure
      0.5000000    ,  !- VF to Ground
               4, !-Rectangle
      0.0000000E+00,  0.0000000E+00,   3.048000    ,
      0.0000000E+00,  0.0000000E+00,  0.0000000E+00,
       6.096000    ,  0.0000000E+00,  0.0000000E+00,
       6.096000    ,  0.0000000E+00,   3.048000    ;

    BuildingSurface:Detailed,Zn001:Wall006,  !- Base Surface Name
      Wall,INTERIOR,  !- Class and Construction Name
      HEARTLAND AREA,  !- Zone
      Surface,Zn004:Wall005,  !- Outside Boundary Conditions and Target (if applicable)
       NoSun,  !- Solar Exposure
       NoWind,  !- Wind Exposure
      0.5000000    ,  !- VF to Ground
               4, !-Rectangle
       38.01000    ,   28.25000    ,   10.00000    ,
       38.01000    ,   28.25000    ,  0.0000000E+00,
       38.01000    ,   18.25000    ,  0.0000000E+00,
       38.01000    ,   18.25000    ,   10.00000    ;

    BuildingSurface:Detailed,Zn001:Wall007,  !- Base Surface Name
      Wall,INTERIOR,  !- Class and Construction Name
      HEARTLAND AREA,  !- Zone
      Surface,Zn003:Wall006,  !- Outside Boundary Conditions and Target (if applicable)
       NoSun,  !- Solar Exposure
       NoWind,  !- Wind Exposure
      0.5000000    ,  !- VF to Ground
               4, !-Rectangle
       58.01000    ,   18.25000    ,   10.00000    ,
       58.01000    ,   18.25000    ,  0.0000000E+00,
       58.01000    ,   28.25000    ,  0.0000000E+00,
       58.01000    ,   28.25000    ,   10.00000    ;
FenestrationSurface:Detailed[LINK]
This surface class is used for subsurfaces, which can be of
five different types: Windows, Doors, GlassDoors,
TubularDaylightDomes, and TubularDaylightDiffusers. A
subsurface (such as a window) of a base surface (such as a
wall) inherits several of the properties (such as Outside
Boundary Condition, Sun Exposure, etc.) of the base surface.
Windows, GlassDoors, TubularDaylightDomes, and
TubularDaylightDiffusers are considered to have one or more
glass layers and so transmit solar radiation. Doors are
considered to be opaque.
This is a unique name associated with the heat transfer
subsurface. It may be used in other places as a reference
(e.g. as the opposing subsurface of an interzone window or
door).
Field: Surface Type[LINK]
The choices for Surface Type are Window,
Door,
GlassDoor, TubularDaylightDome, and TubularDaylightDiffuser.
Doors are assumed to be opaque (do not transmit solar
radiation) whereas the other surface types do transmit solar
radiation. Windows and Glass Doors are treated identically in
the calculation of conduction heat transfer, solar gain,
daylighting, etc. A Window
or GlassDoor, but not a Door,
can have a movable interior, exterior or between-glass shading
device, such as blinds (ref:
WindowMaterial:Blind](page-010.html#windowmaterialblind)
object), and can have a frame and/or a divider (ref: [WindowProperty:FrameAndDivider](../input-output-reference/page-011.html#windowpropertyframeanddivider)
object). TubularDaylightDomes and TubularDaylightDomes are
specialized subsurfaces for use with the
[DaylightingDevice:Tubular](../input-output-reference/page-016.html#daylightingdevicetubular)
object to simulate Tubular Daylighting Devices (TDDs).
TubularDaylightDomes and TubularDaylightDomes cannot have
shades, screens or blinds. In the following, the term “window”
applies to [Window, GlassDoor, TubularDaylightDome, and
TubularDaylightDome, if not otherwise explicitly
mentioned.
As noted in the description of the BuildingSurface:Detailed,
Azimuth (facing angle) and Tilt are calculated from the
entered vertices. Tilts of subsurfaces will normally be the
same as their base surface. If these are significantly beyond
the “normals” for the base surface, warning messages may be
issued. If the facing angles are not correct, you may have a
window pointing “into” the zone rather than out of it – this
would cause problems in the calculations. Note, too, that a
“reveal” (inset or outset) may occur if the plane of the
subsurface is not coincident with the base surface; the reveal
has an effect on shading of the subsurface.
Field: Construction
Name[LINK]
This is the name of the subsurface’s construction (ref:
Construction](page-010.html#construction) object [for Door] and
[Construction](../input-output-reference/page-010.html#construction),
[Construction:ComplexFenestrationState](../input-output-reference/page-010.html#constructioncomplexfenestrationstate),
[Construction:WindowDataFile](../input-output-reference/page-010.html#constructionwindowdatafile)
objects [for [Window and GlassDoor]).
For windows, if Construction](page-010.html#construction)
Name is not found among the constructions on the input (.idf)
file, the [Window Data File (ref. [Construction:WindowDataFile](../input-output-reference/page-010.html#constructionwindowdatafile)
object) will be searched for that [Construction](../input-output-reference/page-010.html#construction)
Name (see “Importing Windows from WINDOW”). If that file is
not present or if the [Construction](../input-output-reference/page-010.html#construction)
Name does not match the name of an entry on the file, an error
will result. If there is a match, a window construction and
its corresponding glass and gas materials will be created from
the information read from the file.
Field: Building Surface
Name[LINK]
This is the name of a surface that contains this
subsurface. Certain kinds of surfaces may not be allowed to
have subsurfaces. For example, a surface in contact with the
ground (Outside Boundary Condition = Ground) cannot contain a
window.
Field:
Outside Boundary Condition Object[LINK]
If the base surface has Outside Boundary Condition =
Surface or OtherSideCoefficients, then this field must also be
specified for the subsurface. Otherwise, it can be left
blank.
If the base surface has Outside Boundary Condition = Zone,
then this surface retains that characteristic and uses the
same zone of the base surface. It can be entered here for
clarity or it can be left blank.
If Outside Boundary Condition for the base surface is
Surface, this field should specify the subsurface in the
opposing zone that is the counterpart to this subsurface. The
constructions of the subsurface and opposing subsurface must
match, except that, for multi-layer constructions, the layer
order of the opposing subsurface’s construction must be the
reverse of that of the subsurface.
If Outside Boundary Condition for the base surface is
OtherSideCoefficients, this field could specify the set of [SurfaceProperty:OtherSideCoefficients](../input-output-reference/page-012.html#surfacepropertyothersidecoefficients)
for this subsurface. If this is left blank, then the Other
Side Coefficients of the base surface will be used for this
subsurface. Windows and GlassDoors are not allowed to have
Other Side Coefficients.
Field: View Factor to
Ground[LINK]
The fraction of the ground plane (assumed horizontal) that
is visible from a heat-transfer surface. It is used to
calculate the diffuse solar radiation from the ground that is
incident on the surface.
For example, if there are no obstructions, a vertical
surface sees half of the ground plane and so View Factor to
Ground = 0.5. A horizontal downward-facing surface sees the
entire ground plane, so View Factor to Ground = 1.0. A
horizontal upward-facing surface (horizontal roof) does not
see the ground at all, so View Factor to Ground = 0.0.
Unused if reflections option in Solar Distribution field in
[Building](../input-output-reference/page-006.html#building)
object input unless a Daylighting Device:Shelf or Daylighting
Device:Tubular has been specified.
If you do not use the reflections option in the Solar
Distribution field in your [Building](../input-output-reference/page-006.html#building)
object input, you are responsible for entering the View Factor
to Ground for each heat-transfer surface. Typical values for a
surface that is not shadowed are obtained by the simple
equation:
View Factor to Ground = (1-cos(SurfTilt))/2
For example, this gives 0.5 for a wall of tilt 90°. If the
tilt of the wall changes, then the View Factor to Ground must
also change.
If you enter autocalculate in this field,
EnergyPlus will automatically calculate the view factor to
ground based on the tilt of the surface.
If you do use the reflections option in the Solar
Distribution field in your BUILDING object input, you
do not have to enter View Factor to Ground
values. In this case the program will automatically calculate
the value to use for each exterior surface taking into account
solar shadowing (including shadowing of the ground by the
building) and reflections from obstructions (ref: [Building](../input-output-reference/page-006.html#building),
Field: Solar Distribution).
However, if you do use the reflections option AND you are
modeling a
DaylightingDevice:Shelf](page-016.html#daylightingdeviceshelf)
or [DaylightingDevice:Tubular](../input-output-reference/page-016.html#daylightingdevicetubular),
then you still need to enter some values of View Factor to
Ground. For [DaylightingDevice:Shelf](../input-output-reference/page-016.html#daylightingdeviceshelf)
you need to enter View Factor to Ground for the window
associated with the shelf. And for [DaylightingDevice:Tubular](../input-output-reference/page-016.html#daylightingdevicetubular)
you need to enter the View Factor to Ground for the
[FenestrationSurface:Detailed corresponding to the dome of the
tubular device (ref: [DaylightingDevice:Tubular](../input-output-reference/page-016.html#daylightingdevicetubular)).
Note 1: The corresponding view factor to the sky for
diffuse solar radiation is not a user input; it is calculated
within EnergyPlus based on surface orientation, sky solar
radiance distribution, and shadowing surfaces.
Note 2: The view factors to the sky and ground for thermal
infrared (long-wave) radiation are not user inputs; they are
calculated within EnergyPlus based on surface tilt and
shadowing surfaces. Shadowing surfaces are considered to have
the same emissivity and temperature as the ground, so they are
lumped together with the ground in calculating the ground
infrared view factor.
Field: Shading Control
Name[LINK]
This field, if not blank, is the name of the window shading
control (ref: WindowProperty:ShadingControl
object) for this subsurface. It is used for Surface Type = Window
and GlassDoor. To assign a shade to a window or glass door,
see WindowMaterial: Shade. To assign a screen, see
WindowMaterial:Screen](page-010.html#windowmaterialscreen). To
assign a blind, see [WindowMaterial:Blind](../input-output-reference/page-010.html#windowmaterialblind).
To assign switchable glazing, such as electrochromic glazing,
see [WindowProperty:ShadingControl.
Field: Frame and
Divider Name[LINK]
This field, if not blank, can be used to specify window
frame, divider and reveal-surface data (ref: WindowProperty:FrameAndDivider
object). It is used only for exterior GlassDoors and
rectangular exterior Windows, i.e., those with
OutsideFaceEnvironment = Outdoors.
This field should be blank for triangular windows.
Field: Multiplier[LINK]
Used only for Surface Type = Window,
Door
or Glass Door.
It is the number of identical items on the base surface. Using
Multiplier can save input effort and calculation time. In the
calculation the area (and area of frame and divider, if
present and surface type is a window) is multiplied by
Multiplier. The calculation of shadowing on the subsurfaces
(and the calculation of the interior distribution of beam
solar radiation transmitted by windows and glass doors) are
done for the specified subsurface position and dimensions.
Multiplier should be used with caution. Multiplier > 1
can give inaccurate or nonsensical results in situations where
the results are sensitive to window or glass door position.
This includes shadowing on the window/glass door, daylighting
from the window/glass door, and interior distribution of solar
radiation from the window/glass door. In these cases, the
results for the single input window/glass door, after
multiplication, may not be representative of the results you
would get if you entered each of the multiple subsurfaces
separately.
If Multiplier > 1, you will get
–a warning if Solar Distribution = FullExterior or
FullInteriorAndExterior (ref: [Building](../input-output-reference/page-006.html#building)
- Field: Solar Distribution), indicating that the shadowing on
the input window or the interior solar radiation distribution
from the input window may not be representative of the actual
group of windows. No warning is issued if Solar Distribution =
MinimalShadowing.
–an error if the window is an exterior
window/glass door in a zone that has a detailed daylighting
calculation (Daylighting:Detailed specified for the zone).
Since a single window with a multiplier can never give the
same daylight illuminance as the actual set of windows, you
are not allowed to use Multiplier in this situation.
Field: Number of
Vertices[LINK]
The number of sides the surface has (number of X,Y,Z vertex
groups). For further information, see the discussion on
“Surface Vertices” above. Door
and GlassDoor subsurfaces are rectangular and therefore have
four vertices. Window
subsurfaces can be rectangular or triangular and therefore
have four or three vertices, respectively.
Fields: Vertex
Coordinates[LINK]
This is a total of twelve fields giving the x,y,z
coordinate values of the four vertices of rectangular
subsurfaces [m], or a total of nine fields giving the x,y,z
coordinate values of the three vertices of triangular
windows.
For triangular windows the first vertex listed can be any
of the three vertices, but the order of the vertices should be
counter-clockwise if VertexEntry is CounterClockWise and
clockwise if VertexEntry is ClockWise (ref:
GlobalGeometryRules).
An IDF example of a rectangular subsurface (Window):
FenestrationSurface:Detailed,
 Zn001:Wall001:Win001,  !- SubSurface Name
  Window,SINGLE PANE HW WINDOW,  !- Class and Construction Name
  Zn001:Wall001,,         !- Base Surface Name and Target (if applicable)
  0.5000000    ,          !- VF to Ground
  WINDOW-CONTROL-DRAPES,  !- Window Shading Control
  TestFrameAndDivider,    !- Frame/Divider name  5,                      !- Multiplier
  4,                      !- Rectangle (number of sides)
   1.524000    ,  0.1520000    ,   2.743000    ,
   1.524000    ,  0.1520000    ,  0.3050000    ,
   4.572000    ,  0.1520000    ,  0.3050000    ,
   4.572000    ,  0.1520000    ,   2.743000    ;
Window Modeling Options[LINK]
The following table shows what input objects/fields to use
to model different window options. It also gives the name of
an example input, if available, that demonstrates the
option.
Window
Modeling Options
Option
Object/Field or Output Variable
Input File (distributed with install)
Build up a window from layers
WindowMaterial:Glazing,
[WindowMaterial:Gas](../input-output-reference/page-010.html#windowmaterialgas),
[WindowMaterial:Shade](../input-output-reference/page-010.html#windowmaterialshade),
[WindowMaterial:Screen](../input-output-reference/page-010.html#windowmaterialscreen),
[WindowMaterial:Blind](../input-output-reference/page-010.html#windowmaterialblind),
Construction
WindowTests.idf
Add an overhang
Shading:Zone:Detailed
5ZoneAirCooled.idf
Add a shading device
WindowMaterial:Shade,
[WindowMaterial:Screen](../input-output-reference/page-010.html#windowmaterialscreen)
or [WindowMaterial:Blind](../input-output-reference/page-010.html#windowmaterialblind);
WindowProperty:ShadingControl
WindowTests.idf, PurchAirWindowBlind.idf
Control a shading device
WindowProperty:ShadingControl
PurchAirWindowBlind.idf
Determine when a shading device is on in a particular
timestep
Print the variable “Surface Shading Device Is On Time
Fraction”
PurchAirWindowBlind.idf
Control the slat angle of a blind
WindowProperty:ShadingControl
PurchAirWindowBlind.idf
Add a frame
WindowProperty:FrameAndDivider
PurchAirWithDaylighting.idf
Add a divider
WindowProperty:FrameAndDivider
PurchAirWithDaylighting.idf
Allow window to daylight a zone
Daylighting:Controls,
Daylighting:DELight:Controls
PurchAirWithDaylighting.idf,
DElight-Detailed-Comparison.idf
Find solar reflected onto window from
neighboring buildings
Building/SolarDistribution field – uses
“WithReflections”
ReflectiveAdjacentBuilding.idf
Model switchable glazing (e.g.,
electrochromic glass)
WindowProperty:ShadingControl
PurchAirWithDaylighting.idf
Add an interior window
Define two FenestrationSurface:Detailed’s, one for each
associated interior wall
PurchAirWithDoubleFacadeDaylighting.idf
Track how beam solar falls on interior
surfaces
Building/Solar Distribution = FullInteriorAndExterior
PurchAirWithDoubleFacadeDaylighting.idf
Track beam solar transmitted through
interior windows
Building/Solar Distribution = FullInteriorAndExterior
PurchAirWithDoubleFacadeDaylighting.idf
Add a shading device on an interior
window
Not allowed
Model an airflow window (aka, heat extract
window)
WindowProperty:AirflowControl
AirflowWindowsAndBetweenGlassBlinds.idf
Add a storm window glass layer
WindowProperty:StormWindow
StormWindow.idf
Add natural ventilation through an open window
Ventilation or AirflowNetwork objects
(AirflowNetwork:Multizone:Surface, [AirflowNetwork:MultiZone:Component:DetailedOpening](../input-output-reference/page-029.html#airflownetworkmultizonecomponentdetailedopening),
etc.)
AirflowNetwork3zvent.idf
Add diffusing glass
WindowMaterial:Glazing/Solar Diffusing = Yes
Add dirt on window
WindowMaterial:Glazing/Dirt Correction Factor for Solar and
Visible Transmittance
Import window (and frame/divider if present) from
WINDOW program
See “Importing Windows from WINDOW program”
Find daylighting through interior
windows
See “Double Facades: Daylighting through Interior
Windows”
PurchAirWithDoubleFacadeDaylighting.idf
Determine when condensation occurs
Print the variables “Surface Window
Inside Face Glazing Condensation Status,” “Surface Window
Inside Face Frame Condensation Status,” “Surface Window
Inside Face Divider Condensation Status”
Any surface that would logically be described as an
interior wall, floor or ceiling can just as easily be
described as Internal Mass. Internal Mass surface types only
exchange energy with the zone in which they are described;
they do not see any other zones. There are two approaches to
using internal mass. The first approach is to have several
pieces of internal mass with each piece having a different
construction type. The other approach is to choose an average
construction type and combine all of the interior surfaces
into a single internal mass. Similar to internal surfaces with
an adiabatic boundary condtion, the zone will only exchange
energy with the inside of the Internal Mass construction. If
both sides of the surface exchange energy with the zone then
the user should input twice the area when defining the
Internal Mass object. Note that furniture and other large
objects within a zone can be described using internal mass.
However, simplifying calculations using internal mass must be
used with caution when the “FullInteriorAndExterior” or
“FullInteriorAndExteriorWithReflections” Solar Distribution
model (see [Building](../input-output-reference/page-006.html#building)
parameters) is chosen.
When zoning an office building, five west-facing offices
have been combined into one zone. All of the offices have
interior walls made of the same materials. As shown in the
figure below, this zone may be described with 5 exterior walls
and 11 internal walls or 1 exterior wall and 1 internal mass.
Note that fewer surfaces will speed up the EnergyPlus
calculations.
A five-story building has the same ceiling/floor
construction separating each of the levels. Zones that are on
floors 2 through 4 may be described using a single piece of
internal mass to represent both the floor and ceiling. The
construction for this internal mass would be identical to the
ceiling/floor construction that would be used to describe
separate surfaces and the area of the internal mass surface
would be the total surface area of the combined
ceilings/floors (i.e. twice the total floor area).
This is a unique character string associated with the
internal mass surface. Though it must be unique from other
surface names, it is used primarily for convenience with
internal mass surfaces.
Field: Construction
Name[LINK]
This is the name of the construction (ref: [Construction](../input-output-reference/page-010.html#construction)
object) used in the surface.
Field: Zone Name[LINK]
This is the name of the zone in which the internal mass is
represented.
Field: Surface Area[LINK]
This field is the surface area of the internal mass. The
area that is specified must be the entire surface area that is
exposed to the zone. If both sides of a wall are completely
within the same zone, then the area of both sides must be
included when describing that internal wall.
IDF examples of Internal Mass surfaces:
InternalMass,Zn002:IntM001,  !- Surface Name
  INTERIOR,  !- Construction Name
  DORM ROOMS AND COMMON AREAS,  !- Zone
   408.7734    ;  !- Total area exposed to Zone {m2}
InternalMass,Zn002:IntM002,  !- Surface Name
  PARTITION02,  !- Construction Name
  DORM ROOMS AND COMMON AREAS,  !- Zone
   371.6122    ;  !- Total area exposed to Zone {m2}
Surface Output
Variables/Reports[LINK]
Note that Surface Outputs from specialized algorithms (such
as Effective Moisture Penetration Depth (EMPD), Combined Heat
and Moisture Transport (HAMT) and Conduction Finite Difference
(CondFD) are discussed under the objects that describe the
specialized inputs for these algorithms). You can access them
via these links:
- Moisture Penetration Depth (EMPD) Outputs
- Conduction Finite Difference (CondFD) Outputs
- Heat and Moisture (HAMT) Outputs
Additionally, the output variables applicable to all heat
transfer surfaces:
Zone,Sum,Surface Inside Face Heat Balance Calculation Iteration Count []
Zone,Average,Surface Inside Face Temperature [C]
Zone,Average,Surface Outside Face Temperature [C]
Zone,Average,Surface Inside Face Adjacent Air Temperature [C]
Zone,Average,Surface Inside Face Convection Heat Transfer Coefficient [W/m2-K]
Zone,Average,Surface Inside Face Convection Heat Gain Rate [W]
Zone,Average,Surface Inside Face Convection Heat Gain Rate per Area [W/m2]
Zone,Sum,Surface Inside Face Convection Heat Gain Energy [J]
Zone,Average,Surface Inside Face Net Surface Thermal Radiation Heat Gain Rate [W]
Zone,Average,Surface Inside Face Net Surface Thermal Radiation Heat Gain Rate per Area [W/m2]
Zone,Sum,Surface Inside Face Net Surface Thermal Radiation Heat Gain Energy [J]
Zone,Average,Surface Inside Face Solar Radiation Heat Gain Rate [W]
Zone,Average,Surface Inside Face Solar Radiation Heat Gain Rate per Area [W/m2]
Zone,Sum,Surface Inside Face Solar Radiation Heat Gain Energy [J]
Zone,Average,Surface Inside Face Lights Radiation Heat Gain Rate [W]
Zone,Average,Surface Inside Face Lights Radiation Heat Gain Rate per Area [W/m2]
Zone,Sum,Surface Inside Face Lights Radiation Heat Gain Energy [J]
Zone,Average,Surface Inside Face Internal Gains Radiation Heat Gain Rate [W]
Zone,Average,Surface Inside Face Internal Gains Radiation Heat Gain Rate per Area [W/m2]
Zone,Sum,Surface Inside Face Internal Gains Radiation Heat Gain Energy [J]
Zone,Average,Surface Inside Face System Radiation Heat Gain Rate [W]
Zone,Average,Surface Inside Face System Radiation Heat Gain Rate per Area [W/m2]
Zone,Sum,Surface Inside Face System Radiation Heat Gain Energy [J]
Zone,Average,Surface Outside Face Convection Heat Transfer Coefficient [W/m2-K]
Zone,Average,Surface Outside Face Convection Heat Gain Rate [W]
Zone,Average,Surface Outside Face Convection Heat Gain Rate per Area [W/m2]
Zone,Sum,Surface Outside Face Convection Heat Gain Energy [J]
Zone,Average,Surface Outside Face Net Thermal Radiation Heat Gain Rate [W]
Zone,Average,Surface Outside Face Net Thermal Radiation Heat Gain Rate per Area [W/m2]
Zone,Sum,Surface Outside Face Net Thermal Radiation Heat Gain Energy [J]
Zone,Average,Surface Outside Face Thermal Radiation to Air Heat Transfer Coefficient [W/m2-K]
Zone,Average,Surface Outside Face Thermal Radiation to Sky Heat Transfer Coefficient [W/m2-K]
Zone,Average,Surface Outside Face Thermal Radiation to Ground Heat Transfer Coefficient [W/m2-K]
Zone,Average,Surface Inside Face Exterior Windows Incident Beam Solar Radiation Rate [W]
Zone,Sum,Surface Inside Face Exterior Windows Incident Beam Solar Radiation Energy [J]
Zone,Average,Surface Inside Face Exterior Windows Incident Beam Solar Radiation Rate per Area[W/m2]
Zone,Average,Surface Inside Face Interior Windows Incident Beam Solar Radiation Rate [W]
Zone,Average,Surface Inside Face Interior Windows Incident Beam Solar Radiation Rate per Area[W/m2]
Zone, Sum,Surface Inside Face Interior Windows Incident Beam Solar Radiation Energy [J]
Zone,Average,Surface Inside Face Initial Transmitted Diffuse Absorbed Solar Radiation Rate [W]
Zone,Average,Surface Inside Face Initial Transmitted Diffuse Transmitted Out Window Solar Radiation Rate [W]
Zone,Average,Surface Inside Face Absorbed Shortwave Radiation Rate [W]
Output variables applicable to all exterior heat transfer
surfaces:
Zone,Average,Surface Outside Face Outdoor Air Drybulb Temperature [C]
Zone,Average,Surface Outside Face Outdoor Air Wetbulb Temperature [C]
Zone,Average,Surface Outside Face Outdoor Air Wind Speed [m/s]
Zone,Average,Surface Outside Face Sunlit Area [m2]
Zone,Average,Surface Outside Face Sunlit Fraction []
Zone,Average,Surface Outside Face Incident Solar Radiation Rate per Area[W/m2]
Zone,Average,Surface Outside Face Solar Radiation Heat Gain Rate [W]
Zone,Average,Surface Outside Face Solar Radiation Heat Gain Rate per Area [W/m2]
Zone,Sum,Surface Outside Face Solar Radiation Heat Gain Energy [J]

Zone,Average,Surface Outside Face Incident Beam Solar Radiation Rate per Area[W/m2]
Zone,Average,Surface Outside Face Incident Sky Diffuse Solar Radiation Rate per Area[W/m2]
Zone,Average,Surface Outside Face Incident Ground Diffuse Solar Radiation Rate per Area[W/m2]
Zone,Average,Surface Ext Diff Sol From Bm-To-Diff Refl From Ground[W/m2]
Zone,Average,Surface Outside Face Incident Sky Diffuse Ground Reflected Solar Radiation Rate per Area[W/m2]
Zone,Average,Surface Outside Face Incident Sky Diffuse Surface Reflected Solar Radiation Rate per Area[W/m2]
Zone,Average,Surface Outside Face Incident Beam To Beam Surface Reflected Solar Radiation Rate per Area[W/m2]
Zone,Average,Surface Outside Face Incident Beam To Diffuse Surface Reflected Solar Radiation Rate per Area[W/m2]
Zone,Average,Surface Outside Face Beam Solar Incident Angle Cosine Value[]
Zone,Average,Surface Anisotropic Sky Multiplier []
Zone,Average,Surface Window BSDF Beam Direction Number []
Zone,Average,Surface Window BSDF Beam Theta Angle [rad]
Zone,Average,Surface Window BSDF Beam Phi Angle [rad]
Output variables applicable to opaque heat transfer
surfaces (FLOOR, WALL, ROOF, DOOR). Note – these are advanced
variables – you must read the descriptions and understand
before use – then you must use the Diagnostics object to allow
reporting.
Zone,Average,Surface Inside Face Solar Radiation Heat Gain Rate [W]
Zone,Average,Surface Inside Face Solar Radiation Heat Gain Rate per Area [W/m2]
Zone,Sum,Surface Inside Face Solar Radiation Heat Gain Energy [J]
Zone,Average,Surface Inside Face Lights Radiation Heat Gain Rate [W]
Zone,Average,Surface Inside Face Lights Radiation Heat Gain Rate per Area [W/m2]
Zone,Sum,Surface Inside Face Lights Radiation Heat Gain Energy [J]
Zone,Average,Surface Inside Face Conduction Heat Transfer Rate [W]
Zone,Average,Surface Inside Face Conduction Heat Gain Rate [W]
Zone,Average,Surface Inside Face Conduction Heat Loss Rate [W]
Zone,Average,Surface Inside Face Conduction Heat Transfer Rate per Area [W/m2]
Zone,Sum,Surface Inside Face Conduction Heat Transfer Energy [J]
Zone,Average,Surface Outside Face Conduction Heat Transfer Rate [W]
Zone,Average,Surface Outside Face Conduction Heat Gain Rate [W]
Zone,Average,Surface Outside Face Conduction Heat Loss Rate [W]
Zone,Average,Surface Outside Face Conduction Heat Transfer Rate per Area [W/m2]
Zone,Sum,Surface Outside Face Conduction Heat Transfer Energy [J]
Zone,Average,Surface Average Face Conduction Heat Transfer Rate [W]
Zone,Average,Surface Average Face Conduction Heat Gain Rate [W]
Zone,Average,Surface Average Face Conduction Heat Loss Rate [W]
Zone,Average,Surface Average Face Conduction Heat Transfer Rate per Area [W/m2]
Zone,Sum,Surface Average Face Conduction Heat Transfer Energy [J]
Zone,Average,Surface Heat Storage Rate [W]
Zone,Average,Surface Heat Storage Gain Rate [W]
Zone,Average,Surface Heat Storage Loss Rate [W]
Zone,Average,Surface Heat Storage Rate per Area [W/m2]
Zone,Sum,Surface Heat Storage Energy [J]
Zone,Average,Surface Internal Source Location Temperature [C]
Zone,Average,Zone Opaque Surface Inside Face Conduction [W]
Zone,Average,Zone Opaque Surface Inside Faces Total Conduction Heat Gain Rate [W]
Zone,Average,Zone Opaque Surface Inside Faces Total Conduction Heat Loss Rate [W]
Zone,Sum,Zone Opaque Surface Inside Faces Total Conduction Heat Gain Energy [J]
Zone,Sum,Zone Opaque Surface Inside Faces Total Conduction Heat Loss Energy [J]
Zone,Average,Zone Opaque Surface Outside Face Conduction [W]
Zone,Average,Zone Opaque Surface Outside Face Conduction Gain[W]
Zone,Average,Zone Opaque Surface Outside Face Conduction Loss[W]
Zone,Average, Surface Inside Face Beam Solar Radiation Heat Gain Rate [W]
Window Output Variables[LINK]
Output variables applicable only to exterior windows and
glass doors:
    Zone,Average,Zone Windows Total Transmitted Solar Radiation Rate [W]
    Zone,Sum,Zone Transmitted Solar Energy [J]
    Zone,Average,Zone Windows Total Heat Gain Rate [W]
    Zone,Sum,Zone Windows Total Heat Gain Energy [J]
    Zone,Average,Zone Windows Total Heat Loss Rate [W]
    Zone,Sum,Zone Windows Total Heat Loss Energy [J]
    Zone,Average,Zone Exterior Windows Total Transmitted Beam Solar Radiation Rate [W]
    Zone,Sum,Zone Exterior Windows Total Transmitted Beam Solar Radiation Energy [J]
    Zone,Average,Zone Interior Windows Total Transmitted Beam Solar Radiation Rate [W]
    Zone,Sum,Zone Interior Windows Total Transmitted Beam Solar Radiation Energy [J]
    Zone,Average,Zone Exterior Windows Total Transmitted Diffuse Solar Radiation Rate [W]
    Zone,Sum,Zone Exterior Windows Total Transmitted Diffuse Solar Radiation Energy [J]
    Zone,Average,Zone Interior Windows Total Transmitted Diffuse Solar Radiation Rate [W]
    Zone,Average,Surface Window Total Glazing Layers Absorbed Solar Radiation Rate [W]
    Zone,Average,Surface Window Total Glazing Layers Absorbed Shortwave Radiation Rate [W]
    Zone,Sum,Surface Window Total Glazing Layers Absorbed Solar Radiation Energy [J]
    Zone,Average,Surface Window Shading Device Absorbed Solar Radiation Rate [W]
    Zone,Sum,Surface Window Shading Device Absorbed Solar Radiation Energy [J]
    Zone,Average, Surface Window Transmitted Solar Radiation Rate [W]
    Zone,Sum,Surface Window Transmitted Solar Radiation Energy [J]
    Zone,Average,Surface Window Transmitted Beam Solar Radiation Rate [W]
    Zone,Average,Surface Window Transmitted Beam To Beam Solar Radiation Rate [W]
    Zone,Average,Surface Window Transmitted Beam To Diffuse Solar Radiation Rate [W]
    Zone,Sum,Surface Window Transmitted Beam Solar Radiation Energy [J]
    Zone,Sum,Surface Window Transmitted Beam To Beam Solar Radiation Energy [J]
    Zone,Sum,Surface Window Transmitted Beam To Diffuse Solar Radiation Energy [J]
    Zone,Average,Surface Window Transmitted Diffuse Solar Radiation Rate [W]
    Zone,Sum,Surface Window Transmitted Diffuse Solar Radiation Energy [J]
    Zone,Average,Surface Window System Solar Transmittance []
    Zone,Average,Surface Window System Solar Absorptance []
    Zone,Average,Surface Window System Solar Reflectance []
    Zone,Average,Surface Window Gap Convective Heat Transfer Rate [W]
    Zone,Sum,Surface Window Gap Convective Heat Transfer Energy [J]
    Zone,Average,Surface Window Heat Gain Rate [W]
    Zone,Sum,Surface Window Heat Gain Energy [J]
    Zone,Average,Surface Window Heat Loss Rate [W]
    Zone,Sum,Surface Window Heat Loss Energy [J]
    Zone,Average,Surface Window Glazing Beam to Beam Solar Transmittance[]
    Zone,Average,Surface Window Glazing Beam to Diffuse Solar Transmittance []
    Zone,Average,Surface Window Glazing Diffuse to Diffuse Solar Transmittance[]
    Zone,Average,Surface Window Model Solver Iteration Count []
    Zone,Average,Surface Window Solar Horizontal Profile Angle[deg]
    Zone,Average,Surface Window Solar Vertical Profile Angle[deg]
    Zone,Average,Surface Window Outside Reveal Reflected Beam Solar Radiation Rate [W]
    Zone,Sum,Surface Window Outside Reveal Reflected Beam Solar Radiation Energy
    Zone,Average,Surface Window Inside Reveal Reflected Beam Solar Radiation Rate [W]
    Zone,Sum,Surface Window Inside Reveal Reflected Beam Solar Radiation Energy [J]
    Zone,Average,Surface Window Inside Reveal Absorbed Beam Solar Radiation Rate [W]

    Zone,Average,Surface Window Inside Face Glazing Condensation Status []
    Zone,Average,Surface Window Inside Face Frame Condensation Status []
    Zone,Average,Surface Window Inside Face Divider Condensation Status []
    Zone,Average,Surface Shading Device Is On Time Fraction[]
    Zone,Average,Surface Window Blind Slat Angle [deg]
    Zone,Average,Surface Window Blind Beam to Beam Solar Transmittance[]
    Zone,Average,Surface Window Blind Beam to Diffuse Solar Transmittance[]
    Zone,Average,Surface Window Blind Diffuse to Diffuse Solar Transmittance[]
    Zone,Average,Surface Window Blind and Glazing System Beam Solar Transmittance[]
    Zone,Average,Surface Window Blind and Glazing System Diffuse Solar Transmittance[]
    Zone,Average,Surface Window Screen Beam to Beam Solar Transmittance []
    Zone,Average,Surface Window Screen Beam to Diffuse Solar Transmittance []
    Zone,Average,Surface Window Screen Diffuse to Diffuse Solar Transmittance []
    Zone,Average,Surface Window Screen and Glazing System Beam Solar Transmittance []
    Zone,Average,Surface Window Screen and Glazing System Diffuse Solar Transmittance []
    Zone,State,Surface Storm Window On Off Status []
    Zone,Average,Surface Window Inside Face Frame and Divider Zone Heat Gain Rate [W]
    Zone,Average,Surface Window Frame Heat Gain Rate [W]
    Zone,Average,Surface Window Frame Heat Loss Rate [W]
    Zone,Average,Surface Window Divider Heat Gain Rate [W]
    Zone,Average,Surface Window Divider Heat Loss Rate [W]
    Zone,Average,Surface Window Frame Inside Temperature [C]
    Zone,Average,Surface Window Frame Outside Temperature [C]
    Zone,Average,Surface Window Divider Inside Temperature [C]
    Zone,Average,Surface Window Divider Outside Temperature [C]
If the user requests to display advanced report/output
variables (e.g. see [Output:Diagnostics](../input-output-reference/page-006.html#outputdiagnostics)
keyword DisplayAdvancedReportVariables) the the following
additional output variables are available for exterior windows
and glass doors
Zone,Average,Surface Window Inside Face Glazing Zone Convection Heat Gain Rate [W]
Zone,Average,Surface Window Inside Face Glazing Net Infrared Heat Transfer Rate [W]
Zone,Average,Surface Window Shortwave from Zone Back Out Window Heat Transfer Rate [W]
Zone,Average,Surface Window Inside Face Frame and Divider Zone Heat Gain Rate [W]
Zone,Average,Surface Window Inside Face Gap between Shade and Glazing Zone Convection Heat Gain Rate [W]
Zone,Average,Surface Window Inside Face Shade Zone Convection Heat Gain Rate [W]
Zone,Average,Surface Window Inside Face Shade Net Infrared Heat Transfer Rate [W]
Output variable applicable only to interior windows and
glass doors:
Zone,Average, Surface Window Transmitted Beam Solar Radiation Rate [W]
Zone,Sum,Surface Window Transmitted Beam Solar Radiation Energy [J]
Surface
Output Variables (all heat transfer surfaces)[LINK]
The various output variables related to surface heat
transfer are organized around the inside and outside face of
each surface. The zone heat balance model draws energy
balances at each side, or face, of a surface and so each
surface essentially has two sets of results. The inside face
is the side of a heat transfer surface that faces toward the
thermal zone. The outside face is the side of a heat transfer
surface that faces away from the thermal zone, typically
facing outdoors. The Key Value for these is generally the
user-defined name of the surface.
Surface
Inside Face Heat Balance Calculation Iteration Count [][LINK]
This output is the number of iterations used in a part of
the solution for surface heat transfer that accounts for
thermal radiation heat transfer between zone surfaces. This is
simply a counter on the iteration loop for inside face surface
modeling. There is only one instance of this output in a given
run and the Key Value is “Simulation.”
Surface Inside Face
Temperature [C][LINK]
This is the temperature of the surface’s inside face, in
degrees Celsius. Former Name: Prior to version 7.1 this output
was called Surface Inside Temperature.
Surface Outside
Face Temperature [C][LINK]
This is the temperature of the surface’s outside face, in
degrees Celsius. Former Name: Prior to version 7.1, this
output was called Surface Outside Temperature.
Surface
Inside Face Adjacent Air Temperature [C][LINK]
This is the effective bulk air temperature used for
modeling the inside surface convection heat transfer. This is
the same as the zone mean air temperature when using the
mixing model for roomair. However, if more advanced roomair
models are used, this variable will report the air temperature
predicted by the roomair model as it was used in the surface
heat balance model calculations. Former Name: Prior to version
7.1, this output was called Surface Int Adjacent Air
Temperature.
Surface
Inside Face Convection Heat Gain Rate [W][LINK]
Surface
Inside Face Convection Heat Gain Rate per Area [W/m2][LINK]
Surface
Inside Face Convection Heat Gain Energy [J][LINK]
These “inside face convection heat gain” output variables
describe the heat transferred by convection between the inside
face and the zone air. The values can be positive or negative
with positive indicating heat is being added to the surface’s
face by convection. Different versions of the report are
available including the basic heat gain rate (W), and a per
unit area flux (W/m2), and an energy version (J).
Former Name: Prior to version 7.1, these outputs were
called “Surface Int Convection Heat *” and had used the
opposite sign convention.
Surface
Inside Face Convection Heat Transfer Coefficient [W/m2-K][LINK]
This is the coefficient that describes the convection heat
transfer. It is the value of “Hc” in the classic convection
model Q = Hc* A* (T – T). This is the result of the surface
convection algorithm used for the inside face. Former Name:
Prior to version 7.1, this output was called “Surface Int
Convection Coeff.”
Surface
Inside Face Net Surface Thermal Radiation Heat Gain Rate
[W][LINK]
Surface
Inside Face Net Surface Thermal Radiation Heat Gain Rate per
Area [W/m2][LINK]
Surface
Inside Face Net Surface Thermal Radiation Heat Gain Energy
[J][LINK]
These “inside face net surface thermal radiation heat gain”
output variables describe the heat transferred by longwave
infrared thermal radiation exchanges between the inside faces
of other surfaces in the zone. The values can be positive or
negative with positive indicating heat is being added to the
surface’s face by thermal radiation. Different versions of the
report are available including the basic heat gain rate (W),
and a per unit area flux (W/m2), and an energy version
(J).
Surface
Inside Face Solar Radiation Heat Gain Rate [W][LINK]
Surface
Inside Face Solar Radiation Heat Gain Rate per Area
[W/m2][LINK]
Surface
Inside Face Solar Radiation Heat Gain Energy [J][LINK]
These “inside face solar radiation heat gain” output
variables describe the heat transferred by solar radiation
onto the inside face. The values are always positive and
indicate heat is being added to the surface’s face by solar
radiation. This is sunlight that has entered the zone through
a window and been absorbed on the inside face of the surface.
Different versions of the report are available including the
basic heat gain rate (W), and a per unit area flux (W/m2), and
an energy version (J).
Surface
Inside Face Lights Radiation Heat Gain Rate [W][LINK]
Surface
Inside Face Lights Radiation Heat Gain Rate per Area
[W/m2][LINK]
Surface
Inside Face Lights Radiation Heat Gain Energy [J][LINK]
These “inside face lights radiation heat gain” output
variables describe the heat transferred by shortwave radiation
onto the inside face. The values are always positive and
indicate heat is being added to the surface’s face by
shortwave radiation that emanated from electric lighting
equipment and was absorbed by the surface. Different versions
of the report are available including the basic heat gain rate
(W), and a per unit area flux (W/m2), and an energy version
(J).
Surface
Inside Face Internal Gains Radiation Heat Gain Rate [W][LINK]
Surface
Inside Face Internal Gains Radiation Heat Gain Rate per Area
[W/m2][LINK]
Surface
Inside Face Internal Gains Radiation Heat Gain Energy [J][LINK]
These “inside face internal gains radiation heat gain”
output variables describe the heat transferred by longwave
infrared thermal radiation onto the inside face that emanated
from internal gains such as lights, electric equipment, and
people. The values are always positive and indicate heat is
being added to the surface’s face by the absorption of
longwave thermal radiation. Different versions of the report
are available including the basic heat gain rate (W), and a
per unit area flux (W/m2), and an energy version (J).
Surface
Inside Face System Radiation Heat Gain Rate [W][LINK]
Surface
Inside Face System Radiation Heat Gain Rate per Area
[W/m2][LINK]
Surface
Inside Face System Radiation Heat Gain Energy [J][LINK]
These “inside face system radiation heat gain” output
variables describe the heat transferred by infrared thermal
radiation onto the inside face that emanated from HVAC
equipment such as baseboard heaters or high-temperature
radiant heating panels. The values are always positive and
indicate heat is being added to the surface’s face by the
absorption of thermal radiation. Different versions of the
report are available including the basic heat gain rate (W),
and a per unit area flux (W/m2), and an energy version
(J).
Surface
Outside Face Convection Heat Gain Rate [W][LINK]
Surface
Outside Face Convection Heat Gain Rate per Area [W/m2][LINK]
Surface
Outside Face Convection Heat Gain Energy [J][LINK]
These “outside face convection” output variables describe
heat transferred by convection between the outside face and
the surrounding air. The values can be positive or negative
with positive values indicating heat is added to the surface
face by convection heat transfer. Different versions of the
report are available including the basic heat gain rate (W),
and a per unit area flux (W/m2), and an energy
version (J).
Former Name: Prior to version 7.1, these outputs were
called “Surface Ext Convection Heat *” and used the opposite
sign convention.
Surface
Outside Face Convection Heat Transfer Coefficient
[W/m2-K][LINK]
This is the coefficient that describes the convection heat
transfer. It is the value of “Hc” in the classic convection
model Q = Hc* A* (T – T). This is the result of the surface
convection algorithm used for the outside face. Former Name:
Prior to [Version](../input-output-reference/page-006.html#version)
7.1, this output was called “Surface Ext Convection
Coeff.”
Surface
Outside Face Net Thermal Radiation Heat Gain Rate [W][LINK]
Surface
Outside Face Net Thermal Radiation Heat Gain Rate per Area
[W/m2][LINK]
Surface
Outside Face Net Thermal Radiation Heat Gain Energy [J][LINK]
These “outside face net thermal radiation” output variables
describe the heat transferred by longwave infrared thermal
radiation exchanges between the surface and the surroundings
of the outside face. This is the net of all forms of longwave
thermal infrared radiation heat transfer. The values can be
positive or negative with positive indicating the net addition
of heat to the outside face. Different versions of the report
are available including the basic heat gain rate (W), and a
per unit area flux (W/m2), and an energy version (J).
Former Name: Prior to version 7.1, these outputs were
called “Surface Ext Thermal Radiation Heat *” and used the
opposite sign convention.
Surface
Inside Face Exterior Windows Incident Beam Solar Radiation
Rate [W][LINK]
Surface
Inside Face Exterior Windows Incident Beam Solar Radiation
Rate per Area [W/m2][LINK]
Surface
Inside Face Exterior Windows Incident Beam Solar Radiation
Energy [J][LINK]
Beam solar radiation from the exterior windows in a zone
incident on the inside face of a surface in the zone. If Solar
Distribution in the BUILDING object is equal to
MinimalShadowing or FullExterior, it is assumed that all beam
solar from exterior windows falls on the floor. In this case
the value of this output variable can be greater than zero
only for floor surfaces. If Solar Distribution equals
FullInteriorExterior the program tracks where beam solar from
exterior windows falls inside the zone, in which case the
value of this variable can be greater than zero for floor as
well as wall surfaces. Different versions of the report are
available including the basic incident rate (W), a per unit
area flux (W/m2), and an energy version (J).
Surface
Inside Face Interior Windows Incident Beam Solar Radiation
Rate [W][LINK]
Surface
Inside Face Interior Windows Incident Beam Solar Radiation
Rate per Area [W/m2][LINK]
Surface
Inside Face Interior Windows Incident Beam Solar Radiation
Energy [J][LINK]
Beam solar radiation from the interior (i.e., interzone)
windows in a zone incident on the inside face of a surface in
the zone. This value is calculated only if Solar Distribution
in the BUILDING object is equal to FullInteriorExterior.
However, the program does not track where this radiation
falls. Instead, it is treated by the program as though it were
diffuse radiation uniformly distributed over all of the zone
surfaces. See Figure 24. Different versions
of the report are available including the basic incident rate
(W), a per unit area flux (W/m2), and an energy version
(J).
Surface
Inside Face Initial Transmitted Diffuse Absorbed Solar
Radiation Rate [W][LINK]
As of [Version](../input-output-reference/page-006.html#version)
2.1, diffuse solar transmitted through exterior and interior
windows is no longer uniformly distributed. Instead, it is
distributed according to the approximate view factors between
the transmitting window and all other heat transfer surfaces
in the zone. This variable is the amount of transmitted
diffuse solar that is initially absorbed on the inside of each
heat transfer surface. The portion of this diffuse solar that
is reflected by all surfaces in the zone is subsequently
redistributed uniformly to all heat transfer surfaces in the
zone, along with interior reflected beam solar and shortwave
radiation from lights. The total absorbed shortwave radiation
is given by the next variable.
Surface
Inside Face Absorbed Shortwave Radiation Rate [W][LINK]
As of [Version](../input-output-reference/page-006.html#version)
2.1, the previous variable plus absorbed shortwave radiation
from uniformly distributed initially-reflected diffuse solar,
reflected beam solar, and shortwave radiation from lights.
This sum is the power of all sources of solar and visible
radiation absorbed by the surface at the inside face.
Surface
Output Variables (exterior heat transfer surfaces)[LINK]
Surface
Outside Face Outdoor Air Drybulb Temperature [C][LINK]
The outdoor air dry-bulb temperature calculated at the
height above ground of the surface centroid. Former Name:
Prior to version 7.1, this output was called “Surface Ext
Outdoor Dry Bulb.”
Surface
Outside Face Outdoor Air Wetbulb Temperature [C][LINK]
The outdoor air wet-bulb temperature calculated at the
height above ground of the surface centroid. Former Name:
Prior to version 7.1, this output was called “Surface Ext
Outdoor Wet Bulb.”
Surface
Outside Face Outdoor Air Wind Speed [m/s][LINK]
The outdoor wind speed calculated at the height above
ground of the surface centroid. Former Name: Prior to version
7.1, this output was called “Surface Ext Wind Speed.”
Surface Outside
Face Sunlit Area [m2][LINK]
The outside area of an exterior surface that is illuminated
by (unreflected) beam solar radiation.
Surface Outside
Face Sunlit Fraction [][LINK]
The fraction of the outside area of an exterior surface
that is illuminated by (unreflected) beam solar radiation.
Equals Surface Outside Face Sunlit Area divided by total
surface area.
Surface
Outside Face Thermal Radiation to Air Heat Transfer
Coefficient [W/m2-K][LINK]
This is the coefficient that describes thermal radiation
heat transfer between the outside face and the air mass
surrounding the surface. It is the value of “Hr” in the
classic linearized model for thermal radiation Q = Hr * A * (T
– T) when applied to the ambient air. Former Name: Prior to
version 7.1, this output was called “Surface Ext Rad to Air
Coeff.”
Surface
Outside Face Thermal Radiation to Sky Heat Transfer
Coefficient [W/m2-K][LINK]
This is the coefficient that describes thermal radiation
heat transfer between the outside face and the sky surrounding
the surface. It is the value of “Hr” in the classic linearized
model for thermal radiation Q = Hr * A * (T – T) when applied
to the sky. Former Name: Prior to version 7.1, this output was
called “Surface Ext Rad to Sky Coeff.”
Surface
Outside Face Thermal Radiation to Ground Heat Transfer
Coefficient [W/m2-K][LINK]
This is the coefficient that describes thermal radiation
heat transfer between the outside face and the ground
surrounding the surface. It is the value of “Hr” in the
classic linearized model for thermal radiation Q = Hr * A * (T
– T) when applied to the ground. Former Name: Prior to version
7.1, this output was called “Surface Ext Rad to Ground
Coeff.”
Surface
Outside Face Solar Radiation Heat Gain Rate [W][LINK]
Surface
Outside Face Solar Radiation Heat Gain Rate per Area
[W/m2][LINK]
Surface
Outside Face Solar Radiation Heat Gain Energy [J][LINK]
These “outside face solar radiation” output variables
describe the heat transferred by the absorption of solar
radiation at the outside face. This is the result of incident
solar radiation being absorbed at the surface face. The values
are always positive.
Surface
Outside Face Incident Solar Radiation Rate per Area
[W/m2][LINK]
The total solar radiation incident on the outside of an
exterior surface. It is the sum of:
Surface Outside Face Incident Beam Solar Radiation Rate per
Area
Surface Outside Face Incident Sky Diffuse Solar Radiation
Rate per Area
Surface Outside Face Incident Ground Diffuse Solar
Radiation Rate per Area
Surface Outside Face Incident Sky Diffuse Surface Reflected
Solar Radiation Rate per Area
Surface Outside Face Incident Beam To Beam Surface
Reflected Solar Radiation Rate per Area
Surface Outside Face Incident Sky Diffuse Surface Reflected
Solar Radiation Rate per Area
Surface
Outside Face Incident Beam Solar Radiation Rate per Area
[W/m2][LINK]
The solar beam radiation incident on the outside of an
exterior surface, including the effects of shadowing, if
present. The beam here is that directly from the sun; it
excludes beam specularly reflected from obstructions.
Surface
Outside Face Incident Sky Diffuse Solar Radiation Rate per
Area [W/m2][LINK]
The solar diffuse radiation from the sky incident on the
outside of an exterior surface, including the effects of
shadowing, if present.
Surface
Outside Face Incident Ground Diffuse Solar Radiation Rate per
Area [W/m2][LINK]
The solar diffuse radiation incident on the outside of an
exterior surface that arises from reflection of beam solar and
sky diffuse solar from the ground. This is the sum of the next
two output variables, “Surface Outside Face Incident Beam To
Diffuse Ground Reflected Solar Radiation Rate per Area” and
“Surface Outside Face Incident Sky Diffuse Ground Reflected
Solar Radiation Rate per Area.” The reflected solar radiation
from the ground is assumed to be diffuse and isotropic (there
is no specular component).
If “Reflections” option is not chosen in the Solar
Distribution Field in the BUILDING object, the effects of
shadowing are accounted for by the user-specified value of
View Factor to Ground for the surface. If “Reflections” option
is chosen, the program determines the effects of shadowing,
including time-varying shadowing of the ground plane by the
building itself.
Surface
Outside Face Incident Beam To Diffuse Ground Reflected Solar
Radiation Rate per Area [W/m2][LINK]
The solar diffuse radiation incident on the outside of an
exterior surface that arises from beam-to-diffuse reflection
from the ground. It is assumed that there is no beam-to-beam
(specular) component. The beam here is that directly from the
sun; it excludes beam specularly reflected from
obstructions.
Surface
Outside Face Incident Sky Diffuse Ground Reflected Solar
Radiation Rate per Area [W/m2][LINK]
The solar diffuse radiation incident on the outside of an
exterior surface that arises from sky diffuse solar reflection
from the ground. The sky diffuse here is that directly from
the sky; it excludes reflection of sky diffuse from
obstructions.
Surface
Outside Face Incident Sky Diffuse Surface Reflected Solar
Radiation Rate per Area [W/m2][LINK]
The solar diffuse radiation incident on the outside of an
exterior surface that arises from sky diffuse reflection from
one or more obstructions. This value will be non-zero only if
“Reflections” option is chosen in the BUILDING object.
Surface
Outside Face Incident Beam To Beam Surface Reflected Solar
Radiation Rate per Area [W/m2][LINK]
The solar beam radiation incident on the outside of an
exterior surface that arises from beam-to-beam (specular)
reflection from one or more obstructions. This value will be
non-zero only if “Reflections” option is chosen in the
BUILDING object. For windows, the program treats this beam
radiation as diffuse radiation in calculating its transmission
and absorption.
Surface
Outside Face Incident Beam To Diffuse Surface Reflected Solar
Radiation Rate per Area [W/m2][LINK]
The solar diffuse radiation incident on the outside of an
exterior surface that arises from beam-to-diffuse reflection
from building shades or building surfaces. This value will be
non-zero only if “Reflections” option is chosen in the
BUILDING object.
Surface
Outside Face Beam Solar Incident Angle Cosine Value [][LINK]
The cosine of the angle of incidence of (unreflected) beam
solar radiation on the outside of an exterior surface. The
value varies from 0.0 for beam parallel to the surface
(incidence angle = 90O) to 1.0 for beam
perpendicular to the surface (incidence angle =
0O). Negative values indicate the sun is behind the
surface, i.e the surface does not see the sun.
Surface
Anisotropic Sky Multiplier [][LINK]
This is the view factor multiplier for diffuse sky
irradiance on exterior surfaces taking into account the
anisotropic radiance of the sky. The diffuse sky irradiance on
a surface is given by Anisotropic Sky Multiplier * Diffuse
Solar Irradiance.
Surface
Window BSDF Beam Direction Number [][LINK]
Surface Window
BSDF Beam Phi Angle [rad][LINK]
Surface
Window BSDF Beam Theta Angle [rad][LINK]
Opaque Surface Output
Variables[LINK]
The following variables apply only to opaque
surfaces, where an opaque surface is considered here to be an
exterior or interzone heat transfer surface of class FLOOR,
WALL, ROOF or DOOR. Note – these are advanced variables – you
must read the descriptions and understand before use – then
you must use the [Output:Diagnostics](../input-output-reference/page-006.html#outputdiagnostics)
object to allow reporting.
Surface
Inside Face Conduction Heat Transfer Rate [W][LINK]
Surface
Inside Face Conduction Heat Transfer Rate per Area [W/m2][LINK]
Surface
Inside Face Conduction Heat Gain Rate [W][LINK]
Surface
Inside Face Conduction Heat Loss Rate [W][LINK]
These “inside face conduction” output variables describe
heat flow by conduction right at the inside face of an opaque
heat transfer surface. A positive value means that the
conduction is from just inside the inside face toward the
inside face. A negative value means that the conduction is
from the inside face into the core of the heat transfer
surface.
Note that Inside Face Conduction, when positive, does
not indicate the heat flow from the surface
to the zone air, which is governed by the inside face
convection coefficient and the difference in temperature
between the inside face and the zone air.
Different versions of the reports are available. The basic
heat gain rate (W) and a per unit area flux (W/m2)
can have positive or negative values with the sign convention
that positive indicates heat flowing toward the face itself.
There are also directed “gain” and “loss” versions that have
only positive values or zero when the heat flow direction
opposes.
Former Name: Prior to version 7.1, these outputs were
called “Opaque Surface Inside Face Conduction *.”
Former Name: For Conduction Finite Difference simulations
(CondFD), CondFD Inside Surface Heat Flux is replaced with
Surface Inside Face Conduction Heat Transfer Rate Per Area.
Likewise for CondFD Inside Heat Flux to Surface.
Surface
Outside Face Conduction Heat Transfer Rate [W][LINK]
Surface
Outside Face Conduction Heat Transfer Rate per Area
[W/m2][LINK]
Surface
Outside Face Conduction Heat Gain Rate [W][LINK]
Surface
Outside Face Conduction Heat Loss Rate [W][LINK]
These “outside face conduction” output variables describe
heat flow by conduction right at the outside face of an opaque
heat transfer surface. A positive value means that the
conduction is from just inside the outside face toward the
outside face. A negative value means that the conduction is
from the outside face into the core of the heat transfer
surface.
Note that outside face conduction, when positive, does
not indicate the heat flow from the surface
to the surrounding air, which is governed by the outside face
convection coefficient and the difference in temperature
between the inside face and the surrounding air.
Different versions of the reports are available. The basic
heat transfer rate (W) and a per unit area flux
(W/m2) can have positive or negative values with
the sign convention that positive indicates heat flowing
toward the face itself. There are also directed “gain” and
“loss” versions that have only positive values or zero when
the heat flow direction opposes.
Former Name: For Conduction Finite Difference simulations
(CondFD), CondFD Outside Surface Heat Flux is replaced with
Surface Outside Face Conduction Heat Transfer Rate Per Area.
Likewise for CondFD Outside Heat Flux to Surface.
Surface
Average Face Conduction Heat Transfer Rate [W][LINK]
Surface
Average Face Conduction Heat Transfer Rate per Area
[W/m2][LINK]
Surface
Average Face Conduction Heat Gain Rate [W][LINK]
Surface
Average Face Conduction Heat Loss Rate [W][LINK]
Surface
Average Face Conduction Heat Transfer Energy [J][LINK]
These “average face conduction” output variables combine
the inside face conduction and outside face conduction reports
together to describe the conduction situation in a heat
transfer surface in a nominal way. This is simply the average
of the inside and outside face conduction rates, but with the
sign convention for the outside face switched to match the
inside face so that positive values here indicate heat flowing
into the thermal zone.
Different versions of the reports are available. The basic
heat conduction rate (W) and a per unit area flux
(W/m2) can have positive or negative values with
the sign convention that positive indicates heat flowing
toward the thermal zone. There are also directed “gain” and
“loss” versions that have only positive values or zero when
the heat flow direction opposes (W). Finally there is a
version for total energy transfer (J).
Surface Heat Storage Rate
[W][LINK]
Surface Heat
Storage Rate per Area [W/m2][LINK]
Surface Heat Storage
Gain Rate [W][LINK]
Surface Heat Storage
Loss Rate [W][LINK]
Surface Heat Storage
Energy [J][LINK]
These “heat storage” output variables combine the inside
face conduction and outside face conduction reports together
to describe the thermal storage situation in a heat transfer
surface in a nominal way. This is simply the difference
between the inside and outside face conduction, but with the
sign convention arranged so that positive values indicate heat
being added to the core of the surface.
Different versions of the reports are available. The basic
heat storage rate (W) and a per unit area flux
(W/m2) can have positive or negative values with
the sign convention that positive indicates heat being added
to the surface’s mass. There are also directed “gain” and
“loss” versions that have only positive values or zero when
the heat storage direction opposes (W). Finally there is a
version for total energy stored (J).
Surface
Internal Source Location Temperature [C][LINK]
When a surface has an internal source or sink (defined
using [Construction:InternalSource](../input-output-reference/page-010.html#constructioninternalsource))
then this output is available for the temperature within the
surface at the location of the source/sink.
Zone
Opaque Surface Inside Face Conduction [W][LINK]
The sum of the Opaque Surface Inside Face Conduction values
for all opaque surfaces in a zone for both positive and
negative sums. For example, assume a zone has six opaque
surfaces with Opaque Surface Inside Face Conduction values of
100, -200, 400, 50, 150 and –300 W. Then Zone
Opaque Surface Inside Face Conduction = 700 - 500 = 200 W. Or
if a zone has six opaque surfaces with Opaque Surface Inside
Face Conduction values of -100, -200, 400, -50, 150 and –300W.
Then Zone
Opaque Surface Inside Face Conduction = 550 – 650 = -100
W.
Zone
Opaque Surface Inside Faces Total Conduction Heat Gain Rate
[W][LINK]
Zone
Opaque Surface Inside Faces Total Conduction Heat Gain Energy
[J][LINK]
These are the power and energy sums for the Opaque Surface
Inside Face Conduction values for all opaque surfaces in a
zone when that sum is positive. For example, assume a zone has
six opaque surfaces with Opaque Surface Inside Face Conduction
values of 100, -200, 400, 50, 150 and –300 W. Then Zone
Opaque Surface Inside Faces Total Conduction Heat Gain Rate =
700 - 500 = 200 W.
Zone
Opaque Surface Inside Faces Total Conduction Heat Loss Rate
[W][LINK]
Zone
Opaque Surface Inside Faces Total Conduction Heat Loss Energy
[J][LINK]
These are the power and energy absolute value for the sums
of the Opaque Surface Inside Face Conduction values for all
opaque surfaces in a zone when that sum is negative. For
example, assume a zone has six opaque surfaces with Opaque
Surface Inside Face Conduction values of -100, -200, 400, -50,
150 and –300W. Then Zone
Opaque Surface Inside Faces Total Conduction Heat Loss Rate =
|550 – 650| = |-100| = 100 W.
Zone
Opaque Surface Outside Face Conduction [W][LINK]
The sum of the Opaque Surface Outside Face Conduction
values for all opaque surfaces in a zone for both positive and
negative sums. For example, assume a zone has six opaque
surfaces with Opaque Surface Outside Face Conduction values of
100, -200, 400, 50, 150 and –300 W. Then Zone
Opaque Surface Outside Face Conduction = 700 - 500 = 200 W. Or
if a zone has six opaque surfaces with Opaque Surface Outside
Face Conduction values of -100, -200, 400, -50, 150 and –300W.
Then Zone
Opaque Surface Outside Face Conduction = 550 – 650 = -100
W.
Zone
Opaque Surface Outside Face Conduction Gain [W][LINK]
Zone
Opaque Surface Outside Face Conduction Gain Energy [J][LINK]
These are the power and energy sums for the Opaque Surface
Outside Face Conduction values for all opaque surfaces in a
zone when that sum is positive. For example, assume a zone has
six opaque surfaces with Opaque Surface Outside Face
Conduction values of 100, -200, 400, 50, 150 and –300 W. Then
Zone
Opaque Surface Outside Face Conduction Gain = 700 - 500 = 200
W.
Zone
Opaque Surface Outside Face Conduction Loss [W][LINK]
Zone
Opaque Surface Outside Face Conduction Loss Energy [J][LINK]
These are the power and energy absolute value for the sums
of the Opaque Surface Outside Face Conduction values for all
opaque surfaces in a zone when that sum is negative. For
example, assume a zone has six opaque surfaces with Opaque
Surface Outside Face Conduction values of -100, -200, 400,
-50, 150 and –300W. Then Zone
Opaque Surface Outside Face Conduction Loss = |550 – 650| =
|-100| = 100 W.
Surface
Inside Face Beam Solar Radiation Heat Gain Rate [W][LINK]
Beam solar radiation from exterior windows absorbed on the
inside face of an opaque heat transfer surface. For Solar
Distribution = FullInteriorAndExterior, this quantity can be
non-zero for both floor and wall surfaces. Otherwise, for
Solar Distribution = FullExterior or MinimalShadowing, it can
be non-zero only for floor surfaces since in this case all
entering beam solar is assumed to fall on the floor. Note that
this variable will not be operational (have a real value)
unless there are exterior windows in the zone.
Window Output
Variables[LINK]
The following output variables apply to subsurfaces that
are windows or glass doors. These two subsurface types are
called “window” here. “Exterior window” means that the base
surface of the window is an exterior wall, floor, roof or
ceiling (i.e., the base surface is a BuildingSurface:Detailed
with OutsideFaceEnvironment = ExteriorEnvironment). “Interior
window” means that the base surface of the window is an
inter-zone wall, floor or ceiling. “Glass” means a transparent
solid layer, usually glass, but possibly plastic or other
transparent material. “Shading device” means an interior,
exterior or between-glass shade or blind, or an exterior
screen (only exterior windows can have a shading device).
Zone
Windows Total Transmitted Solar Radiation Rate [W][LINK]
Zone
Windows Total Transmitted Solar Radiation Energy [J][LINK]
The total Surface Window
Transmitted Solar Radiation Rate of all the exterior windows
in a zone.
Zone Windows
Total Heat Gain Rate [W][LINK]
Zone Windows
Total Heat Gain Energy [J][LINK]
The sum of the heat flow from all of the exterior windows
in a zone when that sum is positive. (See definition of “heat
flow” under “Window Heat Gain,” below.)
Zone Windows
Total Heat Loss Rate [W][LINK]
Zone Windows
Total Heat Loss Energy [J][LINK]
The absolute value of the sum of the heat flow from all of
the exterior windows in a zone when that sum is negative.
Surface
Window Total Glazing Layers Absorbed Shortwave Radiation Rate
[W][LINK]
Surface
Window Total Glazing Layers Absorbed Solar Radiation Rate
[W][LINK]
Surface
Window Total Glazing Layers Absorbed Solar Radiation Energy
[J][LINK]
The total exterior beam and diffuse solar radiation
absorbed in all of the glass layers of an exterior window.
Surface
Window Shading Device Absorbed Solar Radiation Rate [W][LINK]
Surface Window
Shading Device Absorbed Solar Radiation Energy [J]
The exterior beam and diffuse solar radiation absorbed in
the shading device, if present, of an exterior window.
Surface
Window Transmitted Solar Radiation Rate [W][LINK]
Surface
Window Transmitted Solar Radiation Energy [J][LINK]
The amount of beam and diffuse solar radiation entering a
zone through an exterior window. It is the sum of the
following two variables, “Surface Window
Transmitted Beam Solar Radiation Rate” and “Surface Window
Transmitted Diffuse Solar Radiation Rate.”
Surface
Window Transmitted Beam Solar Radiation Rate [W][LINK]
Surface
Window Transmitted Beam Solar Radiation Energy [J][LINK]
The solar radiation transmitted by an exterior window whose
source is beam solar incident on the outside of the window.
For a bare window, this transmitted radiation consists of beam
radiation passing through the glass (assumed transparent) and
diffuse radiation from beam reflected from the outside window
reveal, if present. For a window with a shade, this
transmitted radiation is totally diffuse (shades are assumed
to be perfect diffusers). For a window with a blind, this
transmitted radiation consists of beam radiation that passes
between the slats and diffuse radiation from beam-to-diffuse
reflection from the slats. For a window with a screen, this
value consists of direct beam radiation that is transmitted
through the screen (gaps between the screen material) and
diffuse radiation from beam-to-diffuse reflection from the
screen material.
For each zone time step,
Surface Window
Transmitted Beam Solar Radiation Rate = Surface Window
Transmitted Beam To Beam Solar Radiation Rate + Surface Window
Transmitted Beam To Diffuse Solar Radiation Rate
Surface Window
Transmitted Beam Solar Radiation Energy = Surface Window
Transmitted Beam To Beam Solar Radiation Energy + Surface Window
Transmitted Beam To Diffuse Solar Radiation Energy
Surface
Window Transmitted Beam To Beam Solar Radiation Rate [W][LINK]
Surface
Window Transmitted Beam To Beam Solar Radiation Energy
[J][LINK]
For
a window with a blind, this transmitted radiation consists of
beam radiation that passes between the slats. For a window
with a screen, this value consists of direct beam radiation
that is transmitted through the screen (gaps between the
screen material).[LINK]
Surface
Window Transmitted Beam To Diffuse Solar Radiation Rate
[W][LINK]
Surface
Window Transmitted Beam To Diffuse Solar Radiation Energy
[J][LINK]
For
a window with a blind, this transmitted radiation consists of
diffuse radiation reflected from beam by the slats. For a
window with a screen, this value consists of diffuse radiation
reflected by the screen material.[LINK]
Zone
Exterior Windows Total Transmitted Beam Solar Radiation Rate
[W][LINK]
Zone
Exterior Windows Total Transmitted Beam Solar Radiation Energy
[J][LINK]
The sum of the Surface Window
Transmitted Beam Solar Radiation Rate (see definition above)
from all exterior windows in a zone.
Zone
Interior Windows Total Transmitted Beam Solar Radiation Rate
[W][LINK]
Zone
Interior Windows Total Transmitted Beam Solar Radiation Energy
[J][LINK]
The sum of the Surface Window
Transmitted Beam Solar Radiation Rate (see definition above)
from all interior windows in a zone.
Surface
Window Transmitted Diffuse Solar Radiation Rate [W][LINK]
Surface
Window Transmitted Diffuse Solar Radiation Energy [J][LINK]
The solar radiation transmitted by an exterior window whose
source is diffuse solar incident on the outside of the window.
For a bare window, this transmitted radiation consists of
diffuse radiation passing through the glass. For a window with
a shade, this transmitted radiation is totally diffuse (shades
are assumed to be perfect diffusers). For a window with a
blind, this transmitted radiation consists of diffuse
radiation that passes between the slats and diffuse radiation
from diffuse-to-diffuse reflection from the slats. For a
window with a screen, this value consists of diffuse radiation
transmitted through the screen (gaps between the screen
material) and diffuse radiation from diffuse-to-diffuse
reflection from the screen material.
Zone
Exterior Windows Total Transmitted Diffuse Solar Radiation
Rate [W][LINK]
Zone
Exterior Windows Total Transmitted Diffuse Solar Radiation
Energy [J][LINK]
The combined beam and diffuse solar that first entered
adjacent zones through exterior windows in the adjacent zones,
was subsequently reflected from interior surfaces in those
zones (becoming diffuse through that reflection), and was then
transmitted through interior windows into the current
zone.
Zone
Interior Windows Total Transmitted Diffuse Solar Radiation
Rate [W][LINK]
Zone
Interior Windows Total Transmitted Diffuse Solar Radiation
Energy [J][LINK]
The sum of the Surface Window
Transmitted Diffuse Solar Radiation Rate (see definition
above) from all interior windows in a zone.
Surface
Window System Solar Transmittance [][LINK]
Effective solar transmittance of an exterior window,
including effect of shading device, if present. Equal to
“Surface Window
Transmitted Solar Radiation Rate” divided by total exterior
beam plus diffuse solar radiation incident on the window
(excluding frame, if present).
Surface
Window System Solar Absorptance [][LINK]
Effective solar absorptance of an exterior window,
including effect of shading device, if present. Equal to
“Window Solar Absorbed: All Glass Layers” plus “Window Solar
Absorbed: Shading Device” divided by total exterior beam plus
diffuse solar radiation incident on window (excluding frame,
if present)
Surface
Window System Solar Reflectance [][LINK]
Effective solar reflectance of an exterior window,
including effect of shading device, if present. Equal to: \1.0
– “Surface [Window System Solar Transmittance” – “Surface Window
System Solar Absorptance”].
Surface
Window Gap Convective Heat Transfer Rate [W][LINK]
Surface
Window Gap Convective Heat Transfer Energy [J][LINK]
For an airflow window, the forced convective heat flow from
the gap through which airflow occurs. This is the heat gained
(or lost) by the air from the glass surfaces (and
between-glass shading device surfaces, if present) that the
air comes in contact with as it flows through the gap. If the
gap airflow goes to the zone indoor air, the gap convective
heat flow is added to the zone load. Applicable to exterior
windows only.
Surface Window Heat
Gain Rate [W][LINK]
Surface Window Heat
Gain Energy [J][LINK]
The total heat flow to the zone from the glazing, frame and
divider of an exterior window when the total heat flow is
positive.
For a window without an interior shading device,
this heat flow is equal to:
``{=tex}(media/image46.png) Vertical exterior window
showing solar horizontal profile angle, solar vertical profile
angle and solar incidence angle.
Beam solar radiation reflected from the outside reveal
surfaces of a window (ref: Reveal Surfaces under WindowProperty:FrameAndDivider
object). There are both rate and energy versions.
Beam solar radiation reflected from the inside reveal
surfaces of a window (ref: Reveal Surfaces under WindowProperty:FrameAndDivider
object). There are both rate and energy versions.
Beam solar radiation absorbed at the inside reveal surfaces
of a window, in Watts.
Diffuse solar radiation reflected from inside reveal
surfaces of a window into the zone, in Watts.
Diffuse solar radiation reflected from inside reveal
surfaces onto the frame surfaces of a window, in Watts.
Diffuse solar radiation reflected from inside reveal
surfaces onto the glazing surfaces of a window, in Watts.
A value of 1 means that moisture condensation will occur on
the innermost glass face of an exterior window (i.e., on the
glass face in contact with the zone air). Otherwise the value
is 0. The condition for condensation is glass inside face
temperature < zone air dewpoint temperature.
For airflow exterior windows, in which forced air passes
between adjacent glass faces in double- and triple-pane
windows, a value of 1 means that condensation will occur on
one or both of the glass faces in contact with the airflow. In
this case the condition for condensation is:
As for regular windows, the value will also be 1 if
condensation occurs on the innermost glass face.
If an exterior window has a frame and the value of this
flag is 1, condensation will occur on the inside surface of
the frame. The condition for condensation is frame inside
surface temperature < zone air dewpoint temperature.
If an exterior window has a divider and the value of this
flag is 1, condensation will occur on the inside surface of
the divider. The condition for condensation is divider inside
surface temperature < zone air dewpoint temperature.
The fraction of time that a shading device is on an
exterior window. For a particular simulation timestep, the
value is 0.0 if the shading device is off (or there is no
shading device) and the value is 1.0 if the shading device is
on. (It is assumed that the shading device, if present, is
either on or off for the entire timestep.) If the shading
device is switchable glazing, a value of 0.0 means that the
glazing is in the unswitched (light colored) state, and a
value of 1.0 means that the glazing is in the switched (dark
colored) state.
For a time interval longer a timestep, this is the fraction
of the time interval that the shading device is on. For
example, take the case where the time interval is one hour and
the timestep is 10 minutes. Then if the shading device is on
for two timesteps in the hour and off for the other four
timesteps, then the fraction of time that the shading device
is on = 2/6 = 0.3333.
For an exterior window with a blind, this is the angle in
degrees between the glazing outward normal and the blind slat
angle outward normal, where the outward normal points away
from the front face of the slat. The slat angle varies from 0
to 180 deg. If the slat angle is 0 deg or 180 deg, the slats
are parallel to the glazing and the slats are said to be
“closed”. If the slat angle is 90 deg, the slats are
perpendicular to the glazing and the slats are said to be
“fully open”. See illustrations under [WindowMaterial:Blind](../input-output-reference/page-010.html#windowmaterialblind).
For blinds with a fixed slat angle, the value reported here
will be constant.
For an exterior window with a blind, this is the fraction
of exterior beam solar radiation incident on the blind that is
transmitted through the blind as beam solar radiation when the
blind is isolated (i.e., as though the window glass were not
present). Depends on various factors, including slat angle,
width, separation, and thickness, and horizontal solar profile
angle (for blinds with horizontal slats) or vertical solar
profile angle (for blinds with vertical slats). The
transmittance value reported here will be non-zero only when
some beam solar can pass through the blind without hitting the
slats.
For an exterior window with a blind, the fraction of
exterior beam solar radiation incident on the blind that is
transmitted through the blind as diffuse solar radiation when
the blind is isolated (i.e., as though the window glass were
not present). Depends on various factors, including slat
angle, width, separation, thickness and reflectance, and
horizontal solar profile angle (for blinds with horizontal
slats) or vertical solar profile angle (for blinds with
vertical slats).
For an exterior window with a blind, the fraction of
exterior diffuse solar radiation incident on the blind that is
transmitted through the blind as diffuse solar radiation when
the blind is isolated (i.e., as though the window glass were
not present). Depends on various factors, including slat
angle, width, separation, thickness and reflectance. For
blinds with a fixed slat angle the transmittance value
reported here will be constant.
The fraction of exterior beam solar radiation incident on
an exterior window with a blind (excluding window frame, if
present) that is transmitted through the blind/glass system as
beam solar radiation. Depends on various factors, including
type of glass; solar incidence angle; slat angle, width,
separation, and thickness; and horizontal solar profile angle
(for blinds with horizontal slats) or vertical solar profile
angle (for blinds with vertical slats).
The fraction of exterior diffuse solar radiation incident
on an exterior window with a blind (excluding window frame, if
present) that is transmitted through the blind/glass system as
diffuse solar radiation. Depends on various factors, including
type of glass and slat angle, width, separation, thickness and
reflectance. For blinds with a fixed slat angle the
transmittance value reported here will be constant.
For an exterior window with a screen, this is the fraction
of exterior beam solar radiation incident on the screen that
is transmitted through the screen as beam solar radiation when
the screen is isolated (i.e., as though the window glass were
not present). Depends on various factors, including the screen
reflectance and the relative angle of the incident beam with
respect to the screen. This value will include the amount of
inward reflection of solar beam off the screen material
surface if the user specifies this modeling option (i.e.,
Material: WindowScreen, field Reflected Beam Transmittance
Accounting Method = Model as Direct Beam).
For an exterior window with a screen, the fraction of
exterior beam solar radiation incident on the screen that is
transmitted through the screen as diffuse solar radiation when
the screen is isolated (i.e., as though the window glass were
not present). Depends on various factors, including the screen
reflectance and the relative angle of the incident beam with
respect to the screen. This value is the amount of inward
reflection of solar beam off the screen material surface if
the user specifies this modeling option (i.e., Material:
WindowScreen, field Reflected Beam Transmittance Accounting
Method = Model as Diffuse); otherwise, this value will be
zero.
For an exterior window with a screen, the fraction of
exterior diffuse solar radiation incident on the screen that
is transmitted through the screen as diffuse solar radiation
when the screen is isolated (i.e., as though the window glass
were not present). Depends on various factors including screen
material geometry and reflectance. This value is calculated as
an average, constant For a window with a screen, this value
consists of diffuse radiation transmitted through the screen
(gaps between the screen material) and diffuse radiation from
diffuse-to-diffuse reflection from the screen material. For a
window with a screen, this value consists of diffuse radiation
transmitted through the screen (gaps between the screen
material) and diffuse radiation from diffuse-to-diffuse
reflection from the screen material.
The fraction of exterior beam solar radiation incident on
an exterior window with a screen (excluding window frame, if
present) that is transmitted through the screen/glass system
as beam solar radiation. Depends on various factors, including
the screen reflectance and the relative angle of the incident
beam with respect to the screen. This value will include the
amount of inward reflection of solar beam off the screen
material surface if the user specifies this modeling option
(i.e., Material: WindowScreen, field Reflected Beam
Transmittance Accounting Method = Model as Direct Beam).
The fraction of exterior diffuse solar radiation incident
on an exterior window with a screen (excluding window frame,
if present) that is transmitted through the screen/glass
system as diffuse solar radiation. Depends on various factors
including screen material geometry and reflectance.
The beam solar radiation transmitted through an interior
window. Calculated only if Solar Distribution =
FullInteriorAndExterior in your [Building](../input-output-reference/page-006.html#building)
input. The origin of this radiation is beam solar that enters
through an exterior window in a zone and then passes through
an interior window into the adjacent zone. The amount of this
radiation depends on several factors, including sun position,
intensity of beam solar incident on the exterior window
(including effects of shadowing, if present), relative
position of the exterior and interior window, and the size and
transmittance of the windows. Note that if there are two or
more exterior windows in a zone, then beam solar from one or
more of them may pass through the same interior window.
Likewise, if there are more than two or more interior windows
in a zone then beam solar from a single exterior window may
pass through one or more of the interior windows. There are
both rate and energy versions of the output.
Indicates whether a storm window glass layer is present
(ref: StormWindow object). The value is 0 if
the storm window glass layer is off, 1 if it
is on, and –1 if the window does not have an
associated storm window. Applicable only to exterior windows
and glass doors.
The following output variables for windows or glass doors
are available when the user requests to display advanced
output variables. These seven reports show the individual
components that are combined to determine overall Surface Window
Heat Gain Rate and/or Surface Window
Heat Loss Rate (described above).
The surface convection heat transfer from the glazing to
the zone in watts. This output variable is the term called
“heat flow to the zone from the zone side of the glazing]”
under the description above for Surface [Window Heat Gain Rate
output variable. If the window has an interior shade or blind,
then this is zero and the glazing’s convection is included in
the report called “Surface Window
Inside Face Gap between Shade and Glazing Zone
Convection Heat Gain Rate”.
The net exchange of infrared radiation heat transfer from
the glazing to the zone in watts. This output variable is the
term called “IR heat flow to the zone from zone side of the
glazing]” under the description above for Surface [Window Heat
Gain Rate output variable.
This is the short-wave radiation heat transfer from the
zone back out the window in watts. This is a measure of the
diffuse short-wave light (from reflected solar and electric
lighting) that leave the zone through the window. This output
variable is the term called “-wave radiation from zone
transmitted back out the window]” under the description above
for Surface [Window Heat Gain Rate output variable.
This is the heat transfer from any frames and/or dividers
to the zone in watts. This output variable is the term called
“to zone from window frame and divider, if present]” under the
description above for Surface [Window Heat Gain Rate output
variable. (The word “conduction” here is used because the
models is simplified compared to the complexities of surface
convection and radiation.)
This is the positive heat flow from window frames to the
zone in watts. This is part of the Surface Window
Inside Face Frame and Divider Zone
Heat Gain Rate.
This is the negative heat flow from window frames to the
zone in watts. This is part of the Surface Window
Inside Face Frame and Divider Zone
Heat Gain Rate.
This is the temperature of the inside surface of the window
frames.
This is the temperature of the outside surface of the
window frames.
This is the positive heat flow from window dividers to the
zone in watts. This is part of the Surface Window
Inside Face Frame and Divider Zone
Heat Gain Rate.
This is the negative heat flow from window dividers to the
zone in watts. This is part of the Surface Window
Inside Face Frame and Divider Zone
Heat Gain Rate.
This is the temperature of the inside surface of the window
dividers.
This is the temperature of the outside surface of the
window dividers.
This is the convection surface heat transfer from the both
the glazing and the shade’s back face to the zone in Watts.
This output variable is the term called “heat flow to the zone
from the air flowing through the gap between glazing and
shading device]” under the description above for Surface
[Window Heat Gain Rate output variable.
This is the convection surface heat transfer from the front
side of any interior shade or blind to the zone in Watts. This
output variable is the term called “heat flow to the zone from
the zone side of the shading device]” under the description
above for Surface [Window Heat Gain Rate output variable.
The net exchange of infrared radiation heat transfer from
the shade or blind to the zone in watts. This output variable
is the term called “IR heat flow to the zone from the zone
side of the shading device]” under the description above for
Surface [Window Heat Gain Rate output variable.
The temperature of the TC glass layer of a TC window at
each time step.
The temperature under which the optical data of the TC
glass layer are specified.
The overall properties (U-factor/SHGC/VT) of the
thermochromic windows at different specification temperatures
are reported in the .eio file. These window
constructions are created by EnergyPlus during run time. They
have similar names with suffix “_TC_XX” where XX represents a
specification temperature.
The switching factor (tint level) of the switchable window:
0 means no switching – clear state; 1 means fully switched –
dark state.
The visible transmittance of the switchable window.
Several reports can be selected for Surfaces. (See Group –
Report for details on how to specify). Examples are:
This version of the report creates lines in the
eplusout.eio file for each surface (except internal mass
surfaces). Details of this reporting is shown in the Output
Details and Examples document.
Shading surfaces are entities outside of the building that
may cast shadows on the building’s heat transfer surfaces.
These entities do not typically have enough thermal mass to be
described as part of the building’s thermal makeup.
The most important effect of shading surfaces is to reduce
solar gain in windows that are shadowed. (However, in some
cases, shading surfaces can reflect solar onto a wall or
window and increase solar gain.)
Similarly to the surfaces, the detailed objects use vertex
entry whereas the other objects are limited to rectangular
representation.
EnergyPlus creates “bi-directional” shades from each
shading surface entered. This means that the shade you input
will cast a shadow no matter which side of the shade the sun
is on. For example, a vertical fin will cast a shadow whether
the sun is on the left side or right side of the fin.
It is important to note that EnergyPlus will automatically
account for “self-shading” effects—such as in L-shaped
buildings—in which some of the building’s wall and roof
surfaces shade other parts of the building, especially
windows. This means that you only need to describe shading
elements that aren’t building heat-transfer surfaces.
Shading surfaces also automatically shade diffuse solar
radiation (and long-wave radiation) from the sky. And they
will automically shade diffuse solar radiation from the ground
if Solar Distribution Field = FullExteriorWithReflections or
FullInteriorAndExteriorWithReflections in the
Building](page-006.html#building) object. Otherwise, shading
surfaces will not shade diffuse radiation from the ground
unless you enter a reduced value for View Factor to Ground for
those building surfaces that are shaded (ref:
[BuildingSurface:Detailed - Field: View Factor to Ground and
FenestrationSurface:Detailed
- Field: View Factor to Ground).
These objects are used to describe rectangular shading
elements that are external to the building. Examples are
trees, high fences, near-by hills, and neighboring
buildings.
If relative coordinates are used (ref: Field: Coordinate
System in GlobalGeometryRules), shading surfaces entered with
Shading:Site
remain stationary if the building is rotated, whereas those
entered with Shading:Building
rotate with the building. If world coordinates are used Shading:Site
and Shading:Building
are equivalent.
These shading elements are always opaque.
This is a unique character string associated with the
detached shading surface. Though it must be unique from other
surface names, it is used primarily for convenience with
detached shading surfaces.
Theoretically, this should face to the surface it is
shading (i.e. if a south wall, this should be a north facing
shade) but since EnergyPlus automatically generates the mirror
image, the facing angle per se’ is not so important.
The tilt angle is the angle (in degrees) that the shade is
tilted from horizontal (or the ground). Default for this field
is 90 degrees.
The rectangular surfaces specify the lower left corner of
the surface for their starting coordinate. See the
introductory paragraph for rules on this entry.
This field is the X coordinate (in meters).
This field is the Y coordinate (in meters).
This field is the Z coordinate (in meters).
This field is the length of the shade in meters.
This field is the width of the shade in meters.
Examples of these (can be found in example files
4ZoneWithShading_Simple_1.idf and
4ZoneWithShading_Simple_2.idf)
These objects are used to describe shading elements that
are external to the building. Examples are trees, high fences,
near-by hills, and neighboring buildings.
While “detached” implies that shading surfaces are not part
of the building, the detached shading sequence can be used to
describe attached shading surfaces that may shade heat
transfer surfaces in more than one zone. For example, wing A
of a building might shade several zones of wing B but wing A
(for whatever reason) is not described in the geometry for the
simulation so it is represented by a detached shade to get its
shadowing effect.
This is a unique character string associated with the
detached shading surface. Though it must be unique from other
surface names, it is used primarily for convenience with
detached shading surfaces.
The name of a schedule of solar transmittance values from
0.0 to 1.0 for the shading surface. If a blank is entered in
this field, the transmittance value defaults to 0.0, i.e., the
shading surface is opaque at all times. This scheduling can be
used to allow for seasonal transmittance change, such as for
deciduous trees that have a higher transmittance in winter
than in summer. Transmittance based on time of day can also be
used—a movable awning, for example, where the transmittance is
some value less than 1.0 when the awning is in place and is
1.0 when the awning is retracted.
The following assumptions are made in the shading surface
transmittance calculation:
Note that shading devices only shade solar radiation when
the sun is up, which is automatically determined by EnergyPlus
from latitude, time of year, etc. The user need only account
for the time-varying transmittance of the shading device in
the transmittance schedule, not whether the sun is up or
not.
The number of sides in the surface (number of X,Y,Z vertex
groups). For further information, see the discussion on
“Surface Vertices” above.
Overhangs are usually horizontal devices that are used to
shade windows. Fins are usually vertical devices that
similarly shade windows.
An overhang typically is used to shade a window in a
building.
This is the name of the overhang. It must be different from
other surface names.
The name of a window or door that this overhang shades.
This field is the height (meters) above the top of the door
for the overhang.
This field is the tilt angle from the Window/Door. For a
flat overhang, this would be 90 (degrees).
This field is the width from the left edge of the
window/door to the start of the overhang (meters).
This field is the width from the right edge of the
window/door to the start of the overhang (meters).
This field is the depth of the overhang (meters) projecting
out from the wall.
An overhang typically is used to shade a window in a
building. This object allows for specifying the depth of the
overhang as a fraction of the window or door’s height.
This is the name of the overhang. It must be different from
other surface names.
The name of a window or door that this overhang shades.
This field is the height (meters) above the top of the door
for the overhang.
This field is the tilt angle from the Window/Door. For a
flat overhang, this would be 90 (degrees).
This field is the width from the left edge of the
window/door to the start of the overhang (meters).
This field is the width from the right edge of the
window/door to the start of the overhang (meters).
This field is the fraction of the window/door height to
specify as the depth of the overhang (meters) projecting out
from the wall.
Fins shade either side of windows/doors in a building. This
object allows for specification of both fins for the window.
Fin placement is relative to the edge of the glass and user
must include the frame width when a frame is present.
This is the name of the overhang. It must be different from
other surface names.
The name of a window or door that this overhang shades.
This field is the width from the left edge of the
window/door to the plane of the left fin (meters). The
extension width is relative to the edge of the glass and
includes the frame width when a frame is present.
This field is the distance from the top of the window to
the top of the left fin (meters) and is relative to the edge
of the glass and includes the frame width when a frame is
present.
This field is the distance from the bottom of the window to
the bottom of the left fin (meters) and is relative to the
edge of the glass and includes the frame width when a frame is
present.
This field is the tilt angle from the window / door for the
left fin. Typically, a fin is 90 degrees (default) from its
associated window/door.
This field is the depth (meters) of the left fin
(projecting out from the wall).
This field is the width from the right edge of the
window/door to the plane of the right fin (meters). The
extension width is relative to the edge of the glass and
includes the frame width when a frame is present.
This field is the distance from the top of the window to
the top of the right fin (meters) and is relative to the edge
of the glass and includes the frame width when a frame is
present.
This field is the distance from the bottom of the window to
the bottom of the right fin (meters) and is relative to the
edge of the glass and includes the frame width.
This field is the tilt angle from the window / door for the
right fin.. Typically, a fin is 90 degrees (default) from its
associated window/door.
This field is the depth (meters) of the right fin
(projecting out from the wall).
Fins shade either side of windows/doors in a building. This
object allows for specification of both fins for the window.
This object allows for specifying the depth of the overhang as
a fraction of the window or door’s width. Fin placement is
relative to the edge of the glass and user must include the
frame width when a frame is present.
This is the name of the overhang. It must be different from
other surface names.
The name of a window or door that this overhang shades.
This field is the width from the left edge of the
window/door to the plane of the left fin (meters). The
extension width is relative to the edge of the glass and
includes the frame width when a frame is present.
This field is the distance from the top of the window to
the top of the left fin (meters) and is relative to the edge
of the glass and includes the frame width when a frame is
present.
This field is the distance from the bottom of the window to
the bottom of the left fin (meters) and is relative to the
edge of the glass and includes the frame width when a frame is
present.
This field is the tilt angle from the window / door for the
left fin. Typically, a fin is 90 degrees (default) from its
associated window/door.
This field is the fraction of the window/door width to
specify as the depth of the left fin (meters) projecting out
from the wall.
This field is the width from the right edge of the
window/door to the plane of the right fin (meters).. The
extension width is relative to the edge of the glass and
includes the frame width when a frame is present.
This field is the distance from the top of the window to
the top of the right fin (meters) and is relative to the edge
of the glass and includes the frame width when a frame is
present.
This field is the distance from the bottom of the window to
the bottom of the right fin (meters) and is relative to the
edge of the glass and includes the frame width when a frame is
present.
This field is the tilt angle from the window / door for the
right fin.. Typically, a fin is 90 degrees (default) from its
associated window/door.
This field is the fraction of the window/door width to
specify as the depth of the right fin (meters) projecting out
from the wall.
zone.
Examples of these (can be found in example files
4ZoneWithShading_Simple_1.idf and
4ZoneWithShading_Simple_2.idf)
This object is used to describe attached “subsurfaces” such
as overhangs, wings or fins that project outward from a base
surface. This classification is used for convenience;
actually, a device of this type can cast shadows on the
surface to which it is attached as well as on adjacent
surfaces. For example, a fin may shade its parent wall as well
as adjacent walls.
Note that a zone surface can cast shadows on other zone
surfaces. However, you don’t have to worry about such
effects—for example, one wall of an L-shaped building shading
another wall–because EnergyPlus will automatically check for
this kind of “self shadowing” and do the proper
calculations.
Unlike attached (or detached) shading surfaces, building
surfaces can only cast shadows in the hemisphere towards which
they face. This means, for example, that a roof that faces
upward will not cast a shadow downward.
(Thus, specifying an oversized roof in an attempt to account
for the shading effects of overhangs will not work).
Interior surfaces do not cast shadows of any kind.
This is the name of the attached shading surface. It must
be different from other surface names.
This is the name of the surface to which this shading
device is attached. This surface can be a wall (or roof) but
not a window or door.
The name of a schedule of solar transmittance values from
0.0 to 1.0 for the shading surface. If a blank is entered in
this field, the transmittance value defaults to 0.0, i.e., the
shading surface is opaque at all times. This scheduling can be
used to allow for seasonal transmittance change, such as for
deciduous trees that have a higher transmittance in winter
than in summer. Transmittance based on time of day can also be
used—a movable awning, for example, where the transmittance is
some value less than 1.0 when the awning is in place and is
1.0 when the awning is retracted.
The following assumptions are made in the shading surface
transmittance calculation:
Note that shading devices only shade solar radiation when
the sun is up, which is automatically determined by EnergyPlus
from latitude, time of year, etc. The user need only account
for the time-varying transmittance of the shading device in
the transmittance schedule, not whether the sun is up or
not.
The number of sides in the surface (number of X,Y,Z vertex
groups). For further information, see the discussion on
“Surface Vertices” above. The example below shows the correct
input for an overhang (to shade the appropriate portion of the
base wall and window).
4,(C,0,D),(C,-B,D),(C+A,-B,D),(C+A,0,D); () used to
illustrate each vertex.
Specifies the reflectance properties of a shading surface
when the solar reflection calculation has requested, i.e.,
when if “WithReflections” option is chosen in the [Building](../input-output-reference/page-006.html#building)
object (ref: [Building](../input-output-reference/page-006.html#building)
- Field: Solar Distribution). It is assumed that shading
surfaces are divided into an unglazed, diffusely reflecting
portion and a glazed, specularly-reflecting portion, either of
which may be zero. The reflectance properties are assumed to
be the same on both sides of the shading surface.
Note that a shadowing transmittance schedule (ref: Shading
Surfaces, Field: Transmittance Schedule Name) can be used with
a reflective shading surface. However, EnergyPlus assumes that
the reflectance properties of the shading surface are constant
even if the transmittance varies.
The diffuse solar reflectance of the unglazed part of the
shading surface (default = 0.2). This reflectance is assumed
to be the same for beam-to-diffuse and diffuse-to-diffuse
reflection. Beam-to-diffuse reflection is assumed to be
independent of angle of incidence of beam radiation.
Diffuse-to-diffuse reflection is assumed to be independent of
angular distribution of the incident of diffuse radiation. The
outgoing diffuse radiation is assumed to be isotropic
(hemispherically uniform).
The sum of this reflectance and the shading surface
transmittance should be less than or equal to 1.0.
The diffuse visible reflectance of the unglazed part of the
shading surface (default = 0.2). This reflectance is assumed
to be the same for beam-to-diffuse and diffuse-to-diffuse
reflection. Beam-to-diffuse reflection is assumed to be
independent of angle of incidence of beam radiation.
Diffuse-to-diffuse reflection is assumed to be independent of
angular distribution of the incident of diffuse radiation. The
outgoing diffuse radiation is assumed to be isotropic
(hemispherically uniform).
The fraction of the area of the shading surface that
consists of windows (default = 0.0). It is assumed that the
windows are evenly distributed over the surface and have the
same glazing construction (see following “Name of Glazing [Construction](../input-output-reference/page-010.html#construction)”).
This might be the case, for example, for reflection from the
façade of a neighboring, highly-glazed building. For the
reflection calculation the possible presence of shades,
screens or blinds on the windows of the shading surface is
ignored. Beam-to-beam (specular) reflection is assumed to
occur only from the glazed portion of the shading surface.
This reflection depends on angle of incidence as determined by
the program from the glazing construction. Beam-to-diffuse
reflection from the glazed portion is assumed to be zero. The
diffuse-to-diffuse reflectance of the glazed portion is
determined by the program from the glazing construction.
The name of the construction of the windows on the shading
surface. Required if Fraction of Shading Surface That Is
Glazed is greater than 0.0.
IDF example of Shading Surface Reflectance for shading
surface with specular reflection
IDF example of Shading Surface Reflectance for shading
surface without specular reflection
With WindowProperty:ShadingControl—which is referenced by
windows and glass doors (ref: FenestrationSurface:Detailed
with Type = Window
or GlassDoor)–you specify the type and location of the shading
device, what variable or combination of variables controls
deployment of the shading device, and what the control
setpoint is. If the shading device is a blind, you also
specify how the slat angle is controlled.
As shown in Figure 27, a shading device can be inside the
window (Shading Type = InteriorShade or InteriorBlind),
outside the window (Shading Type = ExteriorShade or
ExteriorBlind), or between panes of glass (Shading Type =
BetweenGlassShade or BetweenGlassBlind). The exception is
window screens which can only be outside the window (Shading
Type = ExteriorScreen).
When a shading device is present it is either retracted or
activated. When it is retracted it covers none of the window.
When it is activated it covers the entire glazed part of the
window (but not the frame). Whether the shading device is
retracted or activated in a particular timestep depends on the
control mechanism: see “Shading Control Type,” below. To model
a case in which the shading device, when activated, covers
only part of the window you will have to
divide the window into two separate windows, one with the
shading device and one without the shading device.
A shading device can also be of a kind in which the optical
properties of the glazing switch from one set of values to
another in order to increase or decrease solar or visible
transmittance (Shading Type = SwitchableGlazing).
When this method is used, the program will automatically
create a shaded window construction by adding a shading layer
to the outside or inside of the construction corresponding to
the window referencing the WindowProperty:ShadingControl.
The name, created by the program, of this shaded construction
is composed as follows: if the name of the window construction
is CCC and the material name of the shading device is DDD,
then the shaded construction name is CCC:DDD:INT for an
interior shading device and CCC:DDD:EXT for an exterior
shading device.
This method is the required if you want to add a shading
device to a construction brought in from a WINDOW Data File
(ref:Construction:WindowDataFile).
Most Shading Control Types allow you to specify a schedule
that determines when the control is active. One example is a
control that is active seasonally. For example, to deploy
shading only in the summer when the incident solar is high
enough, use Shading Control Type = OnIfHighSolarOnWindow with
a schedule that is 1 during the summer months and 0 otherwise
and specify Shading Control Is Scheduled = YES.
In addition, most Shading Control Types also allow you to
specify that glare control is active in addition to the
specified Control Type. For example, you might want to deploy
shading when the solar incident on a window is too high OR the
glare from the window is too high. This type of joint control
requires that the window be in a daylit zone, that the maximum
allowed glare be specified in the Daylighting object for the
zone, and that Glare Control Is Active = YES in WindowProperty:ShadingControl.
If Shading Type = InteriorBlind, ExteriorBlind or
BetweenGlassBlind you can use WindowProperty:ShadingControl
to specify how the slat angle of the blind is controlled when
the blind is in place.
For Shading Type = SwitchableGlazing the state of the
window is either clear (unswitched) or dark (fully switched)
for all Shading Control Types except
MeetDaylightIlluminanceSetpoint. In this case, the
transmittance of the glazing is adjusted to just meet the
daylight illuminance set point at the first daylighting
reference point (see Daylighting). This type of control
assures that there is just enough solar gain to meet the
daylighting requirements in a zone, and no more, thus reducing
the cooling load.
Name of the window shading control. It is referenced by a
window (ref: Field: Shading Control Name).
The type of shading device. The choices are:
Specifies how the shading device is controlled, i.e., it
determines whether the shading device is “on” or “off.” For
blinds, screens and shades, when the device is “on” it is
assumed to cover all of the window except its frame; when the
device is “off” it is assumed to cover none of the window
(whether “on” or “off” the shading device is assumed to cover
none of the wall that the window is on).
For switchable glazing, “on” means that the glazing is in
the fully-switched state and “off” means that it is in the
unswitched state; for example, for electrochromic glazing,
“on” means the glazing is in its darkest state and “off” means
it is in its lightest state.
The choices for Shading Control Type are the following. If
SetPoint is applicable its units are shown in parentheses.
The following six control types are used primarily to
reduce zone cooling load due to window solar gain.
Note: Unlike other Shading Control Types, glare control is
active whether or not a schedule is specified.
The following three control types can be used to reduce
zone heating load during the winter by reducing window
conductive heat loss at night and leaving the window unshaded
during the day to maximize solar gain. They are applicable to
any Shading Type except ExteriorScreen but are most
appropriate for interior or exterior shades with high
insulating value (“movable insulation”). “Night” means the sun
is down and “day” means the sun is up.
The following two control types can be used to reduce zone
heating and cooling load. They are applicable to any Shading
Type except ExteriorScreen but are most appropriate for
translucent interior or exterior shades with high insulating
value (“translucent movable insulation”).
The following control types can be used to reduce zone
cooling load. They are applicable to any Shading Type except
ExteriorScreen but are most appropriate for interior or
exterior blinds, interior or exterior shades with low
insulating value, or switchable glazing.
Required if Shading Control Is Scheduled = Yes. If schedule
value > 0 , shading control is active, i.e., shading can be
on only if the shading control test passes. If schedule value
= 0, shading is off whether or not the control test passes. If
Schedule Name is not specified, shading control is assumed to
be active at all times.
The setpoint for activating window shading. The units
depend on the type of trigger:
SetPoint is unused for Shading Control Type =
OnIfScheduleAllows, OnIfHighGlare and DaylightIlluminance.
Accepts values YES and NO. The default is NO. Not
applicable for Shading Control Type = OnIfHighGlare and should
be blank in that case.
If YES, Schedule Name is required and that schedule
determines whether the shading control specified by Shading
Control Type is active or inactive (see Schedule Name,
above).
If NO, Schedule Name is not applicable (should be blank)
and the shading control is unscheduled.
Shading Control Is Scheduled = YES is required if Shading
Control Type = OnIfScheduleAllows.
Accepts values YES and NO. The default is NO.
If YES and the window is in a daylit zone, shading is on if
the zone’s discomfort glare index exceeds the maximum
discomfort glare index specified in the Daylighting object
referenced by the zone. For switchable windows with
MeetDaylightIlluminanceSetpoint shading control, if
Glare Control is active, the windows are always continuously
dimmed as necessary to meet the zone’s maximum allowable DGI
while providing appropriate amount of daylight for the
zone.
The glare test is OR’ed with the test specified by Shading
Control Type. For example, if Glare Control Is Active = YES
and Shading Control Type = OnIfHighZoneAirTemp, then shading
is on if glare is too high OR if the zone air temperature is
too high.
Glare Control Is Active = YES is required if Shading
Control Type = OnIfHighGlare.
Applies only to Shading Type = InteriorBlind, ExteriorBlind
or BetweenGlassBlind. Specifies how the slat angle is
controlled. The choices are FixedSlatAngle, ScheduledSlatAngle
and BlockBeamSolar.
If ScheduledSlatAngle, the slat angle varies according to
the schedule specified by Slat Angle Schedule Name, below.
This is the name of a schedule of slat angles that is used
when Type of Slat Angle Control for Blinds =
ScheduledSlatAngle. You should be sure that the schedule
values fall within the range given by the Minimum Slat Angle
and Maximum Slat Angle values entered in the corresponding [WindowMaterial:Blind](../input-output-reference/page-010.html#windowmaterialblind).
If not, the program will force them into this range.
Used only as the second setpoint for the following
two-setpoint control types:
OnIfHighOutdoorAirTempAndHighSolarOnWindow,
OnIfHighOutdoorAirTempAndHighHorizontalSolar,
OnIfHighZoneAirTempAndHighSolarOnWindow,
An IDF example: window with interior roll shade that is
deployed when solar incident on the window exceeds 50
W/m2.
In EnergyPlus, a window can have any combination of frame,
divider and reveal surfaces, or none of these.
The best source of frame and divider characteristics is the
WINDOW program, which will calculate the values required by
EnergyPlus for different frame and divider types. In
particular, the THERM program within the WINDOW program will
calculate the effective conductance of frames and dividers;
this is the conductance taking 2-D heat transfer effects into
account.
Note that a window’s frame and divider characteristics,
along with other window information, can be read in from the
Window
Data File (see “Importing Windows from the WINDOW program” and
“Construction:WindowDataFile](page-010.html#constructionwindowdatafile)
object”). In this case the [WindowProperty:FrameAndDivider
referenced by the window is not applicable and should be blank
unless you want to specify reveal surfaces for beam solar
reflection.
In the illustration above, the divider has two horizontal
elements and one vertical element.
The width of the frame elements when projected onto the
plane of the window. It is assumed that the top, bottom and
side elements of the frame have the same width. If not, an
average frame width should be entered such that the projected
frame area calculated using the average value equals the sum
of the areas of the frame elements.
The amount by which the frame projects outward from the
outside surface of the window glazing. If the outer surface of
the frame is flush with the glazing, Frame Outside Projection
= 0.0. Used to calculate shadowing of frame onto glass, solar
absorbed by frame, IR emitted and absorbed by frame, and
convection from frame.
The amount by which the frame projects inward from the
inside surface of the window glazing. If the inner surface of
the frame is flush with the glazing, Frame Inside Projection =
0.0. Used to calculate solar absorbed by frame, IR emitted and
absorbed by frame, and convection from frame.
The effective thermal conductance of the frame measured
from inside to outside frame surface (no air films) and taking
2-D conduction effects into account. Obtained from the WINDOW
program or other 2-D calculation.
The glass conductance near the frame (excluding air films)
divided by the glass conductance at the center of the glazing
(excluding air films). Used only for multi-pane glazing
constructions. This ratio is greater than 1.0 because of
thermal bridging from the glazing across the frame and across
the spacer that separates the glass panes. Values can be
obtained from the WINDOW program the user-selected glazing
construction and frame characteristics.
The solar absorptance of the frame. The value is assumed to
be the same on the inside and outside of the frame and to be
independent of angle of incidence of solar radiation. If solar
reflectance (or reflectivity) data is available, then
absorptance is equal to 1.0 minus reflectance (for opaque
materials).
The visible absorptance of the frame. The value is assumed
to be the same on the inside and outside of the frame and to
be independent of angle of incidence of solar radiation. If
visible reflectance (or reflectivity) data is available, then
absorptance is equal to 1.0 minus reflectance (for opaque
materials).
The thermal emissivity of the frame, assumed the same on
the inside and outside.
The type of divider (see figure below). Divider Type =
Suspended is applicable only to multi-pane glazing. It means
that the divider is suspended between the panes. (If there are
more than two glass layers, the divider is assumed to be
placed between the two outermost layers.)
Divider Type = DividedLite means that the divider elements
project out from the outside and inside surfaces of the
glazing and divide the glazing into individual lites. For
multi-pane glazing, this type of divider also has
between-glass elements that separate the panes.
The width of the divider elements when projected onto the
plane of the window. It is assumed that the horizontal and
vertical divider elements have the same width. If not, an
average divider width should be entered such that the
projected divider area calculated using the average value
equals the sum of the areas of the divider elements.
The number of divider elements parallel to the top and
bottom of the window.
The number of divider elements parallel to the sides of the
window.
The amount by which the divider projects out from the
outside surface of the window glazing. For Divider Type =
Suspended, Divider Projection = 0.0. Used to calculate
shadowing of divider onto glass, solar absorbed by divider, IR
emitted and absorbed by divider, and convection from
divider.
The amount by which the divider projects inward from the
inside surface of the window glazing. If the inner surface of
the divider is flush with the glazing, Divider Inside
Projection = 0.0. Used to calculate solar absorbed by divider,
IR emitted and absorbed by divider, and convection from
divider.
The effective thermal conductance of the divider measured
from inside to outside divider surface (no air films) and
taking 2-D conduction effects into account. Obtained from the
WINDOW program or other 2-D calculation.
The glass conductance near the divider (excluding air
films) divided by the glass conductance at the center of the
glazing (excluding air films). Used only for multi-pane
glazing constructions. This ratio is greater than 1.0 because
of thermal bridging from the glazing across the divider and
across the spacer that separates the glass panes. Values can
be obtained from the WINDOW program for the user-selected
glazing construction and divider characteristics.
The solar absorptance of the divider. The value is assumed
to be the same on the inside and outside of the divider and to
be independent of angle of incidence of solar radiation. If
solar reflectance (or reflectivity) data is available, then
absorptance is equal to 1.0 minus reflectance (for opaque
materials).
The visible absorptance of the divider. The value is
assumed to be the same on the inside and outside of the
divider and to be independent of angle of incidence of solar
radiation. If visible reflectance (or reflectivity) data is
available, then absorptance is equal to 1.0 minus reflectance
(for opaque materials).
The thermal emissivity of the divider, assumed the same on
the inside and outside.
The following fields specify the properties of the window
reveal surfaces (reveals occur when the window is not in the
same plane as the base surface). From this information and
from the geometry of the window and the sun position, the
program calculates beam solar radiation absorbed and reflected
by the top, bottom, right and left sides of outside and inside
window reveal surfaces. In doing this calculation, the
shadowing on a reveal surface by other reveal surfaces is
determined using the orientation of the reveal surfaces and
the sun position.
The net effect of beam solar reflected from outside reveal
surfaces is to increase the heat gain to the zone, whereas the
effect of beam solar reflected from inside reveal surfaces is
to decrease the heat gain to the zone since part of this
reflected solar is transmitted back out the window.
If the window has a frame, the absorption of reflected beam
solar by the inside and outside surfaces of the frame is
considered. The shadowing of the frame onto interior reveal
surfaces is also considered.
The solar absorptance of outside reveal surfaces.
The depth of the inside sill, measured from the inside
surface of the glazing to the edge of the sill (see Figure
31).
The solar absorptance of the inside sill.
The depth of the inside reveal surfaces other than the
sill, measured from the inside surface of the glazing to the
edge of the reveal surface (see Figure 31).
This object is used to specify the control mechanism for
windows in which forced air flows in the gap between adjacent
layers of glass. Such windows are called “airflow windows.”
They are also known as “heat-extract windows” or “climate
windows.”
A common application is to reduce the zone load by
exhausting indoor air through the window. In the cooling
season this picks up and expels some of the solar heat
absorbed by the window glass (and by the between-glass shade
or blind, if present). In the heating season this warms the
window, reducing the heat loss from the window. A side benefit
is increased thermal comfort. This is because the inside
surface of the window will generally be cooler in summer and
warmer in winter.
An error will result if the gas in the airflow gap is other
than air. If an airflow window has a between-glass shade or
blind, the gas in the gap on either side of the shade or blind
must be air.
The source of the gap airflow. The choices are:
This is where the gap air goes after passing through the
window. The choices are:
Figure 32 shows the allowed combinations of Airflow Source
and Airflow Destination. The allowed combinations of Airflow
Source and Airflow Destination are:
The airflow can be modulated by specifying Airflow Has
Multiplier Schedule = Yes and giving the name of the Airflow
Multiplier Schedule (see below).
The fan energy used to move the air through the gap is
generally very small and so is ignored.
Specifies how the airflow is controlled. The choices
are:
Specifies if the airflow is scheduled. The choices are:
If Yes, Airflow Multiplier Schedule Name is required.
The name of a schedule with values between 0.0 and 1.0. The
timestep value of the airflow is Maximum Airflow times the
schedule value. Required if Airflow Is Scheduled = Yes. Unused
if Airflow Is Scheduled = No. This schedule should have a
ScheduleType with Numeric Type = Continuous and Range = 0.0 :
1.0.
An IDF example: window with a constant airflow from inside
to outside at 0.008 m3/s-m.
This object allows you to assign a movable exterior glass
layer (“storm window” or “storm glass”) that is usually
applied to a window in the winter to reduce heat loss and
removed in the summer. A WindowProperty:StormWindow
object is required for each window that has an associated
storm window. It is assumed that:
With the addition of a storm window, single glazing
effectively becomes double glazing, double glazing becomes
triple glazing, etc.
The presence of a storm window is indicated by the output
variable “Surface Storm Window
On Off Status” (see “Window Output Variables”). This flag is
0 if the storm window is off,
1 if it is on, and –1 if the
window does not have an associated storm window.
This is the name of a window (or glass door) to which the
storm glass is applied. Not all windows can accept WindowProperty:StormWindow.
The rules are:
This is the name of a window glass material. Storm windows
are assumed to consist of a single layer of glass. A storm
window frame, if present, is ignored.
The separation between the storm glass and the rest of the
window (Figure 33). It is measured from the inside of the
storm glass layer to the outside of the adjacent glass
layer.
The number of the month (January = 1, February = 2, etc.)
during which the storm window is put in place.
The day of the month that the storm window is put in place.
It is assumed that the storm window is put in place at the
beginning of this day, i.e., during the first simulation
timestep of the day, and remains in place until that month and
day given by the following two fields.
The number of the month (January = 1, February = 2, etc.)
during which the storm window is removed.
The day of the month that the storm window is removed. It
is assumed that the storm window is removed at the beginning
of this day, i.e., during the first simulation timestep of the
day, and stays off until the month and day given by Month that
Storm Glass Layer Is Put On, Day of Month that Storm Glass
Layer Is Put On.
In the northern hemisphere, the month the storm window is
put on is generally greater than the month it is taken off
(for example put on in month 10, when it starts to get cold,
and taken off in month 5, when it starts to warm up). In the
southern hemisphere this is reversed: month on is less than
month off.
The WINDOW program calculates the U-value, Solar Heat Gain
Coefficient, solar transmission/absorption characteristics,
visible transmission characteristics and other properties of a
window under standard indoor and outdoor conditions. WINDOW
treats the whole window system—glazing, frame and divider. A
sub-program of WINDOW called THERM uses a 2-D finite element
calculation to determine the effective conductance of frame,
divider and edge-of-glass elements. Another sub-program,
OPTICS, determines the solar-optical properties of glazing,
including laminates and coated glass.
WINDOW can write a data file containing a description of
the window that was analyzed. An example of this file (which
is no longer the preferred method) is shown in the Tips
document under WINDOW generated files. is shown below. This
file, which can be named by the user, can be read by
EnergyPlus. For more complete description and examples, see
the object description – [Construction:WindowDataFile](../input-output-reference/page-010.html#constructionwindowdatafile).
In this way, the same window that was created in WINDOW can
be imported into EnergyPlus for annual energy analysis without
having to re-input the window data. To obtain WINDOW, THERM,
or OPTICS go to http://windows.lbl.gov and choose the software
link. A major advantage of using WINDOW to create window input
for EnergyPlus is that you will have direct access to WINDOW’s
expanding database of over 1000 different glass types; and you
will be able to browse through this database according to
different criteria (color, transmittance, solar heat gain
coefficient, etc.) to help you select the best glass type for
your application.
Although WINDOW writes only one window entry on the WINDOW
data file, EnergyPlus users can combine two or more of these
files to end up with a single data file with multiple window
entries of different types. In this way a library of windows
from WINDOW can be built up if so desired. If you combine
files like this you should be sure not to leave out or change
any of lines from the original files.
In addition to the canned Surface reports (view the Reports
section later in this document) and surface variables (above),
the following variables are available for all zones:
These two variable outputs are/should be identical.
However, note that they can be reported at different time
intervals. “Zone Mean Air Temperature” is only available on
the Zone/HB timestep (Number of Timesteps per Hour) whereas
“Zone Air Temperature” can be reported at the HVAC timestep
(which can vary).
From the code definition, the zone mean air temperature is
the average temperature of the air temperatures at the system
timestep. Remember that the zone heat balance represents a
“well stirred” model for a zone, therefore there is only one
mean air temperature to represent the air temperature for the
zone.
This is very similar to the mean air temperature in the
last field. The “well stirred” model for the zone is the
basis, but this temperature is also available at the
“detailed” system timestep.
The Mean Radiant Temperature (MRT) in degrees Celsius of a
space is really the measure of the combined effects of
temperatures of surfaces within that space. The larger the
surface area and the closer one is to it, the more effect the
surface temperature of that surface has on each other. The MRT
is the measure of all these surface areas and
temperatures.
This field represents the sensible heating energy in Joules
that is actually supplied by the system to that zone for the
timestep reported. This is the sensible heating rate
multiplied by the simulation timestep. This is calculated and
reported from the Correct step in the Zone
Predictor-Corrector module. . This field is not multiplied by
zone or group multipliers.
This field represents the sensible cooling energy in Joules
that is actually supplied by the system to that zone for the
timestep reported. This is the sensible cooling rate
multiplied by the simulation timestep. This is calculated and
reported from the Correct step in the Zone
Predictor-Corrector module. This field is not multiplied by
zone or group multipliers.
This field represents the sensible heating rate in Watts
that is actually supplied by the system to that zone for the
timestep reported. This is calculated and reported from the
Correct step in the Zone
Predictor-Corrector module. This field is not multiplied by
zone or group multipliers.
This field represents the sensible cooling rate in Watts
that is actually supplied by the system to that zone for the
timestep reported. This is calculated and reported from the
Correct step in the Zone
Predictor-Corrector module. This field is not multiplied by
zone or group multipliers.
This field represents the air humidity ratio after the
correct step for each zone. The humidity ratio is the mass of
water vapor to the mass of dry air contained in the zone in
(kg water/kg air) and is unitless.
This field represents the air relative humidity ratio after
the correct step for each zone. The relative humidity is in
percent and uses the Zone
Air Temperature, the Zone
Air Humidity Ratio and the Outside Barometric Pressure for
calculation.
This field expresses the sum of heat gain in joules that is
the calculated short wavelength radiation gain from lights in
the zones. This calculation uses the total energy from lights
and the fraction visible to realize this value, summed over
the zones in the simulation.
This field represents the sum of latent gains from specific
internal sources (e.g. equipment) throughout the zone in
joules. This includes latent gain from [People](../input-output-reference/page-015.html#people),
Electric Equipment, Gas Equipment, Other Equipment, Hot Water
Equipment, and Steam Equipment.

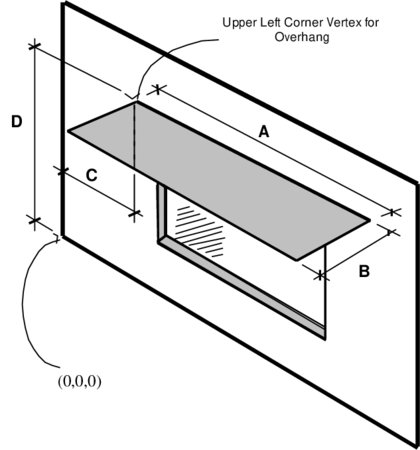 Illustration for Attached Shading Surface
 Allowed
locations of a window shading device.
Allowed
locations of a window shading device. A window with a
frame and divider.
A window with a
frame and divider.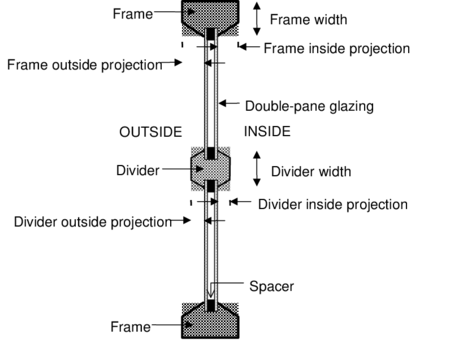 Illustration showing frame and divider dimensioning.
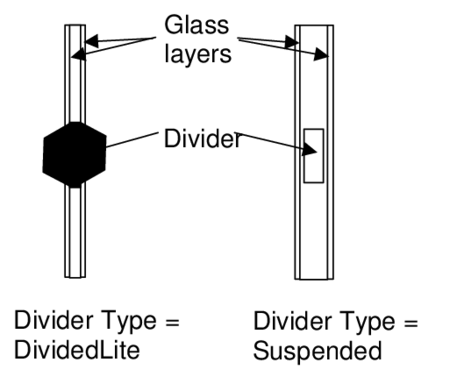 Illustration
showing divider types.
Illustration
showing divider types. (a) Vertical section through a window (with frame) showing
outside and inside reveal surfaces and inside sill. (b)
Perspective view looking from the outside of a window (without
frame) showing reveal surfaces. Note that “Outside Reveal
Depth” is not a user input; it is calculated by the program
from the window and wall vertices.
(a) Vertical section through a window (with frame) showing
outside and inside reveal surfaces and inside sill. (b)
Perspective view looking from the outside of a window (without
frame) showing reveal surfaces. Note that “Outside Reveal
Depth” is not a user input; it is calculated by the program
from the window and wall vertices.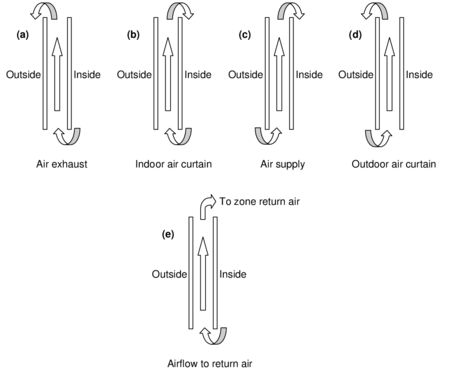 Gap airflow configurations for airflow windows. (a) Air
exhaust window: Airflow Source = InsideAir, Airflow
Destination = OutsideAir; (b) Indoor air curtain window:
Airflow Source = InsideAir, Airflow Destination = InsideAir;
(c) Air supply window: Airflow Source = OutsideAir, Airflow
Destination = InsideAir; (d) Outdoor air curtain window:
Airflow Source = OutsideAir, Airflow Destination = OutsideAir;
(e) Airflow to Return Air: Airflow Source = InsideAir, Airflow
Destination = ReturnAir. Based on “Active facades,” Version
no. 1, Belgian Building
Research Institute, June 2002.
Gap airflow configurations for airflow windows. (a) Air
exhaust window: Airflow Source = InsideAir, Airflow
Destination = OutsideAir; (b) Indoor air curtain window:
Airflow Source = InsideAir, Airflow Destination = InsideAir;
(c) Air supply window: Airflow Source = OutsideAir, Airflow
Destination = InsideAir; (d) Outdoor air curtain window:
Airflow Source = OutsideAir, Airflow Destination = OutsideAir;
(e) Airflow to Return Air: Airflow Source = InsideAir, Airflow
Destination = ReturnAir. Based on “Active facades,” Version
no. 1, Belgian Building
Research Institute, June 2002. Section through a single-glazed window without (left) and with
(right) a storm glass layer. Not to scale.
Section through a single-glazed window without (left) and with
(right) a storm glass layer. Not to scale.
Group – Thermal Zone Description/Geometry[LINK]
Without thermal zones and surfaces, the building can’t be simulated. This group of objects (Zone, BuildingSurface) describes the thermal zone characteristics as well as the details of each surface to be modeled. Included here are shading surfaces.
Zone[LINK]
This element sets up the parameters to simulate each thermal zone of the building.
Field: Direction of Relative North[LINK]
The Zone North Axis is specified relative to the Building](page-006.html#building) North Axis. This value is specified in degrees (clockwise is positive). For more information, see the figure below as well as the description under “[GlobalGeometryRules”.
Field(s): (X,Y,Z) Origin[LINK]
The X,Y,Z coordinates of a zone origin can be specified, for convenience in vertice entry. Depending on the values in “GlobalGeometryRules” (see description later in this section), these will be used to completely specify the building coordinates in “world coordinate” or not. Zone Origin coordinates are specified relative to the Building](page-006.html#building) Origin (which always 0,0,0). The following figure illustrates the use of [Zone North Axis as well as Zone Origin values.
Field: Type[LINK]
Zone type is currently unused.
Field: Multiplier[LINK]
Zone Multiplier is designed as a “multiplier” for floor area, zone loads, and energy consumed by internal gains. It takes the calculated load for the zone and multiplies it, sending the multiplied load to the attached HVAC system. The HVAC system size is specified to meet the entire multiplied zone load and will report the amount of the load met in the Zone Air System Sensible Heating or Cooling Energy/Rate output variable. Autosizing automatically accounts for multipliers. Metered energy consumption by internal gains objects such as [Lights](../input-output-reference/page-015.html#lights) or Electric Equipment will be mutliplied. The default is 1.
Field: Ceiling Height[LINK]
Zone ceiling height is used in several areas within EnergyPlus (such as various room models, some convection coefficient calculations and, primarily, in calculating zone volume in the absence of other parameters). Energyplus automatically calculates the zone ceiling height (m) from the average height of the zone. If this field is 0.0, negative or autocalculate, then the calculated zone ceiling height will be used in subsequent calculations. If this field is positive, then the calculated zone ceiling height will not be used – the number entered here will be used as the zone ceiling height. If this number differs significantly from the calculated ceiling height, then a warning message will be issued. If a zone ceiling height is entered, but no Volume is entered, then the floor area (if there is one) times the zone ceiling height will be used as the volume.
Note that the Zone Ceiling Height is the distance from the Floor to the Ceiling in the Zone, not an absolute height from the ground.
Field: Volume[LINK]
Zone volume is used in several areas within EnergyPlus (such as calculating air change rates for reporting or flow when air change rates are chosen as input, daylighting calculations, some convection coefficient calculations). EnergyPlus automatically calculates the zone volume (m3) from the zone geometry given by the surfaces that belong to the zone. If this field is 0.0, negative or autocalculate, then the calculated zone volume will be used in subsequent calculations. If this field is positive, then it will be used as the zone volume. If this number differs significantly from the calculated zone volume a warning message will be issued. For autocalculate to work properly, the zone must be enclosed by the entered walls. Note that indicating the volume to be calculated but entering a positive ceiling height in the previous field will cause the volume to be calculated as the floor area (if > 0) times the entered ceiling height; else the volume will be calculated from the described surfaces. If this field is positive, any ceiling height positive value will not be used in volume calculations.
Field: Floor Area[LINK]
Zone floor area is used in many places within EnergyPlus. EnergyPlus automatically calculates the zone floor area (m2) from the zone geometry given by the surfaces that belong to the zone. If this field is 0.0, negative or autocalculate, then the calculated zone floor area will be used in subsequent calculations. If this field is positive, then it will be used as the zone floor area. If this number differs significantly from the calculated zone floor area a warning message will be issued.
Field: Zone Inside Convection Algorithm[LINK]
The Zone Inside Convection Algorithm field is optional. This field specifies the convection model to be used for the inside face of heat transfer surfaes associated with this zone. The choices are: Simple (constant natural convection - ASHRAE), Detailed (variable natural convection based on temperature difference - ASHRAE), CeilingDiffuser (ACH based forced and mixed convection correlations for ceiling diffuser configuration with simple natural convection limit), AdaptiveConvectionAlgorithm (complex arrangement of various models that adapt to various zone conditions and can be customized) and TrombeWall (variable natural convection in an enclosed rectangular cavity). See the Inside Convection Algorithm object for further descriptions of the available models.
If omitted or blank, the algorithm specified in the [SurfaceConvectionAlgorithm:Inside](../input-output-reference/page-006.html#surfaceconvectionalgorithminside) object is the default.
Field: Zone Outside Convection Algorithm[LINK]
The Zone Outside Convection Algorithm field is optional. This field specifies the convection model to be used for the outside face of heat transfer surfaces associated with this zone. The choices are: SimpleCombined, TARP, DOE-2, MoWiTT, and AdaptiveConvectionAlgorithm. The simple convection model applies heat transfer coefficients depending on the roughness and windspeed. This is a combined heat transfer coefficient that includes radiation to sky, ground, and air. The correlation is based on Figure 1, Page 25.1 (Thermal and Water Vapor Transmission Data), 2001 ASHRAE Handbook of Fundamentals.
The other convection models apply heat transfer coefficients depending on the roughness, windspeed, and terrain of the building’s location. These are convection only heat transfer coefficients; radiation heat transfer coefficients are calculated automatically by the program. The TARP algorithm was developed for the TARP software and combines natural and wind-driven convection correlations from laboratory measurements on flat plates. The DOE-2 and MoWiTT were derived from field measurements. The AdaptiveConvectionAlgorithm model is an dynamic algorithm that organizes a large number of different convection models and automatically selects the one that best applies. The adaptive convection algorithm can also be customized using the [SurfaceConvectionAlgorithm:Outside:AdaptiveModelSelections](../input-output-reference/page-012.html#surfaceconvectionalgorithmoutsideadaptivemodelselections) input object. All algorithms are described more fully in the Engineering Reference.
If omitted or blank, the algorithm specified in the [SurfaceConvectionAlgorithm:Outside](../input-output-reference/page-006.html#surfaceconvectionalgorithmoutside) object is the default.
Field: Part of Total Floor Area[LINK]
This optional field defaults to Yes if not specified. The field is used to show when a zone is not part of the Total Floor Area as shown in the Annual [Building](../input-output-reference/page-006.html#building) Utility Performance Summary tables. Specifically, when No is specified, the area is excluded from both the conditioned floor area and the total floor area in the [Building](../input-output-reference/page-006.html#building) Area sub table and the Normalized Metrics sub tables.
And, an IDF example:
Zone Outputs[LINK]
Zone Outdoor Air Drybulb Temperature [C][LINK]
The outdoor air dry-bulb temperature calculated at the height above ground of the zone centroid.
Zone Outdoor Air Wetbulb Temperature [C][LINK]
The outdoor air wet-bulb temperature calculated at the height above ground of the zone centroid.
Zone Outdoor Air Wind Speed [m/s][LINK]
The outdoor wind speed calculated at the height above ground of the zone centroid.
Zone Thermal Output(s)[LINK]
In addition to the canned Surface reports (view the Reports section later in this document) and surface variables (above), the following variables are available for all zones:
Two of these are of particular interest:
These two variable outputs are/should be identical. However, note that they can be reported at different time intervals. “Zone Mean Air Temperature” is only available on the Zone/HB timestep (Number of Timesteps per Hour) whereas “Zone Air Temperature” can be reported at the HVAC timestep (which can vary).
Zone Mean Air Temperature [C][LINK]
From the code definition, the zone mean air temperature is the average temperature of the air temperatures at the system timestep. Remember that the zone heat balance represents a “well stirred” model for a zone, therefore there is only one mean air temperature to represent the air temperature for the zone.
Zone Air Temperature [C][LINK]
This is very similar to the mean air temperature in the last field. The “well stirred” model for the zone is the basis, but this temperature is also available at the “detailed” system timestep.
Zone Mean Air Dewpoint Temperature [C][LINK]
This is the dewpoint temperature of the zone calculated from the Zone Mean Air Temperature (above), the Zone Air Humidity Ratio (below) and the outdoor barometric pressure.
Zone Thermostat Air Temperature [C][LINK]
This is the zone air node temperature for the well-mixed room air model, which is the default room air model type (RoomAirModelType=Mixing). But for other types of Room Air Model (the RoomAir:TemperaturePattern:* and RoomAirSettings:* objects) the zone thermostat air temperature may depend on the Thermostat Height and Thermostat Offset.
Zone Mean Radiant Temperature [C][LINK]
The Mean Radiant Temperature (MRT) in degrees Celsius of a space is a measure of the combined effects of temperatures of surfaces within that space. Specifically it is the surface area × emissivity weighted average of the zone inside surface temperatures (ref. Surface Inside Temperature), where emissivity is the Thermal Absorptance of the inside material layer of each surface.
Zone Operative Temperature [C][LINK]
Zone Operative Temperature (OT) is the average of the Zone Mean Air Temperature (MAT) and Zone Mean Radiant Temperature (MRT), OT = 0.5*MAT + 0.5*MRT. This output variable is not affected by the type of thermostat controls in the zone, and does not include the direct effect of high temperature radiant systems. See also Zone Thermostat Operative Temperature.
Zone Air Heat Balance Internal Convective Heat Gain Rate [W][LINK]
The Zone Air Heat Balance Internal Convective Heat Gain Rate is the sum, in watts, of heat transferred to the zone air from all types of internal gains, including people, lights, equipment etc. This and the following provide results on the load components of the zone air heat balance. This field is not multiplied by zone or group multipliers.
Zone Air Heat Balance Surface Convection Rate [W][LINK]
The Zone Air Heat Balance Surface Convection Rate is the sum, in watts, of heat transferred to the zone air from all the surfaces. This field is not multiplied by zone or group multipliers.
Zone Air Heat Balance Interzone Air Transfer Rate [W][LINK]
The Zone Air Heat Balance Interzone Air Transfer Rate is the sum, in watts, of heat transferred to the zone air from all the transfers of air from other thermal zones. This field is not multiplied by zone or group multipliers.
Zone Air Heat Balance Outdoor Air Transfer Rate [W][LINK]
The Zone Air Heat Balance Outdoor Air Transfer Rate is the sum, in watts, of heat transferred to the zone air from all the transfers of air from the out side, such as infiltration. This field is not multiplied by zone or group multipliers.
Zone Air Heat Balance System Air Transfer Rate [W][LINK]
The Zone Air Heat Balance System Air Transfer Rate is the sum, in watts, of heat transferred to the zone air by HVAC forced-air systems and air terminal units. Such HVAC systems are connected to the zone by an inlet node (see ZoneHVac:EquipmentConnections input field called Zone Air Inlet Node or Node List Name) This field is not multiplied by zone or group multipliers.
Zone Air Heat Balance System Convective Heat Gain Rate [W][LINK]
The Zone Air Heat Balance System Convective Heat Gain Rate is the sum, in watts, of heat transferred directly to the zone air by “non-air” HVAC systems. Such HVAC systems are not connected to the zone by an inlet node but rather add or subtract heat directly to the zone air in a manner similar to internal gains. These include the convective fraction of zone HVAC baseboards and high temperature radiant systems, zone HVAC refrigeration chiller set, and the extra convective cooling provided by the cooled beam air terminal unit. This field is not multiplied by zone or group multipliers.
Zone Air Heat Balance Air Energy Storage Rate [W][LINK]
The Zone Air Heat Balance Air Energy Storage Rate is the heat stored, in watts, in the zone air as result of zone air temperature changing from one timestep to the next. This field is not multiplied by zone or group multipliers.
Zone Air Heat Balance Deviation Rate [W][LINK]
The Zone Air Heat Balance Deviation Rate is the imbalance, in watts, in the energy balance for zone air. The value should be near zero but will become non-zero if zone conditions are changing rapidly or erratically. This field is not multiplied by zone or group multipliers. (This output variable is only generated if the user has set a computer system environment variable DisplayAdvancedReportVariables equal to “yes”.)
Zone Air System Sensible Heating Energy [J][LINK]
This output variable represents the sensible heating energy in Joules that is actually supplied by the system to that zone for the timestep reported. This is the sensible heating rate multiplied by the simulation timestep. This is calculated and reported from the Correct step in the Zone Predictor-Corrector module. . This field is not multiplied by zone or group multipliers.
Zone Air System Sensible Cooling Energy [J][LINK]
This output variable represents the sensible cooling energy in Joules that is actually supplied by the system to that zone for the timestep reported. This is the sensible cooling rate multiplied by the simulation timestep. This is calculated and reported from the Correct step in the Zone Predictor-Corrector module. This field is not multiplied by zone or group multipliers.
Zone Air System Sensible Heating Rate [W][LINK]
This output variable represents the sensible heating rate in Watts that is actually supplied by the system to that zone for the timestep reported. This is calculated and reported from the Correct step in the Zone Predictor-Corrector module. This field is not multiplied by zone or group multipliers.
Zone Air System Sensible Cooling Rate [W][LINK]
This output variable represents the sensible cooling rate in Watts that is actually supplied by the system to that zone for the timestep reported. This is calculated and reported from the Correct step in the Zone Predictor-Corrector module. This field is not multiplied by zone or group multipliers.
Zone Air Humidity Ratio [kgWater/kgDryAir][LINK]
This output variable represents the air humidity ratio after the correct step for each zone. The humidity ratio is the mass of water vapor to the mass of dry air contained in the zone in (kg water/kg air) and is unitless.
Zone Air Relative Humidity [%][LINK]
This output variable represents the air relative humidity after the correct step for each zone. The relative humidity is in percent and uses the Zone Air Temperature, the Zone Air Humidity Ratio and the Outside Barometric Pressure for calculation.
Zone Total Internal Radiant Heating Rate [W][LINK]
Zone Total Internal Radiant Heating Energy [J][LINK]
These output variables represent the sum of radiant gains from specific internal sources (e.g. equipment) throughout the zone in Watts (for rate) or joules. This includes radiant gain from [People](../input-output-reference/page-015.html#people), [Lights](../input-output-reference/page-015.html#lights), Electric Equipment, Gas Equipment, Other Equipment, Hot Water Equipment, and Steam Equipment.
Zone Total Internal Visible Radiation Heating Rate [W][LINK]
Zone Total Internal Visible Radiation Heating Energy [J][LINK]
These output variables expresse the sum of heat gain in Watts (for rate) or joules that is the calculated short wavelength radiation gain from lights in the zones. This calculation uses the total energy from lights and the fraction visible to realize this value, summed over the zones in the simulation.
Zone Total Internal Convective Heating Rate [W][LINK]
Zone Total Internal Convective Heating Energy [J][LINK]
These output variables represent the sum of convective gains from specific sources (e.g. equipment) throughout the zone in Watts (for rate) or joules. This includes convective gain from [People](../input-output-reference/page-015.html#people), [Lights](../input-output-reference/page-015.html#lights), Electric Equipment, Gas Equipment, Other Equipment, Hot Water Equipment, and Steam Equipment.
Zone Total Internal Latent Gain Rate [W][LINK]
Zone Total Internal Latent Gain Energy [J][LINK]
These output variables represent the sum of latent gains from specific internal sources (e.g. equipment) throughout the zone in Watts (for rate) or joules. This includes latent gain from [People](../input-output-reference/page-015.html#people), Electric Equipment, Gas Equipment, Other Equipment, Hot Water Equipment, and Steam Equipment.
Zone Total Internal Total Heating Rate [W][LINK]
Zone Total Internal Total Heating Energy [J][LINK]
These output variables represent the sum of all heat gains throughout the zone in Watts (for rate) or joules. This includes all heat gains from [People](../input-output-reference/page-015.html#people), [Lights](../input-output-reference/page-015.html#lights), Electric Equipment, Gas Equipment, Other Equipment, Hot Water Equipment, and Steam Equipment.
ZoneList[LINK]
The ZoneList object defines a list of Zone objects. It is primarily used with the ZoneGroup object to provide a generalized way for doing “Floor Multipliers”. (See the ZoneGroup description below.) The associated ZoneList output variables also provide a way to aggregate and organize zone loads.
Zone lists are not exclusive. A zone can be referenced be more than one ZoneList object.
Field: Zone List Name[LINK]
The name of the ZoneList object. Must be unique across ZoneLists.
Field: Zone 1 – 20 Name[LINK]
Reference to a Zone object. This field is extensible; for greater than 20 zones, edit the IDD to add more Zone Name fields.
ZoneList Outputs[LINK]
The following output variables are reported by the ZoneList object:
All ZoneList variables are the sum of the corresponding Zone variables. Zone Multiplier fields in the Zone objects are also taken into account.
ZoneGroup[LINK]
The ZoneGroup object adds a multiplier to a ZoneList. This can be used to reduce the amount of input necessary for simulating repetitive structures, such as the identical floors of a multi-story building. To create a “Floor Multiplier”, use the ZoneList object to organize several zones into a typical floor. Then use the Zone List Multiplier field in the ZoneGroup object to multiply the system load for the zones in the list will also be multiplied. Zones with a Multiplier field greater than one in the Zone object are effectively double-multiplied.
Tips for Multi-Story Simulations:[LINK]
ZoneGroup and ZoneList can also be used to simulate other repetitive cases, such as clusters of zones on the ground.
Field: Zone Group Name[LINK]
The name of the ZoneGroup object. This must be unique across ZoneGroups.
Field: Zone List Name[LINK]
Reference to a ZoneList object. The zones in the list constitute the zones in the group.
Field: Zone List Multiplier[LINK]
An integer multiplier. Zone List Multiplier is designed as a “multiplier” for floor area, zone loads, and energy consumed by internal gains. It takes the calculated load for the zone and multiplies it, sending the multiplied load to the attached HVAC system. The HVAC system size is specified to meet the entire multiplied zone load and will report the amount of the load met in the Zone Air System Sensible Heating or Cooling Energy/Rate output variable. Autosizing automatically accounts for multipliers. Metered energy consumption by internal gains objects such as [Lights](../input-output-reference/page-015.html#lights) or Electric Equipment will be mutliplied. The default is 1.
ZoneGroup Outputs[LINK]
The following output variables are reported by the ZoneGroup object:
All ZoneGroup variables report the associated ZoneList value multiplied by the Zone List Multiplier.
Surface(s)[LINK]
What’s a building without surfaces?
EnergyPlus allows for several surface types:
Each of the preceding surfaces has “correct” geometry specifications. BuildingSurface and Fenestration surfaces (heat transfer surfaces) are used to describe the important elements of the building (walls, roofs, floors, windows, doors) that will determine the interactions of the building surfaces with the outside environment parameters and the internal space requirements. These surfaces are also used to represent “interzone” heat transfer. During specification of surfaces, several “outside” environments may be chosen:
Ground – when the surface is in touch with the ground (e.g. slab floors)
Outdoors – when the surface is an external surface (e.g. walls, roofs, windows directly exposed to the outdoor conditions)
Surface – when the surface is
An adiabatic internal zone surface
A interzone surface
Zone – when the surface is
A interzone surface in which the other surface is not put in the input file.
OtherSideCoefficients – when using a custom profile to describe the external conditions of the surface (advanced concept – covered in subject: [SurfaceProperty:OtherSideCoefficients](../input-output-reference/page-012.html#surfacepropertyothersidecoefficients))
OtherSideConditionsModel – when using specially modeled components, such as active solar systems, that cover the outside surface and modify the conditions it experiences.
Surface items must also specify an “outside face object”. This is
Zone items must also specify an “outside face object”. This is
Shading surfaces are used to describe aspects of the site which do not directly impact the physical interactions of the environmental parameters but may significantly shade the building during specific hours of the day or time so the year (e.g. trees, bushes, mountains, nearby buildings which aren’t being simulated as part of this facility, etc.)
Another surface type:
is used to specify the construction/material parameters and area of items within the space that are important to heat transfer calculations but not necessarily important geometrically. (For example, furniture within the space – particularly for large spaces). Internal mass can also be used for internal walls that are not needed (when FullInteriorAndExterior Solar Distribution is in effect) for solar distribution or to represent many, if not all, interior walls when solar is distributed to the floors only.
Interzone Surfaces[LINK]
EnergyPlus can quite accurately simulate the surface heat exchange between two zones. However, this accuracy is not always required and using interzonal heat transfer does add to the complexity of the calculations – thus requiring more CPU time to simulate. More information about interzonal heat transfer calculations is contained in the Engineering Reference. Some simple guidelines are presented here – for three cases: adiabatic surfaces, surfaces in “middle” zones, and surfaces where heat transfer is “expected” (e.g. between a residence and an unheated, attached garage).
Surface View Factors[LINK]
EnergyPlus uses an area weighted approximation to calculate “view factors” between surfaces within a thermal zone. Each surface uses the total area that it can “see” among the other surfaces. The approximate view factor from this surface to each other surface is then the area of the receiving surface over the sum of areas that is visible to the sending surface.
In order to account in some limited way for the fact that certain surfaces will not see each other, several assumptions have been built into this simple view factor approximation. First, a surface cannot see itself. Second, surfaces with approximately the same azimuth (facing direction) and tilt (“same” being within a built in limit) will not see each other. This means that a window will not see the wall that it is placed on, for example. Third, floors cannot see each other. Fourth, if the surface is a floor, ceiling, roof, or internal mass, the rule for the same azimuth and tilt eliminating radiant exchange between surface is waived when the receiving surface is floor, roof, ceiling, or internal mass as long as both surfaces are not floors.
Note that this does not take into account that surfaces may be “around the corner” from each other and in reality not see each other at all. Rooms are assumed to be convex rather than concave in this method.
To summarize, using the Surface “Class”, the approximate view factors have:
If geometry is correct, conditions 1,3, and 7 should take care of all surfaces, but the other conditions supply common sense when the geometry is incorrect. More information about the EnergyPlus view factor calculation is contained in the Engineering Reference document.
GlobalGeometryRules[LINK]
Before the surface objects are explained in detail, a description of geometric parameters used in EnergyPlus will be given. Since the input of surface vertices is common to most of the surface types, it will also be given a separate discussion.
Some flexibility is allowed in specifying surface vertices. This flexibility is embodied in the GlobalGeometryRules class/object in the input file. Note that the parameters specified in this statement are used for all surface vertice inputs – there is no further “flexibility” allowed.
In order to perform shadowing calculations, the building surfaces must be specified. EnergyPlus uses a three dimensional (3D) Cartesian coordinate system for surface vertex specification. This Right Hand coordinate system has the X-axis pointing east, the Y-axis pointing north, and the Z-axis pointing up. See figure below.
Field: Starting Vertex Position[LINK]
The shadowing algorithms in EnergyPlus rely on surfaces having vertices in a certain order and positional structure. Thus, the surface translator needs to know the starting point for each surface entry. The choices are: UpperLeftCorner, LowerLeftCorner , UpperRightCorner, or LowerRightCorner. Since most surfaces will be 4 sided, the convention will specify this position as though each surface were 4 sided. Extrapolate 3 sided figures to this convention. For 5 and more sided figures, again, try to extrapolate the best “corner” starting position.
Field: Vertex Entry Direction[LINK]
Surfaces are always specified as being viewed from the outside of the zone to which they belong. (Shading surfaces are specified slightly differently and are discussed under the particular types). EnergyPlus needs to know whether the surfaces are being specified in counterclockwise or clockwise order (from the Starting Vertex Position). EnergyPlus uses this to determine the outward facing normal for the surface (which is the facing angle of the surface – very important in shading and shadowing calculations.
Field: Coordinate System[LINK]
Vertices can be specified in two ways: using “Absolute”/“World” coordinates, or a relative coordinate specification. Relative coordinates allow flexibility of rapid change to observe changes in building results due to orientation and position. “World” coordinates will facilitate use within a CADD system structure.
Relative coordinates make use of both Building](page-006.html#building) and [Zone North Axis values as well as Zone Origin values to locate the surface in 3D coordinate space. World coordinates do not use these values.
Typically, all zone origin values for “World” coordinates will be (0,0,0) but Building](page-006.html#building) and [Zone North Axis values may be used in certain instances (namely the Daylighting Coordinate Location entries).
Field: Daylighting Reference Point Coordinate System[LINK]
Daylighting reference points need to be specified as well. Again, there can be two flavors; relative and world. Daylighting reference points must fit within the zone boundaries.
Relative coordinates make use of both Building](page-006.html#building) and [Zone North Axis values as well as Zone Origin values to locate the reference point in 3D coordinate space. World coordinates do not use these values.
Field: Rectangular Surface Coordinate System[LINK]
Simple, rectangular surfaces (Wall:Exterior, Wall:Adiabatic, Wall:Underground, Wall:Interzone, Roof, Ceiling:Adiabatic, Ceiling:Interzone, Floor:GroundContact, Floor:Adiabatic, Floor:Interzone) can be specified with their Lower Left Corner as relative or world.
Relative (default) corners are specified relative to the Zone Origin for each surface. World corners would specify the absolute/world coordinate for this corner.
Surfaces[LINK]
Surfaces make up the buildings and the elements that shade buildings. There are several methods to inputting surfaces, ranging from simple rectangular surfaces to detailed descriptions that describe each vertex in the order specified in the GlobalGeometryRules object. The simple, rectangular surface objects are described first with the more detailed descriptions following.
Walls[LINK]
Walls are usually vertical (tilt = 90 degrees). These objects are used to describe exterior walls, interior walls (adiabatic), underground walls, and walls adjacent to other zones.
Wall:Exterior[LINK]
The Wall:Exterior object is used to describe walls that are exposed to the external environment. They receive sun, wind – all the characteristics of the external world.
Field: Name[LINK]
This is a unique name associated with the exterior wall. It is used in several other places as a reference (e.g. as the base surface name for a Window or Door).
Field: Construction Name[LINK]
This is the name of the construction (ref: [Construction](../input-output-reference/page-010.html#construction) object) used in the surface. Regardless of location in the building, the “full” construction (all layers) is used. For example, for an interior wall separating two zones, zone x would have the outside layer (e.g. drywall) as the material that shows in zone y and then the layers to the inside layer – the material that shows in zone x. For symmetric constructions, the same construction can be used in the surfaces described in both zones.
Field: Zone Name[LINK]
This is the zone name to which the surface belongs.
Field: Azimuth Angle[LINK]
The Azimuth Angle indicates the direction that the wall faces (outward normal). The angle is specified in degrees where East=90, South=180, West=270, North=0.
Field: Tilt Angle[LINK]
The tilt angle is the angle (in degrees) that the wall is tilted from horizontal (or the ground). Normally, walls are tilted 90 degrees and that is the default for this field.
Starting Corner for the surface[LINK]
The rectangular surfaces specify the lower left corner of the surface for their starting coordinate. This is specified with (x,y,z) and can be relative to the zone origin or in world coordinates, depending on the value for rectangular surfaces specified in the GlobalGeometryRules object.
Field: Starting X Coordinate[LINK]
This field is the X coordinate (in meters).
Field: Starting Y Coordinate[LINK]
This field is the Y coordinate (in meters).
Field: Starting Z Coordinate[LINK]
This field is the Z coordinate (in meters).
Field: Length[LINK]
This field is the length of the wall in meters.
Field: Height[LINK]
This field is the height of the wall in meters.
Wall:Adiabatic[LINK]
The Wall:Adiabatic object is used to describe interior walls and partitions. Adiabatic walls are used to describe walls next to zones that have the same thermal conditions (thus, no heat transfer).
Field: Name[LINK]
This is a unique name associated with the interior wall. It is used in several other places as a reference (e.g. as the base surface name for a Window or Door).
Field: Construction Name[LINK]
This is the name of the construction (ref: [Construction](../input-output-reference/page-010.html#construction) object) used in the surface. Regardless of location in the building, the “full” construction (all layers) is used. For example, for an interior wall separating two zones, zone x would have the outside layer (e.g. drywall) as the material that shows in zone y and then the layers to the inside layer – the material that shows in zone x. For symmetric constructions, the same construction can be used in the surfaces described in both zones.
Field: Zone Name[LINK]
This is the zone name to which the surface belongs.
Field: Azimuth Angle[LINK]
The Azimuth Angle indicates the direction that the wall faces (outward normal). The angle is specified in degrees where East=90, South=180, West=270, North=0.
Field: Tilt Angle[LINK]
The tilt angle is the angle (in degrees) that the wall is tilted from horizontal (or the ground). Normally, walls are tilted 90 degrees and that is the default for this field.
Starting Corner for the surface[LINK]
The rectangular surfaces specify the lower left corner of the surface for their starting coordinate. This is specified with (x,y,z) and can be relative to the zone origin or in world coordinates, depending on the value for rectangular surfaces specified in the GlobalGeometryRules object.
Field: Starting X Coordinate[LINK]
This field is the X coordinate (in meters).
Field: Starting Y Coordinate[LINK]
This field is the Y coordinate (in meters).
Field: Starting Z Coordinate[LINK]
This field is the Z coordinate (in meters).
Field: Length[LINK]
This field is the length of the wall in meters.
Field: Height[LINK]
This field is the height of the wall in meters.
Wall:Underground[LINK]
The Wall:Underground object is used to describe walls with ground contact. The temperature at the outside of the wall is the temperature in the GroundTemperature:BuildingSurface object.
Field: Name[LINK]
This is a unique name associated with the underground wall. It is used in several other places as a reference (e.g. as the base surface name for a Window or Door).
Field: Construction Name[LINK]
This is the name of the construction (ref: [Construction](../input-output-reference/page-010.html#construction) object) used in the surface. Regardless of location in the building, the “full” construction (all layers) is used. For example, for an interior wall separating two zones, zone x would have the outside layer (e.g. drywall) as the material that shows in zone y and then the layers to the inside layer – the material that shows in zone x. For symmetric constructions, the same construction can be used in the surfaces described in both zones. Note that if the construction is Construction:CfactorUndergroundWall then the GroundFCfactoreMethod will be used for this wall.
Field: Zone Name[LINK]
This is the zone name to which the surface belongs.
Field: Azimuth Angle[LINK]
The Azimuth Angle indicates the direction that the wall faces (outward normal). The angle is specified in degrees where East=90, South=180, West=270, North=0.
Field: Tilt Angle[LINK]
The tilt angle is the angle (in degrees) that the wall is tilted from horizontal (or the ground). Normally, walls are tilted 90 degrees and that is the default for this field.
Starting Corner for the surface[LINK]
The rectangular surfaces specify the lower left corner of the surface for their starting coordinate. This is specified with (x,y,z) and can be relative to the zone origin or in world coordinates, depending on the value for rectangular surfaces specified in the GlobalGeometryRules object.
Field: Starting X Coordinate[LINK]
This field is the X coordinate (in meters).
Field: Starting Y Coordinate[LINK]
This field is the Y coordinate (in meters).
Field: Starting Z Coordinate[LINK]
This field is the Z coordinate (in meters).
Field: Length[LINK]
This field is the length of the wall in meters.
Field: Height[LINK]
This field is the height of the wall in meters.
Wall:Interzone[LINK]
The Wall:Interzone object is used to describe walls adjacent to zones that are significantly different conditions than the zone with this wall.
Field: Name[LINK]
This is a unique name associated with the interzone wall. It is used in several other places as a reference (e.g. as the base surface name for a Window or Door).
Field: Construction Name[LINK]
This is the name of the construction (ref: [Construction](../input-output-reference/page-010.html#construction) object) used in the surface. Regardless of location in the building, the “full” construction (all layers) is used. For example, for an interior wall separating two zones, zone x would have the outside layer (e.g. drywall) as the material that shows in zone y and then the layers to the inside layer – the material that shows in zone x. For symmetric constructions, the same construction can be used in the surfaces described in both zones.
Field: Zone Name[LINK]
This is the zone name to which the surface belongs.
Field: Outside Boundary Condition Object[LINK]
The Outside Boundary Condition Object field is the name of a wall in an adjacent zone or the name of the adjacent zone. If the adjacent zone option is used, the adjacent wall is automatically generated in the adjacent zone. If the surface name is used, it must be in the adjacent zone.
Field: Azimuth Angle[LINK]
The Azimuth Angle indicates the direction that the wall faces (outward normal). The angle is specified in degrees where East=90, South=180, West=270, North=0.
Field: Tilt Angle[LINK]
The tilt angle is the angle (in degrees) that the wall is tilted from horizontal (or the ground). Normally, walls are tilted 90 degrees and that is the default for this field.
Starting Corner for the surface[LINK]
The rectangular surfaces specify the lower left corner of the surface for their starting coordinate. This is specified with (x,y,z) and can be relative to the zone origin or in world coordinates, depending on the value for rectangular surfaces specified in the GlobalGeometryRules object.
Field: Starting X Coordinate[LINK]
This field is the X coordinate (in meters).
Field: Starting Y Coordinate[LINK]
This field is the Y coordinate (in meters).
Field: Starting Z Coordinate[LINK]
This field is the Z coordinate (in meters).
Field: Length[LINK]
This field is the length of the wall in meters.
Field: Height[LINK]
This field is the height of the wall in meters.
Roofs/Ceilings[LINK]
Roofs and ceilings are, by default, flat (tilt = 0 degrees). These objects are used to describe roofs, interior ceilings (adiabatic) and ceilings adjacent to other zones.
Roof[LINK]
The Roof object is used to describe roofs that are exposed to the external environment.
Field: Name[LINK]
This is a unique name associated with the roof. It is used in several other places as a reference (e.g. as the base surface name for a Window or Door).
Field: Construction Name[LINK]
This is the name of the construction (ref: [Construction](../input-output-reference/page-010.html#construction) object) used in the surface. Regardless of location in the building, the “full” construction (all layers) is used. For example, for an interior wall separating two zones, zone x would have the outside layer (e.g. drywall) as the material that shows in zone y and then the layers to the inside layer – the material that shows in zone x. For symmetric constructions, the same construction can be used in the surfaces described in both zones.
Field: Zone Name[LINK]
This is the zone name to which the surface belongs.
Field: Azimuth Angle[LINK]
The Azimuth Angle indicates the direction of the outward normal for the roof. The angle is specified in degrees where East=90, South=180, West=270, North=0.
Field: Tilt Angle[LINK]
The tilt angle is the angle (in degrees) that the wall is tilted from horizontal (or the ground). Flat roofs are tilted 0 degrees and that is the default for this field.
Starting Corner for the surface[LINK]
The rectangular surfaces specify the lower left corner of the surface for their starting coordinate. This is specified with (x,y,z) and can be relative to the zone origin or in world coordinates, depending on the value for rectangular surfaces specified in the GlobalGeometryRules object.
Field: Starting X Coordinate[LINK]
This field is the X coordinate (in meters).
Field: Starting Y Coordinate[LINK]
This field is the Y coordinate (in meters).
Field: Starting Z Coordinate[LINK]
This field is the Z coordinate (in meters).
Field: Length[LINK]
This field is the length of the roof in meters.
Field: Width[LINK]
This field is the width of the roof in meters.
Ceiling:Adiabatic[LINK]
The Ceiling:Adiabatic object is used to describe interior ceilings that separate zones of like conditions.
Field: Name[LINK]
This is a unique name associated with the ceiling. It is used in several other places as a reference (e.g. as the base surface name for a Window or Door).
Field: Construction Name[LINK]
This is the name of the construction (ref: [Construction](../input-output-reference/page-010.html#construction) object) used in the surface. Regardless of location in the building, the “full” construction (all layers) is used. For example, for an interior wall separating two zones, zone x would have the outside layer (e.g. drywall) as the material that shows in zone y and then the layers to the inside layer – the material that shows in zone x. For symmetric constructions, the same construction can be used in the surfaces described in both zones.
Field: Zone Name[LINK]
This is the zone name to which the surface belongs.
Field: Azimuth Angle[LINK]
The Azimuth Angle indicates the direction of the outward normal for the roof. The angle is specified in degrees where East=90, South=180, West=270, North=0.
Field: Tilt Angle[LINK]
The tilt angle is the angle (in degrees) that the wall is tilted from horizontal (or the ground). Flat ceilings are tilted 0 degrees and that is the default for this field.
Starting Corner for the surface[LINK]
The rectangular surfaces specify the lower left corner of the surface for their starting coordinate. This is specified with (x,y,z) and can be relative to the zone origin or in world coordinates, depending on the value for rectangular surfaces specified in the GlobalGeometryRules object.
Field: Starting X Coordinate[LINK]
This field is the X coordinate (in meters).
Field: Starting Y Coordinate[LINK]
This field is the Y coordinate (in meters).
Field: Starting Z Coordinate[LINK]
This field is the Z coordinate (in meters).
Field: Length[LINK]
This field is the length of the ceiling in meters.
Field: Width[LINK]
This field is the width of the ceiling in meters.
Ceiling:Interzone[LINK]
The Ceiling:Interzone object is used to describe interior ceilings that separate zones of differing conditions (and expect heat transfer through the ceiling from the adjacent zone).
Field: Name[LINK]
This is a unique name associated with the interzone ceiling. It is used in several other places as a reference (e.g. as the base surface name for a Window or Door).
Field: Construction Name[LINK]
This is the name of the construction (ref: [Construction](../input-output-reference/page-010.html#construction) object) used in the surface. Regardless of location in the building, the “full” construction (all layers) is used. For example, for an interior wall separating two zones, zone x would have the outside layer (e.g. drywall) as the material that shows in zone y and then the layers to the inside layer – the material that shows in zone x. For symmetric constructions, the same construction can be used in the surfaces described in both zones.
Field: Zone Name[LINK]
This is the zone name to which the surface belongs.
Field: Outside Boundary Condition Object[LINK]
The Outside Boundary Condition Object field is the name of a floor in an adjacent zone or the name of the adjacent zone. If the adjacent zone option is used, the adjacent floor is automatically generated in the adjacent zone. If the surface name is used, it must be in the adjacent zone.
Field: Azimuth Angle[LINK]
The Azimuth Angle indicates the direction of the outward normal for the roof. The angle is specified in degrees where East=90, South=180, West=270, North=0.
Field: Tilt Angle[LINK]
The tilt angle is the angle (in degrees) that the wall is tilted from horizontal (or the ground). Flat ceilings are tilted 0 degrees and that is the default for this field.
Starting Corner for the surface[LINK]
The rectangular surfaces specify the lower left corner of the surface for their starting coordinate. This is specified with (x,y,z) and can be relative to the zone origin or in world coordinates, depending on the value for rectangular surfaces specified in the GlobalGeometryRules object.
Field: Starting X Coordinate[LINK]
This field is the X coordinate (in meters).
Field: Starting Y Coordinate[LINK]
This field is the Y coordinate (in meters).
Field: Starting Z Coordinate[LINK]
This field is the Z coordinate (in meters).
Field: Length[LINK]
This field is the length of the ceiling in meters.
Field: Width[LINK]
This field is the width of the ceiling in meters.
Floors[LINK]
Floors are, by default, flat (tilt = 180 degrees). These objects are used to describe floors on the ground, interior floors (adiabatic) and floors adjacent to other zones.
Floor:GroundContact[LINK]
The Floor:GroundContact object is used to describe floors that have ground contact (usually called slabs). The temperature at the outside of the floor is the temperature in the GroundTemperature:BuildingSurface object.
Field: Name[LINK]
This is a unique name associated with the floor.
Field: Construction Name[LINK]
This is the name of the construction (ref: [Construction](../input-output-reference/page-010.html#construction) object) used in the surface. Regardless of location in the building, the “full” construction (all layers) is used. For example, for an interior wall separating two zones, zone x would have the outside layer (e.g. drywall) as the material that shows in zone y and then the layers to the inside layer – the material that shows in zone x. For symmetric constructions, the same construction can be used in the surfaces described in both zones. Note that if the construction is Construction:FfactorGroundFloor, then the GroundFCfactorMethod will be used with this floor.
Field: Zone Name[LINK]
This is the zone name to which the surface belongs.
Field: Azimuth Angle[LINK]
The Azimuth Angle indicates the direction of the outward normal for the roof. The angle is specified in degrees where East=90, South=180, West=270, North=0.
Field: Tilt Angle[LINK]
The tilt angle is the angle (in degrees) that the wall is tilted from horizontal (or the ground). Flat floors are tilted 180 degrees and that is the default for this field.
Starting Corner for the surface[LINK]
The rectangular surfaces specify the lower left corner of the surface for their starting coordinate. This is specified with (x,y,z) and can be relative to the zone origin or in world coordinates, depending on the value for rectangular surfaces specified in the GlobalGeometryRules object.
Field: Starting X Coordinate[LINK]
This field is the X coordinate (in meters).
Field: Starting Y Coordinate[LINK]
This field is the Y coordinate (in meters).
Field: Starting Z Coordinate[LINK]
This field is the Z coordinate (in meters).
Field: Length[LINK]
This field is the length of the floor in meters.
Field: Width[LINK]
This field is the width of the floor in meters.
Floor:Adiabatic[LINK]
The Floor:Adiabatict object is used to describe interior floors or floors that you wish to model with no heat transfer from the exterior to the floor.
Field: Name[LINK]
This is a unique name associated with the floor.
Field: Construction Name[LINK]
This is the name of the construction (ref: [Construction](../input-output-reference/page-010.html#construction) object) used in the surface. Regardless of location in the building, the “full” construction (all layers) is used. For example, for an interior wall separating two zones, zone x would have the outside layer (e.g. drywall) as the material that shows in zone y and then the layers to the inside layer – the material that shows in zone x. For symmetric constructions, the same construction can be used in the surfaces described in both zones.
Field: Zone Name[LINK]
This is the zone name to which the surface belongs.
Field: Azimuth Angle[LINK]
The Azimuth Angle indicates the direction of the outward normal for the roof. The angle is specified in degrees where East=90, South=180, West=270, North=0.
Field: Tilt Angle[LINK]
The tilt angle is the angle (in degrees) that the wall is tilted from horizontal (or the ground). Flat floors are tilted 180 degrees and that is the default for this field.
Starting Corner for the surface[LINK]
The rectangular surfaces specify the lower left corner of the surface for their starting coordinate. This is specified with (x,y,z) and can be relative to the zone origin or in world coordinates, depending on the value for rectangular surfaces specified in the GlobalGeometryRules object.
Field: Starting X Coordinate[LINK]
This field is the X coordinate (in meters).
Field: Starting Y Coordinate[LINK]
This field is the Y coordinate (in meters).
Field: Starting Z Coordinate[LINK]
This field is the Z coordinate (in meters).
Field: Length[LINK]
This field is the length of the floor in meters.
Field: Width[LINK]
This field is the width of the floor in meters.
Floor:Interzone[LINK]
The Floor:Interzone object is used to describe floors that are adjacent to other zones that have differing conditions and you wish to model the heat transfer through the floor.
Field: Name[LINK]
This is a unique name associated with the floor.
Field: Construction Name[LINK]
This is the name of the construction (ref: [Construction](../input-output-reference/page-010.html#construction) object) used in the surface. Regardless of location in the building, the “full” construction (all layers) is used. For example, for an interior wall separating two zones, zone x would have the outside layer (e.g. drywall) as the material that shows in zone y and then the layers to the inside layer – the material that shows in zone x. For symmetric constructions, the same construction can be used in the surfaces described in both zones.
Field: Zone Name[LINK]
This is the zone name to which the surface belongs.
Field: Outside Boundary Condition Object[LINK]
The Outside Boundary Condition Object field is the name of a ceiling in an adjacent zone or the name of the adjacent zone. If the adjacent zone option is used, the adjacent ceiling is automatically generated in the adjacent zone. If the surface name is used, it must be in the adjacent zone.
Field: Azimuth Angle[LINK]
The Azimuth Angle indicates the direction of the outward normal for the roof. The angle is specified in degrees where East=90, South=180, West=270, North=0.
Field: Tilt Angle[LINK]
The tilt angle is the angle (in degrees) that the wall is tilted from horizontal (or the ground). Flat floors are tilted 180 degrees and that is the default for this field.
Starting Corner for the surface[LINK]
The rectangular surfaces specify the lower left corner of the surface for their starting coordinate. This is specified with (x,y,z) and can be relative to the zone origin or in world coordinates, depending on the value for rectangular surfaces specified in the GlobalGeometryRules object.
Field: Starting X Coordinate[LINK]
This field is the X coordinate (in meters).
Field: Starting Y Coordinate[LINK]
This field is the Y coordinate (in meters).
Field: Starting Z Coordinate[LINK]
This field is the Z coordinate (in meters).
Field: Length[LINK]
This field is the length of the floor in meters.
Field: Width[LINK]
This field is the width of the floor in meters.
Windows/Doors[LINK]
The following window and door objects can be used to specify simple, rectangular doors and windows. In each case, the lower left corner (locator coordinate) of the window or door is specified relative to the surface it is on. Viewing the base surface as a planar surface, base the relative location from the lower left corner of the base surface. Vertex entry description as well as provisions for a few other surface types can be entered with the FenestrationSurface:Detailed object.
Window[LINK]
The Window object is used to place windows on surfaces that can have windows, including exterior walls, interior walls, interzone walls, roofs, floors that are exposed to outdoor conditions, interzone ceiling/floors. These, of course, can be entered using the simple rectangular objects or the more detailed vertex entry objects.
Field: Name[LINK]
This is a unique name associated with the window.
Field: Construction Name[LINK]
This is the name of the subsurface’s construction (ref: objects: [Construction](../input-output-reference/page-010.html#construction), [Construction:WindowDataFile](../input-output-reference/page-010.html#constructionwindowdatafile), Construction:CompexFenestrationState).
For windows, if Construction](page-010.html#construction) Name is not found among the constructions on the input (.idf) file, the [Window Data File (ref. [Construction:WindowDataFile](../input-output-reference/page-010.html#constructionwindowdatafile) object) will be searched for that [Construction](../input-output-reference/page-010.html#construction) Name (see “Importing Windows from WINDOW”). If that file is not present or if the [Construction](../input-output-reference/page-010.html#construction) Name does not match the name of an entry on the file, an error will result. If there is a match, a window construction and its corresponding glass and gas materials will be created from the information read from the file.
Field: Building Surface Name[LINK]
This is the name of a surface that contains this subsurface. Certain kinds of surfaces may not be allowed to have subsurfaces. For example, a surface in contact with the ground (e.g., Outside Boundary Condition = Ground) cannot contain a window. The window assumes the outward facing angle as well as the tilt angle of the base surface.
Field: Shading Control Name[LINK]
This field, if not blank, is the name of the window shading control (ref: WindowProperty:ShadingControl object) for this subsurface. It is used for Surface Type = Window and GlassDoor. To assign a shade to a window or glass door, see WindowMaterial: Shade. To assign a screen, see WindowMaterial:Screen](page-010.html#windowmaterialscreen). To assign a blind, see [WindowMaterial:Blind](../input-output-reference/page-010.html#windowmaterialblind). To assign switchable glazing, such as electrochromic glazing, see [WindowProperty:ShadingControl.
Field: Frame and Divider Name[LINK]
This field, if not blank, can be used to specify window frame, divider and reveal-surface data (ref: WindowProperty:FrameAndDivider object). It is used only for exterior GlassDoors and rectangular exterior Windows, i.e., those with OutsideFaceEnvironment = Outdoors.
This field should be blank for triangular windows.
Field: Multiplier[LINK]
This field is the number of identical items on the base surface. Using Multiplier can save input effort and calculation time. In the calculation the area (and area of frame and divider, if present and surface type is a window) is multiplied by Multiplier. The calculation of shadowing on the subsurfaces (and the calculation of the interior distribution of beam solar radiation transmitted by windows and glass doors) are done for the specified subsurface position and dimensions.
Multiplier should be used with caution. Multiplier > 1 can give inaccurate or nonsensical results in situations where the results are sensitive to window or glass door position. This includes shadowing on the window/glass door, daylighting from the window/glass door, and interior distribution of solar radiation from the window/glass door. In these cases, the results for the single input window/glass door, after multiplication, may not be representative of the results you would get if you entered each of the multiple subsurfaces separately.
If Multiplier > 1, you will get
–a warning if Solar Distribution = FullExterior or FullInteriorAndExterior (ref: [Building](../input-output-reference/page-006.html#building) - Field: Solar Distribution), indicating that the shadowing on the input window or the interior solar radiation distribution from the input window may not be representative of the actual group of windows. No warning is issued if Solar Distribution = MinimalShadowing.
–an error if the window is an exterior window/glass door in a zone that has a detailed daylighting calculation (Daylighting:Detailed specified for the zone). Since a single window with a multiplier can never give the same daylight illuminance as the actual set of windows, you are not allowed to use Multiplier in this situation.
Starting Corner for the surface[LINK]
The rectangular subsurfaces specify the lower left corner of the surface for their starting coordinate. This corner is specifed relative to the lower left corner of the base surface by specifying the X and Z values from that corner.
Field: Starting X Coordinate[LINK]
This field is the X coordinate (in meters).
Field: Starting Z Coordinate[LINK]
This field is the Z coordinate (in meters).
Field: Length[LINK]
This field is the length of the window in meters.
Field: Height[LINK]
This field is the height of the window in meters.
Door[LINK]
The Door object is used to place opaque doors on surfaces that can have doors, including exterior walls, interior walls, interzone walls, roofs, floors that are exposed to outdoor conditions, interzone ceiling/floors. These, of course, can be entered using the simple rectangular objects or the more detailed vertex entry objects.
Field: Name[LINK]
This is a unique name associated with the door.
Field: Construction Name[LINK]
This is the name of the subsurface’s construction (ref: [Construction](../input-output-reference/page-010.html#construction) object)
Field: Building Surface Name[LINK]
This is the name of a surface that contains this subsurface. Certain kinds of surfaces may not be allowed to have subsurfaces. The door assumes the outward facing angle as well as the tilt angle of the base surface.
Field: Multiplier[LINK]
This field is the number of identical items on the base surface. Using Multiplier can save input effort and calculation time. In the calculation the area (and area of frame and divider, if present and surface type is a window) is multiplied by Multiplier. The calculation of shadowing on the subsurfaces (and the calculation of the interior distribution of beam solar radiation transmitted by windows and glass doors) are done for the specified subsurface position and dimensions.
Multiplier should be used with caution. Multiplier > 1 can give inaccurate or nonsensical results in situations where the results are sensitive to window or glass door position. This includes shadowing on the window/glass door, daylighting from the window/glass door, and interior distribution of solar radiation from the window/glass door. In these cases, the results for the single input window/glass door, after multiplication, may not be representative of the results you would get if you entered each of the multiple subsurfaces separately.
If Multiplier > 1, you will get
–a warning if Solar Distribution = FullExterior or FullInteriorAndExterior (ref: [Building](../input-output-reference/page-006.html#building) - Field: Solar Distribution), indicating that the shadowing on the input window or the interior solar radiation distribution from the input window may not be representative of the actual group of windows. No warning is issued if Solar Distribution = MinimalShadowing.
–an error if the window is an exterior window/glass door in a zone that has a detailed daylighting calculation (Daylighting:Detailed specified for the zone). Since a single window with a multiplier can never give the same daylight illuminance as the actual set of windows, you are not allowed to use Multiplier in this situation.
Starting Corner for the surface[LINK]
The rectangular subsurfaces specify the lower left corner of the surface for their starting coordinate. This corner is specifed relative to the lower left corner of the base surface by specifying the X and Z values from that corner.
Field: Starting X Coordinate[LINK]
This field is the X coordinate (in meters).
Field: Starting Z Coordinate[LINK]
This field is the Z coordinate (in meters).
Field: Length[LINK]
This field is the length of the door in meters.
Field: Height[LINK]
This field is the height of the door in meters.
GlazedDoor[LINK]
The GlazedDoor object is used to place doors on surfaces that can have doors, including exterior walls, interior walls, interzone walls, roofs, floors that are exposed to outdoor conditions, interzone ceiling/floors. These, of course, can be entered using the simple rectangular objects or the more detailed vertex entry objects.
Field: Name[LINK]
This is a unique name associated with the glass door.
Field: Construction Name[LINK]
This is the name of the subsurface’s construction (ref: objects: [Construction](../input-output-reference/page-010.html#construction), [Construction:WindowDataFile](../input-output-reference/page-010.html#constructionwindowdatafile), Construction:CompexFenestrationState).
For windows, if Construction](page-010.html#construction) Name is not found among the constructions on the input (.idf) file, the [Window Data File (ref. [Construction:WindowDataFile](../input-output-reference/page-010.html#constructionwindowdatafile) object) will be searched for that [Construction](../input-output-reference/page-010.html#construction) Name (see “Importing Windows from WINDOW”). If that file is not present or if the [Construction](../input-output-reference/page-010.html#construction) Name does not match the name of an entry on the file, an error will result. If there is a match, a window construction and its corresponding glass and gas materials will be created from the information read from the file.
Field: Building Surface Name[LINK]
This is the name of a surface that contains this subsurface. Certain kinds of surfaces may not be allowed to have subsurfaces. For example, a surface in contact with the ground (Outside Boundary Condition = Ground) cannot contain a window. The door assumes the outward facing angle as well as the tilt angle of the base surface.
Field: Shading Control Name[LINK]
This field, if not blank, is the name of the window shading control (ref: WindowProperty:ShadingControl object) for this subsurface. It is used for Surface Type = Window and GlassDoor. To assign a shade to a window or glass door, see WindowMaterial: Shade. To assign a screen, see WindowMaterial:Screen](page-010.html#windowmaterialscreen). To assign a blind, see [WindowMaterial:Blind](../input-output-reference/page-010.html#windowmaterialblind). To assign switchable glazing, such as electrochromic glazing, see [WindowProperty:ShadingControl.
Field: Frame and Divider Name[LINK]
This field, if not blank, can be used to specify window frame, divider and reveal-surface data (ref: WindowProperty:FrameAndDivider object). It is used only for exterior GlassDoors and rectangular exterior Windows, i.e., those with OutsideFaceEnvironment = Outdoors.
This field should be blank for triangular windows.
Field: Multiplier[LINK]
This field is the number of identical items on the base surface. Using Multiplier can save input effort and calculation time. In the calculation the area (and area of frame and divider, if present and surface type is a window) is multiplied by Multiplier. The calculation of shadowing on the subsurfaces (and the calculation of the interior distribution of beam solar radiation transmitted by windows and glass doors) are done for the specified subsurface position and dimensions.
Multiplier should be used with caution. Multiplier > 1 can give inaccurate or nonsensical results in situations where the results are sensitive to window or glass door position. This includes shadowing on the window/glass door, daylighting from the window/glass door, and interior distribution of solar radiation from the window/glass door. In these cases, the results for the single input window/glass door, after multiplication, may not be representative of the results you would get if you entered each of the multiple subsurfaces separately.
If Multiplier > 1, you will get
–a warning if Solar Distribution = FullExterior or FullInteriorAndExterior (ref: [Building](../input-output-reference/page-006.html#building) - Field: Solar Distribution), indicating that the shadowing on the input window or the interior solar radiation distribution from the input window may not be representative of the actual group of windows. No warning is issued if Solar Distribution = MinimalShadowing.
–an error if the window is an exterior window/glass door in a zone that has a detailed daylighting calculation (Daylighting:Detailed specified for the zone). Since a single window with a multiplier can never give the same daylight illuminance as the actual set of windows, you are not allowed to use Multiplier in this situation.
Starting Corner for the surface[LINK]
The rectangular subsurfaces specify the lower left corner of the surface for their starting coordinate. This corner is specifed relative to the lower left corner of the base surface by specifying the X and Z values from that corner.
Field: Starting X Coordinate[LINK]
This field is the X coordinate (in meters).
Field: Starting Z Coordinate[LINK]
This field is the Z coordinate (in meters).
Field: Length[LINK]
This field is the length of the door in meters.
Field: Height[LINK]
This field is the height of the door in meters.
Window:Interzone[LINK]
The Window:Interzone object is used to place windows on surfaces that can have windows, including interzone walls, interzone ceiling/floors. These, of course, can be entered using the simple rectangular objects or the more detailed vertex entry objects.
Field: Name[LINK]
This is a unique name associated with the window.
Field: Construction Name[LINK]
This is the name of the subsurface’s construction (ref: objects: [Construction](../input-output-reference/page-010.html#construction), [Construction:WindowDataFile](../input-output-reference/page-010.html#constructionwindowdatafile), Construction:CompexFenestrationState).
For windows, if Construction](page-010.html#construction) Name is not found among the constructions on the input (.idf) file, the [Window Data File (ref. [Construction:WindowDataFile](../input-output-reference/page-010.html#constructionwindowdatafile) object) will be searched for that [Construction](../input-output-reference/page-010.html#construction) Name (see “Importing Windows from WINDOW”). If that file is not present or if the [Construction](../input-output-reference/page-010.html#construction) Name does not match the name of an entry on the file, an error will result. If there is a match, a window construction and its corresponding glass and gas materials will be created from the information read from the file.
Field: Building Surface Name[LINK]
This is the name of a surface that contains this subsurface. Certain kinds of surfaces may not be allowed to have subsurfaces. For example, a surface in contact with the ground (Outside Boundary Condition = Ground) cannot contain a window. The window assumes the outward facing angle as well as the tilt angle of the base surface.
Field: Outside Boundary Condition Object[LINK]
The Outside Boundary Condition Object field is the name of a window in an adjacent zone or the name of the adjacent zone. If the adjacent zone option is used, the adjacent ceiling is automatically generated in the adjacent zone. If the surface name is used, it must be in the adjacent zone.
Field: Multiplier[LINK]
This field is the number of identical items on the base surface. Using Multiplier can save input effort and calculation time. In the calculation the area (and area of frame and divider, if present and surface type is a window) is multiplied by Multiplier. The calculation of shadowing on the subsurfaces (and the calculation of the interior distribution of beam solar radiation transmitted by windows and glass doors) are done for the specified subsurface position and dimensions.
Multiplier should be used with caution. Multiplier > 1 can give inaccurate or nonsensical results in situations where the results are sensitive to window or glass door position. This includes shadowing on the window/glass door, daylighting from the window/glass door, and interior distribution of solar radiation from the window/glass door. In these cases, the results for the single input window/glass door, after multiplication, may not be representative of the results you would get if you entered each of the multiple subsurfaces separately.
If Multiplier > 1, you will get
–a warning if Solar Distribution = FullExterior or FullInteriorAndExterior (ref: [Building](../input-output-reference/page-006.html#building) - Field: Solar Distribution), indicating that the shadowing on the input window or the interior solar radiation distribution from the input window may not be representative of the actual group of windows. No warning is issued if Solar Distribution = MinimalShadowing.
–an error if the window is an exterior window/glass door in a zone that has a detailed daylighting calculation (Daylighting:Detailed specified for the zone). Since a single window with a multiplier can never give the same daylight illuminance as the actual set of windows, you are not allowed to use Multiplier in this situation.
Starting Corner for the surface[LINK]
The rectangular subsurfaces specify the lower left corner of the surface for their starting coordinate. This corner is specifed relative to the lower left corner of the base surface by specifying the X and Z values from that corner.
Field: Starting X Coordinate[LINK]
This field is the X coordinate (in meters).
Field: Starting Z Coordinate[LINK]
This field is the Z coordinate (in meters).
Field: Length[LINK]
This field is the length of the window in meters.
Field: Height[LINK]
This field is the height of the window in meters.
Door:Interzone[LINK]
The Door:Interzone object is used to place opaque doors on surfaces that can have doors, including interzone walls, interzone ceiling/floors. These, of course, can be entered using the simple rectangular objects or the more detailed vertex entry objects.
Field: Name[LINK]
This is a unique name associated with the door.
Field: Construction Name[LINK]
This is the name of the subsurface’s construction (ref: [Construction](../input-output-reference/page-010.html#construction) object).
Field: Building Surface Name[LINK]
This is the name of a surface that contains this subsurface. Certain kinds of surfaces may not be allowed to have subsurfaces. The door assumes the outward facing angle as well as the tilt angle of the base surface.
Field: Outside Boundary Condition Object[LINK]
The Outside Boundary Condition Object field is the name of a door in an adjacent zone or the name of the adjacent zone. If the adjacent zone option is used, the adjacent ceiling is automatically generated in the adjacent zone. If the surface name is used, it must be in the adjacent zone.
Field: Multiplier[LINK]
This field is the number of identical items on the base surface. Using Multiplier can save input effort and calculation time. In the calculation the area (and area of frame and divider, if present and surface type is a window) is multiplied by Multiplier. The calculation of shadowing on the subsurfaces (and the calculation of the interior distribution of beam solar radiation transmitted by windows and glass doors) are done for the specified subsurface position and dimensions.
Multiplier should be used with caution. Multiplier > 1 can give inaccurate or nonsensical results in situations where the results are sensitive to window or glass door position. This includes shadowing on the window/glass door, daylighting from the window/glass door, and interior distribution of solar radiation from the window/glass door. In these cases, the results for the single input window/glass door, after multiplication, may not be representative of the results you would get if you entered each of the multiple subsurfaces separately.
If Multiplier > 1, you will get
–a warning if Solar Distribution = FullExterior or FullInteriorAndExterior (ref: [Building](../input-output-reference/page-006.html#building) - Field: Solar Distribution), indicating that the shadowing on the input window or the interior solar radiation distribution from the input window may not be representative of the actual group of windows. No warning is issued if Solar Distribution = MinimalShadowing.
–an error if the window is an exterior window/glass door in a zone that has a detailed daylighting calculation (Daylighting:Detailed specified for the zone). Since a single window with a multiplier can never give the same daylight illuminance as the actual set of windows, you are not allowed to use Multiplier in this situation.
Starting Corner for the surface[LINK]
The rectangular subsurfaces specify the lower left corner of the surface for their starting coordinate. This corner is specifed relative to the lower left corner of the base surface by specifying the X and Z values from that corner.
Field: Starting X Coordinate[LINK]
This field is the X coordinate (in meters).
Field: Starting Z Coordinate[LINK]
This field is the Z coordinate (in meters).
Field: Length[LINK]
This field is the length of the door in meters.
Field: Height[LINK]
This field is the height of the door in meters.
GlazedDoor:Interzone[LINK]
The GlazedDoor:Interzone object is used to place doors on surfaces that can have doors, including interzone walls, interzone ceiling/floors. These, of course, can be entered using the simple rectangular objects or the more detailed vertex entry objects.
Field: Name[LINK]
This is a unique name associated with the glass door.
Field: Construction Name[LINK]
This is the name of the subsurface’s construction (ref: objects: [Construction](../input-output-reference/page-010.html#construction), [Construction:WindowDataFile](../input-output-reference/page-010.html#constructionwindowdatafile), [Construction:ComplexFenestrationState](../input-output-reference/page-010.html#constructioncomplexfenestrationstate)).
For windows, if Construction](page-010.html#construction) Name is not found among the constructions on the input (.idf) file, the [Window Data File (ref. [Construction:WindowDataFile](../input-output-reference/page-010.html#constructionwindowdatafile) object) will be searched for that [Construction](../input-output-reference/page-010.html#construction) Name (see “Importing Windows from WINDOW”). If that file is not present or if the [Construction](../input-output-reference/page-010.html#construction) Name does not match the name of an entry on the file, an error will result. If there is a match, a window construction and its corresponding glass and gas materials will be created from the information read from the file.
Field: Building Surface Name[LINK]
This is the name of a surface that contains this subsurface. Certain kinds of surfaces may not be allowed to have subsurfaces. For example, a surface in contact with the ground (Outside Boundary Condition = Ground) cannot contain a window. The door assumes the outward facing angle as well as the tilt angle of the base surface.
Field: Outside Boundary Condition Object[LINK]
The Outside Boundary Condition Object field is the name of a glazed (glass) door in an adjacent zone or the name of the adjacent zone. If the adjacent zone option is used, the adjacent ceiling is automatically generated in the adjacent zone. If the surface name is used, it must be in the adjacent zone.
Field: Multiplier[LINK]
This field is the number of identical items on the base surface. Using Multiplier can save input effort and calculation time. In the calculation the area (and area of frame and divider, if present and surface type is a window) is multiplied by Multiplier. The calculation of shadowing on the subsurfaces (and the calculation of the interior distribution of beam solar radiation transmitted by windows and glass doors) are done for the specified subsurface position and dimensions.
Multiplier should be used with caution. Multiplier > 1 can give inaccurate or nonsensical results in situations where the results are sensitive to window or glass door position. This includes shadowing on the window/glass door, daylighting from the window/glass door, and interior distribution of solar radiation from the window/glass door. In these cases, the results for the single input window/glass door, after multiplication, may not be representative of the results you would get if you entered each of the multiple subsurfaces separately.
If Multiplier > 1, you will get
–a warning if Solar Distribution = FullExterior or FullInteriorAndExterior (ref: [Building](../input-output-reference/page-006.html#building) - Field: Solar Distribution), indicating that the shadowing on the input window or the interior solar radiation distribution from the input window may not be representative of the actual group of windows. No warning is issued if Solar Distribution = MinimalShadowing.
–an error if the window is an exterior window/glass door in a zone that has a detailed daylighting calculation (Daylighting:Detailed specified for the zone). Since a single window with a multiplier can never give the same daylight illuminance as the actual set of windows, you are not allowed to use Multiplier in this situation.
Starting Corner for the surface[LINK]
The rectangular subsurfaces specify the lower left corner of the surface for their starting coordinate. This corner is specifed relative to the lower left corner of the base surface by specifying the X and Z values from that corner.
Field: Starting X Coordinate[LINK]
This field is the X coordinate (in meters).
Field: Starting Z Coordinate[LINK]
This field is the Z coordinate (in meters).
Field: Length[LINK]
This field is the length of the door in meters.
Field: Height[LINK]
This field is the height of the door in meters.
Examples of the rectangular surfaces are found in the example files 4ZoneWithShading_Simple_1.idf and 4ZoneWithShading_Simple_2. Some examples:
Surface Vertices[LINK]
Each of the following surfaces:
BuildingSurface:Detailed
Wall:Detailed
RoofCeiling:Detailed
Floor:Detailed
FenstrationSurface:Detailed
Shading:Site:Detailed
Shading:Building:Detailed
Shading:Zone:Detailed
use the same vertex input. The numeric parameters indicated below are taken from the BuildingSurface:Detailed definition; the others may not be exactly the same but are identical in configuration. They are also “extensible” – so, if you want more vertices for these surfaces, you may add to the IDD definition as indicated in the “extensible” comment or, as EnergyPlus is “auto-extensible” just add the number of vertices into your input file.. Note that FenestrationSurface:Detailed is not extensible and is limited to 4 (max) vertices. If you leave the Number of Surface Vertex groups blank or enter autocalculate, EnergyPlus looks at the number of groups entered and figures out how many coordinate groups are entered.
The figure above will help illustrate Surface Vertex entry. The convention used in “GlobalGeometryRules” dictates the order of the vertices (ref: GlobalGeometryRules). In this example, the conventions used are Starting Vertex Position = UpperLeftCorner and Vertex Entry Direction= CounterClockwise. The surfaces for this single zone are:
Note that in this example, point 1 of the entry is the Upper Left Corner of the rectangular surfaces and the point of the triangle for the 3 sided surface. The east wall shows the order of vertex entry. For horizontal surfaces, any vertex may be chosen as the starting position, but the Vertex Entry Direction convention must be followed. The surface details report (Output: Surfaces:List, Details;) is very useful for reviewing the accuracy of surface geometry inputs (ref: Surface Output Variables/Reports and Variable Dictionary Reports).
From the detailed vertices, EnergyPlus tries to determine the “height” and “width” of the surface. Obviously, this doesn’t work well for >4 sided surfaces; for these, if the calculated height and width are not close to the gross area for the surface, the height and width shown will be the square root of the area (and thus a square).
Building Surfaces - Detailed[LINK]
A building surface is necessary for all calculations. There must be at least one building surface per zone. You can use the detailed descriptions as shown below or the simpler, rectangular surface descriptions shown earlier.
Wall:Detailed[LINK]
The Wall:Detailed object is used to describe walls.
Field: Name[LINK]
This is a unique name associated with each building surface. It is used in several other places as a reference (e.g. as the base surface name for a Window or Door).
Field: Construction Name[LINK]
This is the name of the construction (ref: [Construction](../input-output-reference/page-010.html#construction) object) used in the surface. Regardless of location in the building, the “full” construction (all layers) is used. For example, for an interior wall separating two zones, zone x would have the outside layer (e.g. drywall) as the material that shows in zone y and then the layers to the inside layer – the material that shows in zone x. For symmetric constructions, the same construction can be used in the surfaces described in both zones.
Field: Zone Name[LINK]
This is the zone name to which the surface belongs.
Field: Outside Boundary Condition[LINK]
This value can be one of several things depending on the actual kind of surface.
Surface – if this surface is an internal surface, then this is the choice. The value will either be a surface in the base zone or a surface in another zone. The heat balance between two zones can be accurately simulated by specifying a surface in an adjacent zone. EnergyPlus will simulate a group of zones simultaneously and will include the heat transfer between zones. However, as this increases the complexity of the calculations, it is not necessary to specify the other zone unless the two zones will have a significant temperature difference. If the two zones will not be very different (temperature wise), then the surface should use itself as the outside environment or specify this field as Adiabatic. The surface name on the “outside” of this surface (adjacent to) is placed in the next field.
Adiabatic – an internal surface in the same Zone. This surface will not transfer heat out of the zone, but will still store heat in thermal mass. Only the inside face of the surface will exchange heat with the zone (i.e. two adiabatic surfaces are required to model internal partitions where both sides of the surface are exchanging heat with the zone). The Outside Boundary Condition Object can be left blank.
Zone – this is similar to Surface but EnergyPlus will automatically create the required surface in the adjacent zone when this is entered for the surface. If there are windows or doors on the surface, EnergyPlus automatically creates appropriate sub-surfaces as well.
Outdoors – if this surface is exposed to outside temperature conditions, then this is the choice. See Sun Exposure and Wind Exposure below for further specifications on this kind of surface.
Ground – if this surface is exposed to the ground, then this is the usual choice. The temperature on the outside of this surface will be the Site:GroundTemperature:Surface value for the month. For more information on ground contact surfaces, reference the Auxiliary Programs document section on “Ground Heat Transfer in EnergyPlus”.
GroundFCfactorMethod – if this surface is exposed to the ground and using the Construction:CfactorUndergroundWall, then this is the choice. The temperature on the outside of this surface will be the Site:GroundTemperature:FcfactorMethod value for the month.
OtherSideCoefficients – if this surface has a custom, user specified temperature or other parameters (See [SurfaceProperty:OtherSideCoefficients](../input-output-reference/page-012.html#surfacepropertyothersidecoefficients) specification), then this is the choice. The outside boundary condition will be the name of the [SurfaceProperty:OtherSideCoefficients](../input-output-reference/page-012.html#surfacepropertyothersidecoefficients) specification.
OtherSideConditionsModel – if this surface has a specially-modeled multi-skin component, such as a transpired collector or vented photovoltaic panel, attached to the outside (See [SurfaceProperty:OtherSideConditionsModel](../input-output-reference/page-012.html#surfacepropertyothersideconditionsmodel) specification), then this the choice. The outside face environment will be the name of the SurfaceProperty:OtherSideConditionsModelspecification.
GroundSlabPreprocessorAverage – uses the average results from the Slab preprocessor calculations.
GroundSlabPreprocessorCore – uses the core results from the Slab preprocessor calculations.
GroundSlabPreprocessorPerimeter – uses the perimeter results from the Slab preprocessor calculations.
GroundBasementPreprocessorAverageWall – uses the average wall results from the Basement preprocessor calculations.
GroundBasementPreprocessorAverageFloor – uses the average floor results from the Basement preprocessor calculations.
GroundBasementPreprocessorUpperWall – uses the upper wall results from the Basement preprocessor calculations.
GroundBasementPreprocessorLowerWall – uses the lower wall results from the Basement preprocessor calculations.
Field: Outside Boundary Condition Object[LINK]
If neither Surface, OtherSideCoefficients, or OtherSideConditionsModel are specified for the Outside Boundary Condition (previous field), then this field should be left blank.
As stated above, if the Outside Boundary Condition is “Surface”, then this field’s value must be the surface name whose inside face temperature will be forced on the outside face of the base surface. This permits heat exchange between adjacent zones (interzone heat transfer) when multiple zones are simulated, but can also be used to simulate middle zone behavior without modeling the adjacent zones. This is done by specifying a surface within the zone. For example, a middle floor zone can be modeled by making the floor the Outside Boundary Condition Object for the ceiling, and the ceiling the Outside Boundary Condition Object for the floor.
If the Outside Boundary Condition is Zone, then this field should contain the zone name of the adjacent zone for the surface.
Equally, if the Outside Boundary Condition is “OtherSideCoefficients”, then this field’s value must be the [SurfaceProperty:OtherSideCoefficients](../input-output-reference/page-012.html#surfacepropertyothersidecoefficients) name. Or if the Outside Boundary Condition is “OtherSideConditionsModel” then this field’s value must be the [SurfaceProperty:OtherSideConditionsModel](../input-output-reference/page-012.html#surfacepropertyothersideconditionsmodel) name.
Field: Sun Exposure[LINK]
If the surface is exposed to the sun, then “SunExposed” should be entered in this field. Otherwise, “NoSun” should be entered.
Note, a cantilevered floor could have “Outdoors” but “NoSun” exposure.
Field: Wind Exposure[LINK]
If the surface is exposed to the Wind, then “WindExposed” should be entered in this field. Otherwise, “NoWind” should be entered.
Note: When a surface is specified with “NoWind”, this has several implications. Within the heat balance code, this surface will default to using the simple ASHRAE exterior convection coefficient correlation with a zero wind speed. In addition, since the ASHRAE simple method does not have a separate value for equivalent long wavelength radiation to the sky and ground, using “NoWind” also eliminates long wavelength radiant exchange from the exterior of the surface to both the sky and the ground. Thus, only simple convection takes place at the exterior face of a surface specified with “NoWind”.
Field: View Factor to Ground[LINK]
The fraction of the ground plane (assumed horizontal) that is visible from a heat-transfer surface. It is used to calculate the diffuse solar radiation from the ground that is incident on the surface.
For example, if there are no obstructions, a vertical surface sees half of the ground plane and so View Factor to Ground = 0.5. A horizontal downward-facing surface sees the entire ground plane, so View Factor to Ground = 1.0. A horizontal upward-facing surface (horizontal roof) does not see the ground at all, so View Factor to Ground = 0.0.
Unused if reflections option in Solar Distribution field in [Building](../input-output-reference/page-006.html#building) object input unless a [DaylightingDevice:Shelf](../input-output-reference/page-016.html#daylightingdeviceshelf) or [DaylightingDevice:Tubular](../input-output-reference/page-016.html#daylightingdevicetubular) has been specified.
If you do not use the reflections option in the Solar Distribution field in your [Building](../input-output-reference/page-006.html#building) object input, you are responsible for entering the View Factor to Ground for each heat-transfer surface. Typical values for a surface that is not shadowed are obtained by the simple equation:
View Factor to Ground = (1-cos(SurfTilt))/2
For example, this gives 0.5 for a wall of tilt 90°. If the tilt of the wall changes, then the View Factor to Ground must also change.
If you enter autocalculate in this field, EnergyPlus will automatically calculate the view factor to ground based on the tilt of the surface.
If you do use the reflections option in the Solar Distribution field in your [Building](../input-output-reference/page-006.html#building) object input, you do not have to enter View Factor to Ground values. In this case the program will automatically calculate the value to use for each exterior surface taking into account solar shadowing (including shadowing of the ground by the building) and reflections from obstructions (ref: [Building](../input-output-reference/page-006.html#building), Field: Solar Distribution).
However, if you do use the reflections option AND you are modeling a DaylightingDevice:Shelf](page-016.html#daylightingdeviceshelf) or [DaylightingDevice:Tubular](../input-output-reference/page-016.html#daylightingdevicetubular), then you still need to enter some values of View Factor to Ground. For [DaylightingDevice:Shelf](../input-output-reference/page-016.html#daylightingdeviceshelf) you need to enter View Factor to Ground for the window associated with the shelf. And for [DaylightingDevice:Tubular](../input-output-reference/page-016.html#daylightingdevicetubular) you need to enter the View Factor to Ground for the [FenestrationSurface:Detailed corresponding to the dome of the tubular device.
Note 1: The corresponding view factor to the sky for diffuse solar radiation is not a user input; it is calculated within EnergyPlus based on surface orientation, sky solar radiance distribution, and shadowing surfaces.
Note 2: The view factors to the sky and ground for thermal infrared (long-wave) radiation are not user inputs; they are calculated within EnergyPlus based on surface tilt and shadowing surfaces. Shadowing surfaces are considered to have the same emissivity and temperature as the ground, so they are lumped together with the ground in calculating the ground IR view factor.
Field: Number of Vertices[LINK]
This field specifies the number of sides in the surface (number of X,Y,Z vertex groups). For further information, see the discussion on “Surface Vertices” above.
RoofCeiling:Detailed[LINK]
The RoofCeiling:Detailed object is used to describe walls.
Field: Name[LINK]
This is a unique name associated with each building surface. It is used in several other places as a reference (e.g. as the base surface name for a Window or Door).
Field: Construction Name[LINK]
This is the name of the construction (ref: [Construction](../input-output-reference/page-010.html#construction) object) used in the surface. Regardless of location in the building, the “full” construction (all layers) is used. For example, for an interior wall separating two zones, zone x would have the outside layer (e.g. drywall) as the material that shows in zone y and then the layers to the inside layer – the material that shows in zone x. For symmetric constructions, the same construction can be used in the surfaces described in both zones.
Field: Zone Name[LINK]
This is the zone name to which the surface belongs.
Field: Outside Boundary Condition[LINK]
This value can be one of several things depending on the actual kind of surface.
Field: Outside Boundary Condition Object[LINK]
If neither Surface, OtherSideCoefficients, or OtherSideConditionsModel are specified for the Outside Boundary Condition (previous field), then this field should be left blank.
As stated above, if the Outside Boundary Condition is “Surface”, then this field’s value must be the surface name whose inside face temperature will be forced on the outside face of the base surface. This permits heat exchange between adjacent zones (interzone heat transfer) when multiple zones are simulated, but can also be used to simulate middle zone behavior without modeling the adjacent zones. This is done by specifying a surface within the zone. For example, a middle floor zone can be modeled by making the floor the Outside Boundary Condition Object for the ceiling, and the ceiling the Outside Boundary Condition Object for the floor.
If the Outside Boundary Condition is Zone, then this field should contain the zone name of the adjacent zone for the surface.
Equally, if the Outside Boundary Condition is “OtherSideCoefficients”, then this field’s value must be the [SurfaceProperty:OtherSideCoefficients](../input-output-reference/page-012.html#surfacepropertyothersidecoefficients) name. Or if the Outside Boundary Condition is “OtherSideConditionsModel” then this field’s value must be the [SurfaceProperty:OtherSideConditionsModel](../input-output-reference/page-012.html#surfacepropertyothersideconditionsmodel) name.
Field: Sun Exposure[LINK]
If the surface is exposed to the sun, then “SunExposed” should be entered in this field. Otherwise, “NoSun” should be entered.
Note, a cantilevered floor could have “Outdoors” but “NoSun” exposure.
Field: Wind Exposure[LINK]
If the surface is exposed to the Wind, then “WindExposed” should be entered in this field. Otherwise, “NoWind” should be entered.
Note: When a surface is specified with “NoWind”, this has several implications. Within the heat balance code, this surface will default to using the simple ASHRAE exterior convection coefficient correlation with a zero wind speed. In addition, since the ASHRAE simple method does not have a separate value for equivalent long wavelength radiation to the sky and ground, using “NoWind” also eliminates long wavelength radiant exchange from the exterior of the surface to both the sky and the ground. Thus, only simple convection takes place at the exterior face of a surface specified with “NoWind”.
Field: View Factor to Ground[LINK]
The fraction of the ground plane (assumed horizontal) that is visible from a heat-transfer surface. It is used to calculate the diffuse solar radiation from the ground that is incident on the surface.
For example, if there are no obstructions, a vertical surface sees half of the ground plane and so View Factor to Ground = 0.5. A horizontal downward-facing surface sees the entire ground plane, so View Factor to Ground = 1.0. A horizontal upward-facing surface (horizontal roof) does not see the ground at all, so View Factor to Ground = 0.0.
Unused if reflections option in Solar Distribution field in [Building](../input-output-reference/page-006.html#building) object input unless a [DaylightingDevice:Shelf](../input-output-reference/page-016.html#daylightingdeviceshelf) or [DaylightingDevice:Tubular](../input-output-reference/page-016.html#daylightingdevicetubular) has been specified.
If you do not use the reflections option in the Solar Distribution field in your [Building](../input-output-reference/page-006.html#building) object input, you are responsible for entering the View Factor to Ground for each heat-transfer surface. Typical values for a surface that is not shadowed are obtained by the simple equation:
View Factor to Ground = (1-cos(SurfTilt))/2
For example, this gives 0.5 for a wall of tilt 90°. If the tilt of the wall changes, then the View Factor to Ground must also change.
If you enter autocalculate in this field, EnergyPlus will automatically calculate the view factor to ground based on the tilt of the surface.
If you do use the reflections option in the Solar Distribution field in your [Building](../input-output-reference/page-006.html#building) object input, you do not have to enter View Factor to Ground values. In this case the program will automatically calculate the value to use for each exterior surface taking into account solar shadowing (including shadowing of the ground by the building) and reflections from obstructions (ref: [Building](../input-output-reference/page-006.html#building), Field: Solar Distribution).
However, if you do use the reflections option AND you are modeling a DaylightingDevice:Shelf](page-016.html#daylightingdeviceshelf) or [DaylightingDevice:Tubular](../input-output-reference/page-016.html#daylightingdevicetubular), then you still need to enter some values of View Factor to Ground. For [DaylightingDevice:Shelf](../input-output-reference/page-016.html#daylightingdeviceshelf) you need to enter View Factor to Ground for the window associated with the shelf. And for [DaylightingDevice:Tubular](../input-output-reference/page-016.html#daylightingdevicetubular) you need to enter the View Factor to Ground for the [FenestrationSurface:Detailed corresponding to the dome of the tubular device.
Note 1: The corresponding view factor to the sky for diffuse solar radiation is not a user input; it is calculated within EnergyPlus based on surface orientation, sky solar radiance distribution, and shadowing surfaces.
Note 2: The view factors to the sky and ground for thermal infrared (long-wave) radiation are not user inputs; they are calculated within EnergyPlus based on surface tilt and shadowing surfaces. Shadowing surfaces are considered to have the same emissivity and temperature as the ground, so they are lumped together with the ground in calculating the ground IR view factor.
Field: Number of Vertices[LINK]
This field specifies the number of sides in the surface (number of X,Y,Z vertex groups). For further information, see the discussion on “Surface Vertices” above.
Floor:Detailed[LINK]
The Floor:Detailed object is used to describe walls.
Field: Name[LINK]
This is a unique name associated with each building surface. It is used in several other places as a reference (e.g. as the base surface name for a Window or Door).
Field: Construction Name[LINK]
This is the name of the construction (ref: [Construction](../input-output-reference/page-010.html#construction) object) used in the surface. Regardless of location in the building, the “full” construction (all layers) is used. For example, for an interior wall separating two zones, zone x would have the outside layer (e.g. drywall) as the material that shows in zone y and then the layers to the inside layer – the material that shows in zone x. For symmetric constructions, the same construction can be used in the surfaces described in both zones.
Field: Zone Name[LINK]
This is the zone name to which the surface belongs.
Field: Outside Boundary Condition[LINK]
This value can be one of several things depending on the actual kind of surface.
Field: Outside Boundary Condition Object[LINK]
If neither Surface, OtherSideCoefficients, or OtherSideConditionsModel are specified for the Outside Boundary Condition (previous field), then this field should be left blank.
As stated above, if the Outside Boundary Condition is “Surface”, then this field’s value must be the surface name whose inside face temperature will be forced on the outside face of the base surface. This permits heat exchange between adjacent zones (interzone heat transfer) when multiple zones are simulated, but can also be used to simulate middle zone behavior without modeling the adjacent zones. This is done by specifying a surface within the zone. For example, a middle floor zone can be modeled by making the floor the Outside Boundary Condition Object for the ceiling, and the ceiling the Outside Boundary Condition Object for the floor.
If the Outside Boundary Condition is Zone, then this field should contain the zone name of the adjacent zone for the surface.
Equally, if the Outside Boundary Condition is “OtherSideCoefficients”, then this field’s value must be the [SurfaceProperty:OtherSideCoefficients](../input-output-reference/page-012.html#surfacepropertyothersidecoefficients) name. Or if the Outside Boundary Condition is “OtherSideConditionsModel” then this field’s value must be the [SurfaceProperty:OtherSideConditionsModel](../input-output-reference/page-012.html#surfacepropertyothersideconditionsmodel) name.
Field: Sun Exposure[LINK]
If the surface is exposed to the sun, then “SunExposed” should be entered in this field. Otherwise, “NoSun” should be entered.
Note, a cantilevered floor could have “Outdoors” but “NoSun” exposure.
Field: Wind Exposure[LINK]
If the surface is exposed to the Wind, then “WindExposed” should be entered in this field. Otherwise, “NoWind” should be entered.
Note: When a surface is specified with “NoWind”, this has several implications. Within the heat balance code, this surface will default to using the simple ASHRAE exterior convection coefficient correlation with a zero wind speed. In addition, since the ASHRAE simple method does not have a separate value for equivalent long wavelength radiation to the sky and ground, using “NoWind” also eliminates long wavelength radiant exchange from the exterior of the surface to both the sky and the ground. Thus, only simple convection takes place at the exterior face of a surface specified with “NoWind”.
Field: View Factor to Ground[LINK]
The fraction of the ground plane (assumed horizontal) that is visible from a heat-transfer surface. It is used to calculate the diffuse solar radiation from the ground that is incident on the surface.
For example, if there are no obstructions, a vertical surface sees half of the ground plane and so View Factor to Ground = 0.5. A horizontal downward-facing surface sees the entire ground plane, so View Factor to Ground = 1.0. A horizontal upward-facing surface (horizontal roof) does not see the ground at all, so View Factor to Ground = 0.0.
Unused if reflections option in Solar Distribution field in [Building](../input-output-reference/page-006.html#building) object input unless a [DaylightingDevice:Shelf](../input-output-reference/page-016.html#daylightingdeviceshelf) or [DaylightingDevice:Tubular](../input-output-reference/page-016.html#daylightingdevicetubular) has been specified.
If you do not use the reflections option in the Solar Distribution field in your [Building](../input-output-reference/page-006.html#building) object input, you are responsible for entering the View Factor to Ground for each heat-transfer surface. Typical values for a surface that is not shadowed are obtained by the simple equation:
View Factor to Ground = (1-cos(SurfTilt))/2
For example, this gives 0.5 for a wall of tilt 90°. If the tilt of the wall changes, then the View Factor to Ground must also change.
If you enter autocalculate in this field, EnergyPlus will automatically calculate the view factor to ground based on the tilt of the surface.
If you do use the reflections option in the Solar Distribution field in your [Building](../input-output-reference/page-006.html#building) object input, you do not have to enter View Factor to Ground values. In this case the program will automatically calculate the value to use for each exterior surface taking into account solar shadowing (including shadowing of the ground by the building) and reflections from obstructions (ref: [Building](../input-output-reference/page-006.html#building), Field: Solar Distribution).
However, if you do use the reflections option AND you are modeling a DaylightingDevice:Shelf](page-016.html#daylightingdeviceshelf) or [DaylightingDevice:Tubular](../input-output-reference/page-016.html#daylightingdevicetubular), then you still need to enter some values of View Factor to Ground. For [DaylightingDevice:Shelf](../input-output-reference/page-016.html#daylightingdeviceshelf) you need to enter View Factor to Ground for the window associated with the shelf. And for [DaylightingDevice:Tubular](../input-output-reference/page-016.html#daylightingdevicetubular) you need to enter the View Factor to Ground for the [FenestrationSurface:Detailed corresponding to the dome of the tubular device.
Note 1: The corresponding view factor to the sky for diffuse solar radiation is not a user input; it is calculated within EnergyPlus based on surface orientation, sky solar radiance distribution, and shadowing surfaces.
Note 2: The view factors to the sky and ground for thermal infrared (long-wave) radiation are not user inputs; they are calculated within EnergyPlus based on surface tilt and shadowing surfaces. Shadowing surfaces are considered to have the same emissivity and temperature as the ground, so they are lumped together with the ground in calculating the ground IR view factor.
Field: Number of Vertices[LINK]
This field specifies the number of sides in the surface (number of X,Y,Z vertex groups). For further information, see the discussion on “Surface Vertices” above.
Some examples of using these objects:
BuildingSurface:Detailed[LINK]
The BuildingSurface:Detailed object can more generally describe each of the surfaces.
Field: Name[LINK]
This is a unique name associated with each building surface. It is used in several other places as a reference (e.g. as the base surface name for a Window or Door).
Field: Surface Type[LINK]
Used primarily for convenience, the surface type can be one of the choices illustrated above – Wall, Floor, Ceiling, Roof. Azimuth (facing) and Tilt are determined from the vertex coordinates. Note that “normal” floors will be tilted 180° whereas flat roofs/ceilings will be tilted 0°. EnergyPlus uses this field’s designation, along with the calculated tilt of the surface, to issue warning messages when tilts are “out of range”. Calculations in EnergyPlus use the actual calculated tilt values for the actual heat balance calculations. Note, however, that a floor tilted 0° is really facing “into” the zone and is not what you will desire for the calculations even though the coordinate may appear correct in the viewed DXF display.
“Normal” tilt for walls is 90° – here you may use the calculated Azimuth to make sure your walls are facing away from the zone’s interior.
Field: Construction Name[LINK]
This is the name of the construction (ref: [Construction](../input-output-reference/page-010.html#construction) object) used in the surface. Regardless of location in the building, the “full” construction (all layers) is used. For example, for an interior wall separating two zones, zone x would have the outside layer (e.g. drywall) as the material that shows in zone y and then the layers to the inside layer – the material that shows in zone x. For symmetric constructions, the same construction can be used in the surfaces described in both zones.
Field: Zone Name[LINK]
This is the zone name to which the surface belongs.
Field: Outside Boundary Condition[LINK]
This value can be one of several things depending on the actual kind of surface.
Field: Outside Boundary Condition Object[LINK]
If neither Surface, OtherSideCoefficients, or OtherSideConditionsModel are specified for the Outside Boundary Condition (previous field), then this field should be left blank.
As stated above, if the Outside Boundary Condition is “Surface”, then this field’s value must be the surface name whose inside face temperature will be forced on the outside face of the base surface. This permits heat exchange between adjacent zones (interzone heat transfer) when multiple zones are simulated, but can also be used to simulate middle zone behavior without modeling the adjacent zones. This is done by specifying a surface within the zone. For example, a middle floor zone can be modeled by making the floor the Outside Boundary Condition Object for the ceiling, and the ceiling the Outside Boundary Condition Object for the floor.
If the Outside Boundary Condition is Zone, then this field should contain the zone name of the adjacent zone for the surface.
Equally, if the Outside Boundary Condition is “OtherSideCoefficients”, then this field’s value must be the [SurfaceProperty:OtherSideCoefficients](../input-output-reference/page-012.html#surfacepropertyothersidecoefficients) name. Or if the Outside Boundary Condition is “OtherSideConditionsModel” then this field’s value must be the [SurfaceProperty:OtherSideConditionsModel](../input-output-reference/page-012.html#surfacepropertyothersideconditionsmodel) name.
Field: Sun Exposure[LINK]
If the surface is exposed to the sun, then “SunExposed” should be entered in this field. Otherwise, “NoSun” should be entered.
Note, a cantilevered floor could have “Outdoors” but “NoSun” exposure.
Field: Wind Exposure[LINK]
If the surface is exposed to the Wind, then “WindExposed” should be entered in this field. Otherwise, “NoWind” should be entered.
Note: When a surface is specified with “NoWind”, this has several implications. Within the heat balance code, this surface will default to using the simple ASHRAE exterior convection coefficient correlation with a zero wind speed. In addition, since the ASHRAE simple method does not have a separate value for equivalent long wavelength radiation to the sky and ground, using “NoWind” also eliminates long wavelength radiant exchange from the exterior of the surface to both the sky and the ground. Thus, only simple convection takes place at the exterior face of a surface specified with “NoWind”.
Field: View Factor to Ground[LINK]
The fraction of the ground plane (assumed horizontal) that is visible from a heat-transfer surface. It is used to calculate the diffuse solar radiation from the ground that is incident on the surface.
For example, if there are no obstructions, a vertical surface sees half of the ground plane and so View Factor to Ground = 0.5. A horizontal downward-facing surface sees the entire ground plane, so View Factor to Ground = 1.0. A horizontal upward-facing surface (horizontal roof) does not see the ground at all, so View Factor to Ground = 0.0.
Unused if reflections option in Solar Distribution field in [Building](../input-output-reference/page-006.html#building) object input unless a [DaylightingDevice:Shelf](../input-output-reference/page-016.html#daylightingdeviceshelf) or [DaylightingDevice:Tubular](../input-output-reference/page-016.html#daylightingdevicetubular) has been specified.
If you do not use the reflections option in the Solar Distribution field in your [Building](../input-output-reference/page-006.html#building) object input, you are responsible for entering the View Factor to Ground for each heat-transfer surface. Typical values for a surface that is not shadowed are obtained by the simple equation:
View Factor to Ground = (1-cos(SurfTilt))/2
For example, this gives 0.5 for a wall of tilt 90°. If the tilt of the wall changes, then the View Factor to Ground must also change.
If you enter autocalculate in this field, EnergyPlus will automatically calculate the view factor to ground based on the tilt of the surface.
If you do use the reflections option in the Solar Distribution field in your [Building](../input-output-reference/page-006.html#building) object input, you do not have to enter View Factor to Ground values. In this case the program will automatically calculate the value to use for each exterior surface taking into account solar shadowing (including shadowing of the ground by the building) and reflections from obstructions (ref: [Building](../input-output-reference/page-006.html#building), Field: Solar Distribution).
However, if you do use the reflections option AND you are modeling a DaylightingDevice:Shelf](page-016.html#daylightingdeviceshelf) or [DaylightingDevice:Tubular](../input-output-reference/page-016.html#daylightingdevicetubular), then you still need to enter some values of View Factor to Ground. For [DaylightingDevice:Shelf](../input-output-reference/page-016.html#daylightingdeviceshelf) you need to enter View Factor to Ground for the window associated with the shelf. And for [DaylightingDevice:Tubular](../input-output-reference/page-016.html#daylightingdevicetubular) you need to enter the View Factor to Ground for the [FenestrationSurface:Detailed corresponding to the dome of the tubular device.
Note 1: The corresponding view factor to the sky for diffuse solar radiation is not a user input; it is calculated within EnergyPlus based on surface orientation, sky solar radiance distribution, and shadowing surfaces.
Note 2: The view factors to the sky and ground for thermal infrared (long-wave) radiation are not user inputs; they are calculated within EnergyPlus based on surface tilt and shadowing surfaces. Shadowing surfaces are considered to have the same emissivity and temperature as the ground, so they are lumped together with the ground in calculating the ground IR view factor.
Field: Number of Vertices[LINK]
This field specifies the number of sides in the surface (number of X,Y,Z vertex groups). For further information, see the discussion on “Surface Vertices” above.
IDF example of three walls (first is an exterior wall, second and third are interzone partitions):
FenestrationSurface:Detailed[LINK]
This surface class is used for subsurfaces, which can be of five different types: Windows, Doors, GlassDoors, TubularDaylightDomes, and TubularDaylightDiffusers. A subsurface (such as a window) of a base surface (such as a wall) inherits several of the properties (such as Outside Boundary Condition, Sun Exposure, etc.) of the base surface. Windows, GlassDoors, TubularDaylightDomes, and TubularDaylightDiffusers are considered to have one or more glass layers and so transmit solar radiation. Doors are considered to be opaque.
Field: Name[LINK]
This is a unique name associated with the heat transfer subsurface. It may be used in other places as a reference (e.g. as the opposing subsurface of an interzone window or door).
Field: Surface Type[LINK]
The choices for Surface Type are Window, Door, GlassDoor, TubularDaylightDome, and TubularDaylightDiffuser. Doors are assumed to be opaque (do not transmit solar radiation) whereas the other surface types do transmit solar radiation. Windows and Glass Doors are treated identically in the calculation of conduction heat transfer, solar gain, daylighting, etc. A Window or GlassDoor, but not a Door, can have a movable interior, exterior or between-glass shading device, such as blinds (ref: WindowMaterial:Blind](page-010.html#windowmaterialblind) object), and can have a frame and/or a divider (ref: [WindowProperty:FrameAndDivider](../input-output-reference/page-011.html#windowpropertyframeanddivider) object). TubularDaylightDomes and TubularDaylightDomes are specialized subsurfaces for use with the [DaylightingDevice:Tubular](../input-output-reference/page-016.html#daylightingdevicetubular) object to simulate Tubular Daylighting Devices (TDDs). TubularDaylightDomes and TubularDaylightDomes cannot have shades, screens or blinds. In the following, the term “window” applies to [Window, GlassDoor, TubularDaylightDome, and TubularDaylightDome, if not otherwise explicitly mentioned.
As noted in the description of the BuildingSurface:Detailed, Azimuth (facing angle) and Tilt are calculated from the entered vertices. Tilts of subsurfaces will normally be the same as their base surface. If these are significantly beyond the “normals” for the base surface, warning messages may be issued. If the facing angles are not correct, you may have a window pointing “into” the zone rather than out of it – this would cause problems in the calculations. Note, too, that a “reveal” (inset or outset) may occur if the plane of the subsurface is not coincident with the base surface; the reveal has an effect on shading of the subsurface.
Field: Construction Name[LINK]
This is the name of the subsurface’s construction (ref: Construction](page-010.html#construction) object [for Door] and [Construction](../input-output-reference/page-010.html#construction), [Construction:ComplexFenestrationState](../input-output-reference/page-010.html#constructioncomplexfenestrationstate), [Construction:WindowDataFile](../input-output-reference/page-010.html#constructionwindowdatafile) objects [for [Window and GlassDoor]).
For windows, if Construction](page-010.html#construction) Name is not found among the constructions on the input (.idf) file, the [Window Data File (ref. [Construction:WindowDataFile](../input-output-reference/page-010.html#constructionwindowdatafile) object) will be searched for that [Construction](../input-output-reference/page-010.html#construction) Name (see “Importing Windows from WINDOW”). If that file is not present or if the [Construction](../input-output-reference/page-010.html#construction) Name does not match the name of an entry on the file, an error will result. If there is a match, a window construction and its corresponding glass and gas materials will be created from the information read from the file.
Field: Building Surface Name[LINK]
This is the name of a surface that contains this subsurface. Certain kinds of surfaces may not be allowed to have subsurfaces. For example, a surface in contact with the ground (Outside Boundary Condition = Ground) cannot contain a window.
Field: Outside Boundary Condition Object[LINK]
If the base surface has Outside Boundary Condition = Surface or OtherSideCoefficients, then this field must also be specified for the subsurface. Otherwise, it can be left blank.
If the base surface has Outside Boundary Condition = Zone, then this surface retains that characteristic and uses the same zone of the base surface. It can be entered here for clarity or it can be left blank.
If Outside Boundary Condition for the base surface is Surface, this field should specify the subsurface in the opposing zone that is the counterpart to this subsurface. The constructions of the subsurface and opposing subsurface must match, except that, for multi-layer constructions, the layer order of the opposing subsurface’s construction must be the reverse of that of the subsurface.
If Outside Boundary Condition for the base surface is OtherSideCoefficients, this field could specify the set of [SurfaceProperty:OtherSideCoefficients](../input-output-reference/page-012.html#surfacepropertyothersidecoefficients) for this subsurface. If this is left blank, then the Other Side Coefficients of the base surface will be used for this subsurface. Windows and GlassDoors are not allowed to have Other Side Coefficients.
Field: View Factor to Ground[LINK]
The fraction of the ground plane (assumed horizontal) that is visible from a heat-transfer surface. It is used to calculate the diffuse solar radiation from the ground that is incident on the surface.
For example, if there are no obstructions, a vertical surface sees half of the ground plane and so View Factor to Ground = 0.5. A horizontal downward-facing surface sees the entire ground plane, so View Factor to Ground = 1.0. A horizontal upward-facing surface (horizontal roof) does not see the ground at all, so View Factor to Ground = 0.0.
Unused if reflections option in Solar Distribution field in [Building](../input-output-reference/page-006.html#building) object input unless a Daylighting Device:Shelf or Daylighting Device:Tubular has been specified.
If you do not use the reflections option in the Solar Distribution field in your [Building](../input-output-reference/page-006.html#building) object input, you are responsible for entering the View Factor to Ground for each heat-transfer surface. Typical values for a surface that is not shadowed are obtained by the simple equation:
View Factor to Ground = (1-cos(SurfTilt))/2
For example, this gives 0.5 for a wall of tilt 90°. If the tilt of the wall changes, then the View Factor to Ground must also change.
If you enter autocalculate in this field, EnergyPlus will automatically calculate the view factor to ground based on the tilt of the surface.
If you do use the reflections option in the Solar Distribution field in your BUILDING object input, you do not have to enter View Factor to Ground values. In this case the program will automatically calculate the value to use for each exterior surface taking into account solar shadowing (including shadowing of the ground by the building) and reflections from obstructions (ref: [Building](../input-output-reference/page-006.html#building), Field: Solar Distribution).
However, if you do use the reflections option AND you are modeling a DaylightingDevice:Shelf](page-016.html#daylightingdeviceshelf) or [DaylightingDevice:Tubular](../input-output-reference/page-016.html#daylightingdevicetubular), then you still need to enter some values of View Factor to Ground. For [DaylightingDevice:Shelf](../input-output-reference/page-016.html#daylightingdeviceshelf) you need to enter View Factor to Ground for the window associated with the shelf. And for [DaylightingDevice:Tubular](../input-output-reference/page-016.html#daylightingdevicetubular) you need to enter the View Factor to Ground for the [FenestrationSurface:Detailed corresponding to the dome of the tubular device (ref: [DaylightingDevice:Tubular](../input-output-reference/page-016.html#daylightingdevicetubular)).
Note 1: The corresponding view factor to the sky for diffuse solar radiation is not a user input; it is calculated within EnergyPlus based on surface orientation, sky solar radiance distribution, and shadowing surfaces.
Note 2: The view factors to the sky and ground for thermal infrared (long-wave) radiation are not user inputs; they are calculated within EnergyPlus based on surface tilt and shadowing surfaces. Shadowing surfaces are considered to have the same emissivity and temperature as the ground, so they are lumped together with the ground in calculating the ground infrared view factor.
Field: Shading Control Name[LINK]
This field, if not blank, is the name of the window shading control (ref: WindowProperty:ShadingControl object) for this subsurface. It is used for Surface Type = Window and GlassDoor. To assign a shade to a window or glass door, see WindowMaterial: Shade. To assign a screen, see WindowMaterial:Screen](page-010.html#windowmaterialscreen). To assign a blind, see [WindowMaterial:Blind](../input-output-reference/page-010.html#windowmaterialblind). To assign switchable glazing, such as electrochromic glazing, see [WindowProperty:ShadingControl.
Field: Frame and Divider Name[LINK]
This field, if not blank, can be used to specify window frame, divider and reveal-surface data (ref: WindowProperty:FrameAndDivider object). It is used only for exterior GlassDoors and rectangular exterior Windows, i.e., those with OutsideFaceEnvironment = Outdoors.
This field should be blank for triangular windows.
Field: Multiplier[LINK]
Used only for Surface Type = Window, Door or Glass Door. It is the number of identical items on the base surface. Using Multiplier can save input effort and calculation time. In the calculation the area (and area of frame and divider, if present and surface type is a window) is multiplied by Multiplier. The calculation of shadowing on the subsurfaces (and the calculation of the interior distribution of beam solar radiation transmitted by windows and glass doors) are done for the specified subsurface position and dimensions.
Multiplier should be used with caution. Multiplier > 1 can give inaccurate or nonsensical results in situations where the results are sensitive to window or glass door position. This includes shadowing on the window/glass door, daylighting from the window/glass door, and interior distribution of solar radiation from the window/glass door. In these cases, the results for the single input window/glass door, after multiplication, may not be representative of the results you would get if you entered each of the multiple subsurfaces separately.
If Multiplier > 1, you will get
–a warning if Solar Distribution = FullExterior or FullInteriorAndExterior (ref: [Building](../input-output-reference/page-006.html#building) - Field: Solar Distribution), indicating that the shadowing on the input window or the interior solar radiation distribution from the input window may not be representative of the actual group of windows. No warning is issued if Solar Distribution = MinimalShadowing.
–an error if the window is an exterior window/glass door in a zone that has a detailed daylighting calculation (Daylighting:Detailed specified for the zone). Since a single window with a multiplier can never give the same daylight illuminance as the actual set of windows, you are not allowed to use Multiplier in this situation.
Field: Number of Vertices[LINK]
The number of sides the surface has (number of X,Y,Z vertex groups). For further information, see the discussion on “Surface Vertices” above. Door and GlassDoor subsurfaces are rectangular and therefore have four vertices. Window subsurfaces can be rectangular or triangular and therefore have four or three vertices, respectively.
Fields: Vertex Coordinates[LINK]
This is a total of twelve fields giving the x,y,z coordinate values of the four vertices of rectangular subsurfaces [m], or a total of nine fields giving the x,y,z coordinate values of the three vertices of triangular windows.
For triangular windows the first vertex listed can be any of the three vertices, but the order of the vertices should be counter-clockwise if VertexEntry is CounterClockWise and clockwise if VertexEntry is ClockWise (ref: GlobalGeometryRules).
An IDF example of a rectangular subsurface (Window):
Window Modeling Options[LINK]
The following table shows what input objects/fields to use to model different window options. It also gives the name of an example input, if available, that demonstrates the option.
Window Modeling Options
Option
Object/Field or Output Variable
Input File (distributed with install)
Build up a window from layers
WindowMaterial:Glazing, [WindowMaterial:Gas](../input-output-reference/page-010.html#windowmaterialgas), [WindowMaterial:Shade](../input-output-reference/page-010.html#windowmaterialshade), [WindowMaterial:Screen](../input-output-reference/page-010.html#windowmaterialscreen), [WindowMaterial:Blind](../input-output-reference/page-010.html#windowmaterialblind), Construction
WindowTests.idf
Add an overhang
Shading:Zone:Detailed
5ZoneAirCooled.idf
Add a shading device
WindowMaterial:Shade, [WindowMaterial:Screen](../input-output-reference/page-010.html#windowmaterialscreen) or [WindowMaterial:Blind](../input-output-reference/page-010.html#windowmaterialblind); WindowProperty:ShadingControl
WindowTests.idf, PurchAirWindowBlind.idf
Control a shading device
WindowProperty:ShadingControl
PurchAirWindowBlind.idf
Determine when a shading device is on in a particular timestep
Print the variable “Surface Shading Device Is On Time Fraction”
PurchAirWindowBlind.idf
Control the slat angle of a blind
WindowProperty:ShadingControl
PurchAirWindowBlind.idf
Add a frame
WindowProperty:FrameAndDivider
PurchAirWithDaylighting.idf
Add a divider
WindowProperty:FrameAndDivider
PurchAirWithDaylighting.idf
Allow window to daylight a zone
Daylighting:Controls, Daylighting:DELight:Controls
PurchAirWithDaylighting.idf, DElight-Detailed-Comparison.idf
Find solar reflected onto window from neighboring buildings
Building/SolarDistribution field – uses “WithReflections”
ReflectiveAdjacentBuilding.idf
Model switchable glazing (e.g., electrochromic glass)
WindowProperty:ShadingControl
PurchAirWithDaylighting.idf
Add an interior window
Define two FenestrationSurface:Detailed’s, one for each associated interior wall
PurchAirWithDoubleFacadeDaylighting.idf
Track how beam solar falls on interior surfaces
Building/Solar Distribution = FullInteriorAndExterior
PurchAirWithDoubleFacadeDaylighting.idf
Track beam solar transmitted through interior windows
Building/Solar Distribution = FullInteriorAndExterior
PurchAirWithDoubleFacadeDaylighting.idf
Add a shading device on an interior window
Not allowed
Model an airflow window (aka, heat extract window)
WindowProperty:AirflowControl
AirflowWindowsAndBetweenGlassBlinds.idf
Add a storm window glass layer
WindowProperty:StormWindow
StormWindow.idf
Add natural ventilation through an open window
Ventilation or AirflowNetwork objects (AirflowNetwork:Multizone:Surface, [AirflowNetwork:MultiZone:Component:DetailedOpening](../input-output-reference/page-029.html#airflownetworkmultizonecomponentdetailedopening), etc.)
AirflowNetwork3zvent.idf
Add diffusing glass
WindowMaterial:Glazing/Solar Diffusing = Yes
Add dirt on window
WindowMaterial:Glazing/Dirt Correction Factor for Solar and Visible Transmittance
Import window (and frame/divider if present) from WINDOW program
See “Importing Windows from WINDOW program”
Find daylighting through interior windows
See “Double Facades: Daylighting through Interior Windows”
PurchAirWithDoubleFacadeDaylighting.idf
Determine when condensation occurs
Print the variables “Surface Window Inside Face Glazing Condensation Status,” “Surface Window Inside Face Frame Condensation Status,” “Surface Window Inside Face Divider Condensation Status”
InternalMass[LINK]
Any surface that would logically be described as an interior wall, floor or ceiling can just as easily be described as Internal Mass. Internal Mass surface types only exchange energy with the zone in which they are described; they do not see any other zones. There are two approaches to using internal mass. The first approach is to have several pieces of internal mass with each piece having a different construction type. The other approach is to choose an average construction type and combine all of the interior surfaces into a single internal mass. Similar to internal surfaces with an adiabatic boundary condtion, the zone will only exchange energy with the inside of the Internal Mass construction. If both sides of the surface exchange energy with the zone then the user should input twice the area when defining the Internal Mass object. Note that furniture and other large objects within a zone can be described using internal mass. However, simplifying calculations using internal mass must be used with caution when the “FullInteriorAndExterior” or “FullInteriorAndExteriorWithReflections” Solar Distribution model (see [Building](../input-output-reference/page-006.html#building) parameters) is chosen.
Example[LINK]
When zoning an office building, five west-facing offices have been combined into one zone. All of the offices have interior walls made of the same materials. As shown in the figure below, this zone may be described with 5 exterior walls and 11 internal walls or 1 exterior wall and 1 internal mass. Note that fewer surfaces will speed up the EnergyPlus calculations.
Example[LINK]
A five-story building has the same ceiling/floor construction separating each of the levels. Zones that are on floors 2 through 4 may be described using a single piece of internal mass to represent both the floor and ceiling. The construction for this internal mass would be identical to the ceiling/floor construction that would be used to describe separate surfaces and the area of the internal mass surface would be the total surface area of the combined ceilings/floors (i.e. twice the total floor area).
Field: Name[LINK]
This is a unique character string associated with the internal mass surface. Though it must be unique from other surface names, it is used primarily for convenience with internal mass surfaces.
Field: Construction Name[LINK]
This is the name of the construction (ref: [Construction](../input-output-reference/page-010.html#construction) object) used in the surface.
Field: Zone Name[LINK]
This is the name of the zone in which the internal mass is represented.
Field: Surface Area[LINK]
This field is the surface area of the internal mass. The area that is specified must be the entire surface area that is exposed to the zone. If both sides of a wall are completely within the same zone, then the area of both sides must be included when describing that internal wall.
IDF examples of Internal Mass surfaces:
Surface Output Variables/Reports[LINK]
Note that Surface Outputs from specialized algorithms (such as Effective Moisture Penetration Depth (EMPD), Combined Heat and Moisture Transport (HAMT) and Conduction Finite Difference (CondFD) are discussed under the objects that describe the specialized inputs for these algorithms). You can access them via these links:
Additionally, the output variables applicable to all heat transfer surfaces:
Output variables applicable to all exterior heat transfer surfaces:
Output variables applicable to opaque heat transfer surfaces (FLOOR, WALL, ROOF, DOOR). Note – these are advanced variables – you must read the descriptions and understand before use – then you must use the Diagnostics object to allow reporting.
Window Output Variables[LINK]
Output variables applicable only to exterior windows and glass doors:
If the user requests to display advanced report/output variables (e.g. see [Output:Diagnostics](../input-output-reference/page-006.html#outputdiagnostics) keyword DisplayAdvancedReportVariables) the the following additional output variables are available for exterior windows and glass doors
Output variable applicable only to interior windows and glass doors:
Surface Output Variables (all heat transfer surfaces)[LINK]
The various output variables related to surface heat transfer are organized around the inside and outside face of each surface. The zone heat balance model draws energy balances at each side, or face, of a surface and so each surface essentially has two sets of results. The inside face is the side of a heat transfer surface that faces toward the thermal zone. The outside face is the side of a heat transfer surface that faces away from the thermal zone, typically facing outdoors. The Key Value for these is generally the user-defined name of the surface.
Surface Inside Face Heat Balance Calculation Iteration Count [][LINK]
This output is the number of iterations used in a part of the solution for surface heat transfer that accounts for thermal radiation heat transfer between zone surfaces. This is simply a counter on the iteration loop for inside face surface modeling. There is only one instance of this output in a given run and the Key Value is “Simulation.”
Surface Inside Face Temperature [C][LINK]
This is the temperature of the surface’s inside face, in degrees Celsius. Former Name: Prior to version 7.1 this output was called Surface Inside Temperature.
Surface Outside Face Temperature [C][LINK]
This is the temperature of the surface’s outside face, in degrees Celsius. Former Name: Prior to version 7.1, this output was called Surface Outside Temperature.
Surface Inside Face Adjacent Air Temperature [C][LINK]
This is the effective bulk air temperature used for modeling the inside surface convection heat transfer. This is the same as the zone mean air temperature when using the mixing model for roomair. However, if more advanced roomair models are used, this variable will report the air temperature predicted by the roomair model as it was used in the surface heat balance model calculations. Former Name: Prior to version 7.1, this output was called Surface Int Adjacent Air Temperature.
Surface Inside Face Convection Heat Gain Rate [W][LINK]
Surface Inside Face Convection Heat Gain Rate per Area [W/m2][LINK]
Surface Inside Face Convection Heat Gain Energy [J][LINK]
These “inside face convection heat gain” output variables describe the heat transferred by convection between the inside face and the zone air. The values can be positive or negative with positive indicating heat is being added to the surface’s face by convection. Different versions of the report are available including the basic heat gain rate (W), and a per unit area flux (W/m2), and an energy version (J).
Former Name: Prior to version 7.1, these outputs were called “Surface Int Convection Heat *” and had used the opposite sign convention.
Surface Inside Face Convection Heat Transfer Coefficient [W/m2-K][LINK]
This is the coefficient that describes the convection heat transfer. It is the value of “Hc” in the classic convection model Q = Hc* A* (T – T). This is the result of the surface convection algorithm used for the inside face. Former Name: Prior to version 7.1, this output was called “Surface Int Convection Coeff.”
Surface Inside Face Net Surface Thermal Radiation Heat Gain Rate [W][LINK]
Surface Inside Face Net Surface Thermal Radiation Heat Gain Rate per Area [W/m2][LINK]
Surface Inside Face Net Surface Thermal Radiation Heat Gain Energy [J][LINK]
These “inside face net surface thermal radiation heat gain” output variables describe the heat transferred by longwave infrared thermal radiation exchanges between the inside faces of other surfaces in the zone. The values can be positive or negative with positive indicating heat is being added to the surface’s face by thermal radiation. Different versions of the report are available including the basic heat gain rate (W), and a per unit area flux (W/m2), and an energy version (J).
Surface Inside Face Solar Radiation Heat Gain Rate [W][LINK]
Surface Inside Face Solar Radiation Heat Gain Rate per Area [W/m2][LINK]
Surface Inside Face Solar Radiation Heat Gain Energy [J][LINK]
These “inside face solar radiation heat gain” output variables describe the heat transferred by solar radiation onto the inside face. The values are always positive and indicate heat is being added to the surface’s face by solar radiation. This is sunlight that has entered the zone through a window and been absorbed on the inside face of the surface. Different versions of the report are available including the basic heat gain rate (W), and a per unit area flux (W/m2), and an energy version (J).
Surface Inside Face Lights Radiation Heat Gain Rate [W][LINK]
Surface Inside Face Lights Radiation Heat Gain Rate per Area [W/m2][LINK]
Surface Inside Face Lights Radiation Heat Gain Energy [J][LINK]
These “inside face lights radiation heat gain” output variables describe the heat transferred by shortwave radiation onto the inside face. The values are always positive and indicate heat is being added to the surface’s face by shortwave radiation that emanated from electric lighting equipment and was absorbed by the surface. Different versions of the report are available including the basic heat gain rate (W), and a per unit area flux (W/m2), and an energy version (J).
Surface Inside Face Internal Gains Radiation Heat Gain Rate [W][LINK]
Surface Inside Face Internal Gains Radiation Heat Gain Rate per Area [W/m2][LINK]
Surface Inside Face Internal Gains Radiation Heat Gain Energy [J][LINK]
These “inside face internal gains radiation heat gain” output variables describe the heat transferred by longwave infrared thermal radiation onto the inside face that emanated from internal gains such as lights, electric equipment, and people. The values are always positive and indicate heat is being added to the surface’s face by the absorption of longwave thermal radiation. Different versions of the report are available including the basic heat gain rate (W), and a per unit area flux (W/m2), and an energy version (J).
Surface Inside Face System Radiation Heat Gain Rate [W][LINK]
Surface Inside Face System Radiation Heat Gain Rate per Area [W/m2][LINK]
Surface Inside Face System Radiation Heat Gain Energy [J][LINK]
These “inside face system radiation heat gain” output variables describe the heat transferred by infrared thermal radiation onto the inside face that emanated from HVAC equipment such as baseboard heaters or high-temperature radiant heating panels. The values are always positive and indicate heat is being added to the surface’s face by the absorption of thermal radiation. Different versions of the report are available including the basic heat gain rate (W), and a per unit area flux (W/m2), and an energy version (J).
Surface Outside Face Convection Heat Gain Rate [W][LINK]
Surface Outside Face Convection Heat Gain Rate per Area [W/m2][LINK]
Surface Outside Face Convection Heat Gain Energy [J][LINK]
These “outside face convection” output variables describe heat transferred by convection between the outside face and the surrounding air. The values can be positive or negative with positive values indicating heat is added to the surface face by convection heat transfer. Different versions of the report are available including the basic heat gain rate (W), and a per unit area flux (W/m2), and an energy version (J).
Former Name: Prior to version 7.1, these outputs were called “Surface Ext Convection Heat *” and used the opposite sign convention.
Surface Outside Face Convection Heat Transfer Coefficient [W/m2-K][LINK]
This is the coefficient that describes the convection heat transfer. It is the value of “Hc” in the classic convection model Q = Hc* A* (T – T). This is the result of the surface convection algorithm used for the outside face. Former Name: Prior to [Version](../input-output-reference/page-006.html#version) 7.1, this output was called “Surface Ext Convection Coeff.”
Surface Outside Face Net Thermal Radiation Heat Gain Rate [W][LINK]
Surface Outside Face Net Thermal Radiation Heat Gain Rate per Area [W/m2][LINK]
Surface Outside Face Net Thermal Radiation Heat Gain Energy [J][LINK]
These “outside face net thermal radiation” output variables describe the heat transferred by longwave infrared thermal radiation exchanges between the surface and the surroundings of the outside face. This is the net of all forms of longwave thermal infrared radiation heat transfer. The values can be positive or negative with positive indicating the net addition of heat to the outside face. Different versions of the report are available including the basic heat gain rate (W), and a per unit area flux (W/m2), and an energy version (J).
Former Name: Prior to version 7.1, these outputs were called “Surface Ext Thermal Radiation Heat *” and used the opposite sign convention.
Surface Inside Face Exterior Windows Incident Beam Solar Radiation Rate [W][LINK]
Surface Inside Face Exterior Windows Incident Beam Solar Radiation Rate per Area [W/m2][LINK]
Surface Inside Face Exterior Windows Incident Beam Solar Radiation Energy [J][LINK]
Beam solar radiation from the exterior windows in a zone incident on the inside face of a surface in the zone. If Solar Distribution in the BUILDING object is equal to MinimalShadowing or FullExterior, it is assumed that all beam solar from exterior windows falls on the floor. In this case the value of this output variable can be greater than zero only for floor surfaces. If Solar Distribution equals FullInteriorExterior the program tracks where beam solar from exterior windows falls inside the zone, in which case the value of this variable can be greater than zero for floor as well as wall surfaces. Different versions of the report are available including the basic incident rate (W), a per unit area flux (W/m2), and an energy version (J).
Surface Inside Face Interior Windows Incident Beam Solar Radiation Rate [W][LINK]
Surface Inside Face Interior Windows Incident Beam Solar Radiation Rate per Area [W/m2][LINK]
Surface Inside Face Interior Windows Incident Beam Solar Radiation Energy [J][LINK]
Beam solar radiation from the interior (i.e., interzone) windows in a zone incident on the inside face of a surface in the zone. This value is calculated only if Solar Distribution in the BUILDING object is equal to FullInteriorExterior. However, the program does not track where this radiation falls. Instead, it is treated by the program as though it were diffuse radiation uniformly distributed over all of the zone surfaces. See Figure 24. Different versions of the report are available including the basic incident rate (W), a per unit area flux (W/m2), and an energy version (J).
Surface Inside Face Initial Transmitted Diffuse Absorbed Solar Radiation Rate [W][LINK]
As of [Version](../input-output-reference/page-006.html#version) 2.1, diffuse solar transmitted through exterior and interior windows is no longer uniformly distributed. Instead, it is distributed according to the approximate view factors between the transmitting window and all other heat transfer surfaces in the zone. This variable is the amount of transmitted diffuse solar that is initially absorbed on the inside of each heat transfer surface. The portion of this diffuse solar that is reflected by all surfaces in the zone is subsequently redistributed uniformly to all heat transfer surfaces in the zone, along with interior reflected beam solar and shortwave radiation from lights. The total absorbed shortwave radiation is given by the next variable.
Surface Inside Face Absorbed Shortwave Radiation Rate [W][LINK]
As of [Version](../input-output-reference/page-006.html#version) 2.1, the previous variable plus absorbed shortwave radiation from uniformly distributed initially-reflected diffuse solar, reflected beam solar, and shortwave radiation from lights. This sum is the power of all sources of solar and visible radiation absorbed by the surface at the inside face.
Surface Output Variables (exterior heat transfer surfaces)[LINK]
Surface Outside Face Outdoor Air Drybulb Temperature [C][LINK]
The outdoor air dry-bulb temperature calculated at the height above ground of the surface centroid. Former Name: Prior to version 7.1, this output was called “Surface Ext Outdoor Dry Bulb.”
Surface Outside Face Outdoor Air Wetbulb Temperature [C][LINK]
The outdoor air wet-bulb temperature calculated at the height above ground of the surface centroid. Former Name: Prior to version 7.1, this output was called “Surface Ext Outdoor Wet Bulb.”
Surface Outside Face Outdoor Air Wind Speed [m/s][LINK]
The outdoor wind speed calculated at the height above ground of the surface centroid. Former Name: Prior to version 7.1, this output was called “Surface Ext Wind Speed.”
Surface Outside Face Sunlit Area [m2][LINK]
The outside area of an exterior surface that is illuminated by (unreflected) beam solar radiation.
Surface Outside Face Sunlit Fraction [][LINK]
The fraction of the outside area of an exterior surface that is illuminated by (unreflected) beam solar radiation. Equals Surface Outside Face Sunlit Area divided by total surface area.
Surface Outside Face Thermal Radiation to Air Heat Transfer Coefficient [W/m2-K][LINK]
This is the coefficient that describes thermal radiation heat transfer between the outside face and the air mass surrounding the surface. It is the value of “Hr” in the classic linearized model for thermal radiation Q = Hr * A * (T – T) when applied to the ambient air. Former Name: Prior to version 7.1, this output was called “Surface Ext Rad to Air Coeff.”
Surface Outside Face Thermal Radiation to Sky Heat Transfer Coefficient [W/m2-K][LINK]
This is the coefficient that describes thermal radiation heat transfer between the outside face and the sky surrounding the surface. It is the value of “Hr” in the classic linearized model for thermal radiation Q = Hr * A * (T – T) when applied to the sky. Former Name: Prior to version 7.1, this output was called “Surface Ext Rad to Sky Coeff.”
Surface Outside Face Thermal Radiation to Ground Heat Transfer Coefficient [W/m2-K][LINK]
This is the coefficient that describes thermal radiation heat transfer between the outside face and the ground surrounding the surface. It is the value of “Hr” in the classic linearized model for thermal radiation Q = Hr * A * (T – T) when applied to the ground. Former Name: Prior to version 7.1, this output was called “Surface Ext Rad to Ground Coeff.”
Surface Outside Face Solar Radiation Heat Gain Rate [W][LINK]
Surface Outside Face Solar Radiation Heat Gain Rate per Area [W/m2][LINK]
Surface Outside Face Solar Radiation Heat Gain Energy [J][LINK]
These “outside face solar radiation” output variables describe the heat transferred by the absorption of solar radiation at the outside face. This is the result of incident solar radiation being absorbed at the surface face. The values are always positive.
Surface Outside Face Incident Solar Radiation Rate per Area [W/m2][LINK]
The total solar radiation incident on the outside of an exterior surface. It is the sum of:
Surface Outside Face Incident Beam Solar Radiation Rate per Area
Surface Outside Face Incident Sky Diffuse Solar Radiation Rate per Area
Surface Outside Face Incident Ground Diffuse Solar Radiation Rate per Area
Surface Outside Face Incident Sky Diffuse Surface Reflected Solar Radiation Rate per Area
Surface Outside Face Incident Beam To Beam Surface Reflected Solar Radiation Rate per Area
Surface Outside Face Incident Sky Diffuse Surface Reflected Solar Radiation Rate per Area
Surface Outside Face Incident Beam Solar Radiation Rate per Area [W/m2][LINK]
The solar beam radiation incident on the outside of an exterior surface, including the effects of shadowing, if present. The beam here is that directly from the sun; it excludes beam specularly reflected from obstructions.
Surface Outside Face Incident Sky Diffuse Solar Radiation Rate per Area [W/m2][LINK]
The solar diffuse radiation from the sky incident on the outside of an exterior surface, including the effects of shadowing, if present.
Surface Outside Face Incident Ground Diffuse Solar Radiation Rate per Area [W/m2][LINK]
The solar diffuse radiation incident on the outside of an exterior surface that arises from reflection of beam solar and sky diffuse solar from the ground. This is the sum of the next two output variables, “Surface Outside Face Incident Beam To Diffuse Ground Reflected Solar Radiation Rate per Area” and “Surface Outside Face Incident Sky Diffuse Ground Reflected Solar Radiation Rate per Area.” The reflected solar radiation from the ground is assumed to be diffuse and isotropic (there is no specular component).
If “Reflections” option is not chosen in the Solar Distribution Field in the BUILDING object, the effects of shadowing are accounted for by the user-specified value of View Factor to Ground for the surface. If “Reflections” option is chosen, the program determines the effects of shadowing, including time-varying shadowing of the ground plane by the building itself.
Surface Outside Face Incident Beam To Diffuse Ground Reflected Solar Radiation Rate per Area [W/m2][LINK]
The solar diffuse radiation incident on the outside of an exterior surface that arises from beam-to-diffuse reflection from the ground. It is assumed that there is no beam-to-beam (specular) component. The beam here is that directly from the sun; it excludes beam specularly reflected from obstructions.
Surface Outside Face Incident Sky Diffuse Ground Reflected Solar Radiation Rate per Area [W/m2][LINK]
The solar diffuse radiation incident on the outside of an exterior surface that arises from sky diffuse solar reflection from the ground. The sky diffuse here is that directly from the sky; it excludes reflection of sky diffuse from obstructions.
Surface Outside Face Incident Sky Diffuse Surface Reflected Solar Radiation Rate per Area [W/m2][LINK]
The solar diffuse radiation incident on the outside of an exterior surface that arises from sky diffuse reflection from one or more obstructions. This value will be non-zero only if “Reflections” option is chosen in the BUILDING object.
Surface Outside Face Incident Beam To Beam Surface Reflected Solar Radiation Rate per Area [W/m2][LINK]
The solar beam radiation incident on the outside of an exterior surface that arises from beam-to-beam (specular) reflection from one or more obstructions. This value will be non-zero only if “Reflections” option is chosen in the BUILDING object. For windows, the program treats this beam radiation as diffuse radiation in calculating its transmission and absorption.
Surface Outside Face Incident Beam To Diffuse Surface Reflected Solar Radiation Rate per Area [W/m2][LINK]
The solar diffuse radiation incident on the outside of an exterior surface that arises from beam-to-diffuse reflection from building shades or building surfaces. This value will be non-zero only if “Reflections” option is chosen in the BUILDING object.
Surface Outside Face Beam Solar Incident Angle Cosine Value [][LINK]
The cosine of the angle of incidence of (unreflected) beam solar radiation on the outside of an exterior surface. The value varies from 0.0 for beam parallel to the surface (incidence angle = 90O) to 1.0 for beam perpendicular to the surface (incidence angle = 0O). Negative values indicate the sun is behind the surface, i.e the surface does not see the sun.
Surface Anisotropic Sky Multiplier [][LINK]
This is the view factor multiplier for diffuse sky irradiance on exterior surfaces taking into account the anisotropic radiance of the sky. The diffuse sky irradiance on a surface is given by Anisotropic Sky Multiplier * Diffuse Solar Irradiance.
Surface Window BSDF Beam Direction Number [][LINK]
Surface Window BSDF Beam Phi Angle [rad][LINK]
Surface Window BSDF Beam Theta Angle [rad][LINK]
Opaque Surface Output Variables[LINK]
The following variables apply only to opaque surfaces, where an opaque surface is considered here to be an exterior or interzone heat transfer surface of class FLOOR, WALL, ROOF or DOOR. Note – these are advanced variables – you must read the descriptions and understand before use – then you must use the [Output:Diagnostics](../input-output-reference/page-006.html#outputdiagnostics) object to allow reporting.
Surface Inside Face Conduction Heat Transfer Rate [W][LINK]
Surface Inside Face Conduction Heat Transfer Rate per Area [W/m2][LINK]
Surface Inside Face Conduction Heat Gain Rate [W][LINK]
Surface Inside Face Conduction Heat Loss Rate [W][LINK]
These “inside face conduction” output variables describe heat flow by conduction right at the inside face of an opaque heat transfer surface. A positive value means that the conduction is from just inside the inside face toward the inside face. A negative value means that the conduction is from the inside face into the core of the heat transfer surface.
Note that Inside Face Conduction, when positive, does not indicate the heat flow from the surface to the zone air, which is governed by the inside face convection coefficient and the difference in temperature between the inside face and the zone air.
Different versions of the reports are available. The basic heat gain rate (W) and a per unit area flux (W/m2) can have positive or negative values with the sign convention that positive indicates heat flowing toward the face itself. There are also directed “gain” and “loss” versions that have only positive values or zero when the heat flow direction opposes.
Former Name: Prior to version 7.1, these outputs were called “Opaque Surface Inside Face Conduction *.”
Former Name: For Conduction Finite Difference simulations (CondFD), CondFD Inside Surface Heat Flux is replaced with Surface Inside Face Conduction Heat Transfer Rate Per Area. Likewise for CondFD Inside Heat Flux to Surface.
Surface Outside Face Conduction Heat Transfer Rate [W][LINK]
Surface Outside Face Conduction Heat Transfer Rate per Area [W/m2][LINK]
Surface Outside Face Conduction Heat Gain Rate [W][LINK]
Surface Outside Face Conduction Heat Loss Rate [W][LINK]
These “outside face conduction” output variables describe heat flow by conduction right at the outside face of an opaque heat transfer surface. A positive value means that the conduction is from just inside the outside face toward the outside face. A negative value means that the conduction is from the outside face into the core of the heat transfer surface.
Note that outside face conduction, when positive, does not indicate the heat flow from the surface to the surrounding air, which is governed by the outside face convection coefficient and the difference in temperature between the inside face and the surrounding air.
Different versions of the reports are available. The basic heat transfer rate (W) and a per unit area flux (W/m2) can have positive or negative values with the sign convention that positive indicates heat flowing toward the face itself. There are also directed “gain” and “loss” versions that have only positive values or zero when the heat flow direction opposes.
Former Name: For Conduction Finite Difference simulations (CondFD), CondFD Outside Surface Heat Flux is replaced with Surface Outside Face Conduction Heat Transfer Rate Per Area. Likewise for CondFD Outside Heat Flux to Surface.
Surface Average Face Conduction Heat Transfer Rate [W][LINK]
Surface Average Face Conduction Heat Transfer Rate per Area [W/m2][LINK]
Surface Average Face Conduction Heat Gain Rate [W][LINK]
Surface Average Face Conduction Heat Loss Rate [W][LINK]
Surface Average Face Conduction Heat Transfer Energy [J][LINK]
These “average face conduction” output variables combine the inside face conduction and outside face conduction reports together to describe the conduction situation in a heat transfer surface in a nominal way. This is simply the average of the inside and outside face conduction rates, but with the sign convention for the outside face switched to match the inside face so that positive values here indicate heat flowing into the thermal zone.
Different versions of the reports are available. The basic heat conduction rate (W) and a per unit area flux (W/m2) can have positive or negative values with the sign convention that positive indicates heat flowing toward the thermal zone. There are also directed “gain” and “loss” versions that have only positive values or zero when the heat flow direction opposes (W). Finally there is a version for total energy transfer (J).
Surface Heat Storage Rate [W][LINK]
Surface Heat Storage Rate per Area [W/m2][LINK]
Surface Heat Storage Gain Rate [W][LINK]
Surface Heat Storage Loss Rate [W][LINK]
Surface Heat Storage Energy [J][LINK]
These “heat storage” output variables combine the inside face conduction and outside face conduction reports together to describe the thermal storage situation in a heat transfer surface in a nominal way. This is simply the difference between the inside and outside face conduction, but with the sign convention arranged so that positive values indicate heat being added to the core of the surface.
Different versions of the reports are available. The basic heat storage rate (W) and a per unit area flux (W/m2) can have positive or negative values with the sign convention that positive indicates heat being added to the surface’s mass. There are also directed “gain” and “loss” versions that have only positive values or zero when the heat storage direction opposes (W). Finally there is a version for total energy stored (J).
Surface Internal Source Location Temperature [C][LINK]
When a surface has an internal source or sink (defined using [Construction:InternalSource](../input-output-reference/page-010.html#constructioninternalsource)) then this output is available for the temperature within the surface at the location of the source/sink.
Zone Opaque Surface Inside Face Conduction [W][LINK]
The sum of the Opaque Surface Inside Face Conduction values for all opaque surfaces in a zone for both positive and negative sums. For example, assume a zone has six opaque surfaces with Opaque Surface Inside Face Conduction values of 100, -200, 400, 50, 150 and –300 W. Then Zone Opaque Surface Inside Face Conduction = 700 - 500 = 200 W. Or if a zone has six opaque surfaces with Opaque Surface Inside Face Conduction values of -100, -200, 400, -50, 150 and –300W. Then Zone Opaque Surface Inside Face Conduction = 550 – 650 = -100 W.
Zone Opaque Surface Inside Faces Total Conduction Heat Gain Rate [W][LINK]
Zone Opaque Surface Inside Faces Total Conduction Heat Gain Energy [J][LINK]
These are the power and energy sums for the Opaque Surface Inside Face Conduction values for all opaque surfaces in a zone when that sum is positive. For example, assume a zone has six opaque surfaces with Opaque Surface Inside Face Conduction values of 100, -200, 400, 50, 150 and –300 W. Then Zone Opaque Surface Inside Faces Total Conduction Heat Gain Rate = 700 - 500 = 200 W.
Zone Opaque Surface Inside Faces Total Conduction Heat Loss Rate [W][LINK]
Zone Opaque Surface Inside Faces Total Conduction Heat Loss Energy [J][LINK]
These are the power and energy absolute value for the sums of the Opaque Surface Inside Face Conduction values for all opaque surfaces in a zone when that sum is negative. For example, assume a zone has six opaque surfaces with Opaque Surface Inside Face Conduction values of -100, -200, 400, -50, 150 and –300W. Then Zone Opaque Surface Inside Faces Total Conduction Heat Loss Rate = |550 – 650| = |-100| = 100 W.
Zone Opaque Surface Outside Face Conduction [W][LINK]
The sum of the Opaque Surface Outside Face Conduction values for all opaque surfaces in a zone for both positive and negative sums. For example, assume a zone has six opaque surfaces with Opaque Surface Outside Face Conduction values of 100, -200, 400, 50, 150 and –300 W. Then Zone Opaque Surface Outside Face Conduction = 700 - 500 = 200 W. Or if a zone has six opaque surfaces with Opaque Surface Outside Face Conduction values of -100, -200, 400, -50, 150 and –300W. Then Zone Opaque Surface Outside Face Conduction = 550 – 650 = -100 W.
Zone Opaque Surface Outside Face Conduction Gain [W][LINK]
Zone Opaque Surface Outside Face Conduction Gain Energy [J][LINK]
These are the power and energy sums for the Opaque Surface Outside Face Conduction values for all opaque surfaces in a zone when that sum is positive. For example, assume a zone has six opaque surfaces with Opaque Surface Outside Face Conduction values of 100, -200, 400, 50, 150 and –300 W. Then Zone Opaque Surface Outside Face Conduction Gain = 700 - 500 = 200 W.
Zone Opaque Surface Outside Face Conduction Loss [W][LINK]
Zone Opaque Surface Outside Face Conduction Loss Energy [J][LINK]
These are the power and energy absolute value for the sums of the Opaque Surface Outside Face Conduction values for all opaque surfaces in a zone when that sum is negative. For example, assume a zone has six opaque surfaces with Opaque Surface Outside Face Conduction values of -100, -200, 400, -50, 150 and –300W. Then Zone Opaque Surface Outside Face Conduction Loss = |550 – 650| = |-100| = 100 W.
Surface Inside Face Beam Solar Radiation Heat Gain Rate [W][LINK]
Beam solar radiation from exterior windows absorbed on the inside face of an opaque heat transfer surface. For Solar Distribution = FullInteriorAndExterior, this quantity can be non-zero for both floor and wall surfaces. Otherwise, for Solar Distribution = FullExterior or MinimalShadowing, it can be non-zero only for floor surfaces since in this case all entering beam solar is assumed to fall on the floor. Note that this variable will not be operational (have a real value) unless there are exterior windows in the zone.
Window Output Variables[LINK]
The following output variables apply to subsurfaces that are windows or glass doors. These two subsurface types are called “window” here. “Exterior window” means that the base surface of the window is an exterior wall, floor, roof or ceiling (i.e., the base surface is a BuildingSurface:Detailed with OutsideFaceEnvironment = ExteriorEnvironment). “Interior window” means that the base surface of the window is an inter-zone wall, floor or ceiling. “Glass” means a transparent solid layer, usually glass, but possibly plastic or other transparent material. “Shading device” means an interior, exterior or between-glass shade or blind, or an exterior screen (only exterior windows can have a shading device).
Zone Windows Total Transmitted Solar Radiation Rate [W][LINK]
Zone Windows Total Transmitted Solar Radiation Energy [J][LINK]
The total Surface Window Transmitted Solar Radiation Rate of all the exterior windows in a zone.
Zone Windows Total Heat Gain Rate [W][LINK]
Zone Windows Total Heat Gain Energy [J][LINK]
The sum of the heat flow from all of the exterior windows in a zone when that sum is positive. (See definition of “heat flow” under “Window Heat Gain,” below.)
Zone Windows Total Heat Loss Rate [W][LINK]
Zone Windows Total Heat Loss Energy [J][LINK]
The absolute value of the sum of the heat flow from all of the exterior windows in a zone when that sum is negative.
Surface Window Total Glazing Layers Absorbed Shortwave Radiation Rate [W][LINK]
Surface Window Total Glazing Layers Absorbed Solar Radiation Rate [W][LINK]
Surface Window Total Glazing Layers Absorbed Solar Radiation Energy [J][LINK]
The total exterior beam and diffuse solar radiation absorbed in all of the glass layers of an exterior window.
Surface Window Shading Device Absorbed Solar Radiation Rate [W][LINK]
Surface Window Shading Device Absorbed Solar Radiation Energy [J]
The exterior beam and diffuse solar radiation absorbed in the shading device, if present, of an exterior window.
Surface Window Transmitted Solar Radiation Rate [W][LINK]
Surface Window Transmitted Solar Radiation Energy [J][LINK]
The amount of beam and diffuse solar radiation entering a zone through an exterior window. It is the sum of the following two variables, “Surface Window Transmitted Beam Solar Radiation Rate” and “Surface Window Transmitted Diffuse Solar Radiation Rate.”
Surface Window Transmitted Beam Solar Radiation Rate [W][LINK]
Surface Window Transmitted Beam Solar Radiation Energy [J][LINK]
The solar radiation transmitted by an exterior window whose source is beam solar incident on the outside of the window. For a bare window, this transmitted radiation consists of beam radiation passing through the glass (assumed transparent) and diffuse radiation from beam reflected from the outside window reveal, if present. For a window with a shade, this transmitted radiation is totally diffuse (shades are assumed to be perfect diffusers). For a window with a blind, this transmitted radiation consists of beam radiation that passes between the slats and diffuse radiation from beam-to-diffuse reflection from the slats. For a window with a screen, this value consists of direct beam radiation that is transmitted through the screen (gaps between the screen material) and diffuse radiation from beam-to-diffuse reflection from the screen material.
For each zone time step,
Surface Window Transmitted Beam Solar Radiation Rate = Surface Window Transmitted Beam To Beam Solar Radiation Rate + Surface Window Transmitted Beam To Diffuse Solar Radiation Rate
Surface Window Transmitted Beam Solar Radiation Energy = Surface Window Transmitted Beam To Beam Solar Radiation Energy + Surface Window Transmitted Beam To Diffuse Solar Radiation Energy
Surface Window Transmitted Beam To Beam Solar Radiation Rate [W][LINK]
Surface Window Transmitted Beam To Beam Solar Radiation Energy [J][LINK]
For a window with a blind, this transmitted radiation consists of beam radiation that passes between the slats. For a window with a screen, this value consists of direct beam radiation that is transmitted through the screen (gaps between the screen material).[LINK]
Surface Window Transmitted Beam To Diffuse Solar Radiation Rate [W][LINK]
Surface Window Transmitted Beam To Diffuse Solar Radiation Energy [J][LINK]
For a window with a blind, this transmitted radiation consists of diffuse radiation reflected from beam by the slats. For a window with a screen, this value consists of diffuse radiation reflected by the screen material.[LINK]
Zone Exterior Windows Total Transmitted Beam Solar Radiation Rate [W][LINK]
Zone Exterior Windows Total Transmitted Beam Solar Radiation Energy [J][LINK]
The sum of the Surface Window Transmitted Beam Solar Radiation Rate (see definition above) from all exterior windows in a zone.
Zone Interior Windows Total Transmitted Beam Solar Radiation Rate [W][LINK]
Zone Interior Windows Total Transmitted Beam Solar Radiation Energy [J][LINK]
The sum of the Surface Window Transmitted Beam Solar Radiation Rate (see definition above) from all interior windows in a zone.
Surface Window Transmitted Diffuse Solar Radiation Rate [W][LINK]
Surface Window Transmitted Diffuse Solar Radiation Energy [J][LINK]
The solar radiation transmitted by an exterior window whose source is diffuse solar incident on the outside of the window. For a bare window, this transmitted radiation consists of diffuse radiation passing through the glass. For a window with a shade, this transmitted radiation is totally diffuse (shades are assumed to be perfect diffusers). For a window with a blind, this transmitted radiation consists of diffuse radiation that passes between the slats and diffuse radiation from diffuse-to-diffuse reflection from the slats. For a window with a screen, this value consists of diffuse radiation transmitted through the screen (gaps between the screen material) and diffuse radiation from diffuse-to-diffuse reflection from the screen material.
Zone Exterior Windows Total Transmitted Diffuse Solar Radiation Rate [W][LINK]
Zone Exterior Windows Total Transmitted Diffuse Solar Radiation Energy [J][LINK]
The combined beam and diffuse solar that first entered adjacent zones through exterior windows in the adjacent zones, was subsequently reflected from interior surfaces in those zones (becoming diffuse through that reflection), and was then transmitted through interior windows into the current zone.
Zone Interior Windows Total Transmitted Diffuse Solar Radiation Rate [W][LINK]
Zone Interior Windows Total Transmitted Diffuse Solar Radiation Energy [J][LINK]
The sum of the Surface Window Transmitted Diffuse Solar Radiation Rate (see definition above) from all interior windows in a zone.
Surface Window System Solar Transmittance [][LINK]
Effective solar transmittance of an exterior window, including effect of shading device, if present. Equal to “Surface Window Transmitted Solar Radiation Rate” divided by total exterior beam plus diffuse solar radiation incident on the window (excluding frame, if present).
Surface Window System Solar Absorptance [][LINK]
Effective solar absorptance of an exterior window, including effect of shading device, if present. Equal to “Window Solar Absorbed: All Glass Layers” plus “Window Solar Absorbed: Shading Device” divided by total exterior beam plus diffuse solar radiation incident on window (excluding frame, if present)
Surface Window System Solar Reflectance [][LINK]
Effective solar reflectance of an exterior window, including effect of shading device, if present. Equal to: \1.0 – “Surface [Window System Solar Transmittance” – “Surface Window System Solar Absorptance”].
Surface Window Gap Convective Heat Transfer Rate [W][LINK]
Surface Window Gap Convective Heat Transfer Energy [J][LINK]
For an airflow window, the forced convective heat flow from the gap through which airflow occurs. This is the heat gained (or lost) by the air from the glass surfaces (and between-glass shading device surfaces, if present) that the air comes in contact with as it flows through the gap. If the gap airflow goes to the zone indoor air, the gap convective heat flow is added to the zone load. Applicable to exterior windows only.
Surface Window Heat Gain Rate [W][LINK]
Surface Window Heat Gain Energy [J][LINK]
The total heat flow to the zone from the glazing, frame and divider of an exterior window when the total heat flow is positive.
For a window without an interior shading device, this heat flow is equal to:
``{=tex}(media/image46.png) Vertical exterior window showing solar horizontal profile angle, solar vertical profile angle and solar incidence angle.